Showing posts with label scrapbook. Show all posts

Monday, December 14, 2015

Happy Birthday to Me


The cover says Turkeys and football, your birthday too. Fun memories of this day our gift to you. Happy 70th birthday!

   Do you find that the time goes double fast this time of year?  Well, it sure has for me since we came back from Tennessee.  Thanksgiving was special for me this year because it was also my birthday.  Every 7 years anyone whose birthday falls near the end of November has the same situation as I did this year.
  It was super sweet because I also turned 70 and had all my kids and grand kids ( except for Adia) with me.  Jude, my son Brian's special friend, had everyone present take a picture of me, then head on upstairs to a room I was not allowed in to create a page in this very special book.  She sanded, stained, and cut the wood for the cover of this scrapbook I will always treasure.

This is the page the Alex my youngest grandson created.

  Everyone gathered right after our meal and presented me with the book.  When I read the cover it brought tears to my eyes.  I felt very special and loved.


Wednesday, January 8, 2014

UfO's- one completed for 2014

The ribbon is from the pillow gifts I got each night. It is tied around the cover of the book.  Inside the front cover I placed a map of the island.

     Do you know what a UFO is in the crafting sewing world?  An Unfinished Object.  Well, I am focusing in 2014 on finishing up unfinished things.  I want to change my reputation. My daughter Debbie got me a t-shirt several years ago that says Queen on Unfinished Projects on the front.  Need I say more.
   Last Friday night I was a part of a scrapbooking group and actually finished an album  YEAH ME!  The scrapbook was of the incentive trip I earned and took in 2014.  Better late than never I say.  Since I have brought the book home and placed it out in the open, my husband who went with me to Hilton Head has already looked the book over once.

 
The bikes we had available to us and a fountain on the grounds of the Westin Hotel where we stayed.


We had out picture taken in front of the hotel we stayed in before boarding the bus to head home.

     It felt great to finally have the scrapbook completed.  I wonder how many projects I will be able to finish in 2014?  Do you have any UFO's you plan to finish this year?

Sunday, May 5, 2013

What exactly is a scrap map?


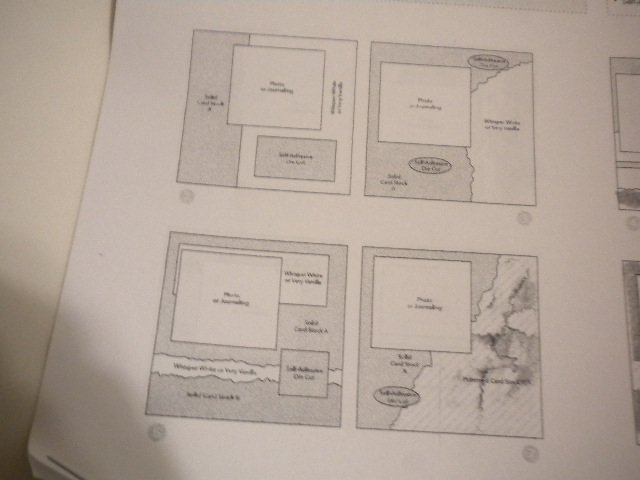
     Yesterday was National Scrapbooking Day and I decided to show you all my favorite way to make a 6 by 6 scrapbook.  I used a scrap map that StampinUp posted several years ago.  You need just a few supplies, and the rest is up to the person you give the scrapbook to......the pictures.

1.  12 by 12 Neutral card stock
2.  12 by 12 solid colors 2 different kinds
3.  12 by 12 Designer paper 2 different patterns.

   Follow the maps and you will end up with 20 pages ready for pictures.


     These are 3 of the layouts I made using the scrap mat for a baby scrapbook.  I have made baby books, wedding books, family books, kid books and use this same map over and over.  Sound like something you might like, well, I am having a mini scrapbook day on May 9th at 12:30 or 6:30.  You will be able to pick your own colors and designer paper and go home with a book ready to give to a friends.  Contact me at sue.scheets@gmail.com if you need more information or would like to RSVP.

Sunday, April 14, 2013

A mini scrapbook for Charlotte

The cover-the charm has the word love written on it.

     My friend Rita's daughter recently, well maybe 9 months ago, had a baby named Charlotte Love.  I have been working on a scrapbook for Elizabeth.  I finally finished and love how it turned out.  Charlotte's bedroom is grey, pink with touches of gold.  I used several stamping items to create the book with a vintage look.
     Elegant Bird Bigz Big Shot die
     Broadsheet Alphabet
     Rhinestones
     First Edition Designer paper
     Everything Eleanor, Nature Walk, Affection Collection stamp sets
     Antique Brads
     Gold and Vanilla Shimmer Smooch Spritz

One inside page spread-notice the spritz
     May is scrapbook month and I will be teaching a class using this same scrapbook layout.  Look on my class schedule next week to find the date and time and sign up for the class.
    What pictures would you place on these pages?
      

Sunday, January 20, 2013

Valentine Scrapbook Your Life Layout


     If a layout works for one scrapbook spread do you think it might work for another?  Thanks again to Lana  this was the second layout the scrappers made in last week's Scrapbook Your Life class.  What do scrappers that come to the class do you might wonder.

1.  Make two 2-page themed spreads each month.

2.  RSVP your intent to come to class the 3rd Thursday of every month and receive a thank you gift from me.

3.  Bring back last month's pages with pictures on them and receive an incentive gift.

4.  Bring a friend who has not attended class before and receive a gift certificate.

5.  Pay only $15 and receive all the supplies and 2 the plastic sleeves to hold the pages. Assemble the pages during the class.

6.  Order a minimum of $25 and the class is free.

Isn't this a great way to create pages to mount your pictures and not have to worry about what the page should look like?  Cammie and Clara have been coming for 4 years and now their friend Kim has started to come.  Maybe you would like to come next month. 

Contact me through this page or my email and I will put you on the list.
sue.scheets@gmail.com


Saturday, January 19, 2013

Winter Scrapbook Layout inspired by Lana


   Don't you just love it when you find a great idea from a friend?  My friend Lana posted a couple of scrapbook layouts she created for a recent class.  I was having a minor brain freeze and could not come up with the idea that sparked my imagination for my latest Scapbook Your Life class.  So, I CASED her layout and added my own touch.  Here are the easy steps I took.
 
1.  Stamp the snowflake images from the set Snowflake Soiree about midcenter in two parallel lines using Not Quite Navy ink.
 
2.  Emboss a 2 1/2 strip of Whisper White cardstock using the new Borders Scoring plate for the Simply Scored.
 
3. Die cut 6 snowflakes from silver glimmer paper,using the Snow Flurries Big Shot Bigz die.
 
4.  Add a variety of brads to the center of each snowflake.
      Designer Builder brads
      Basics Glimmer Brads
      Silver brads
  Can't you picture some great snow pictures spread out over this layout?  Thank you Lana for such a great idea.


Monday, December 3, 2012

First Project for the New Year


   I am testing out a new link I have figured out with this blog.  This post should be automatically linked to Facebook.  We shall see.  This picture is a box full of free goodies I found on my pillow as the Hilton Head trip I earned this year was ending.  Inside the box is a variety of supplies I am planning on using to make a scrapbook to commemorate the event.  A great start off the New year project.  In the months ahead look for the finished project.  What will be your first project to complete in 2013?