Showing posts with label designer paper. Show all posts

Wednesday, July 7, 2021

What is it Wednesday-Designer Paper Sale

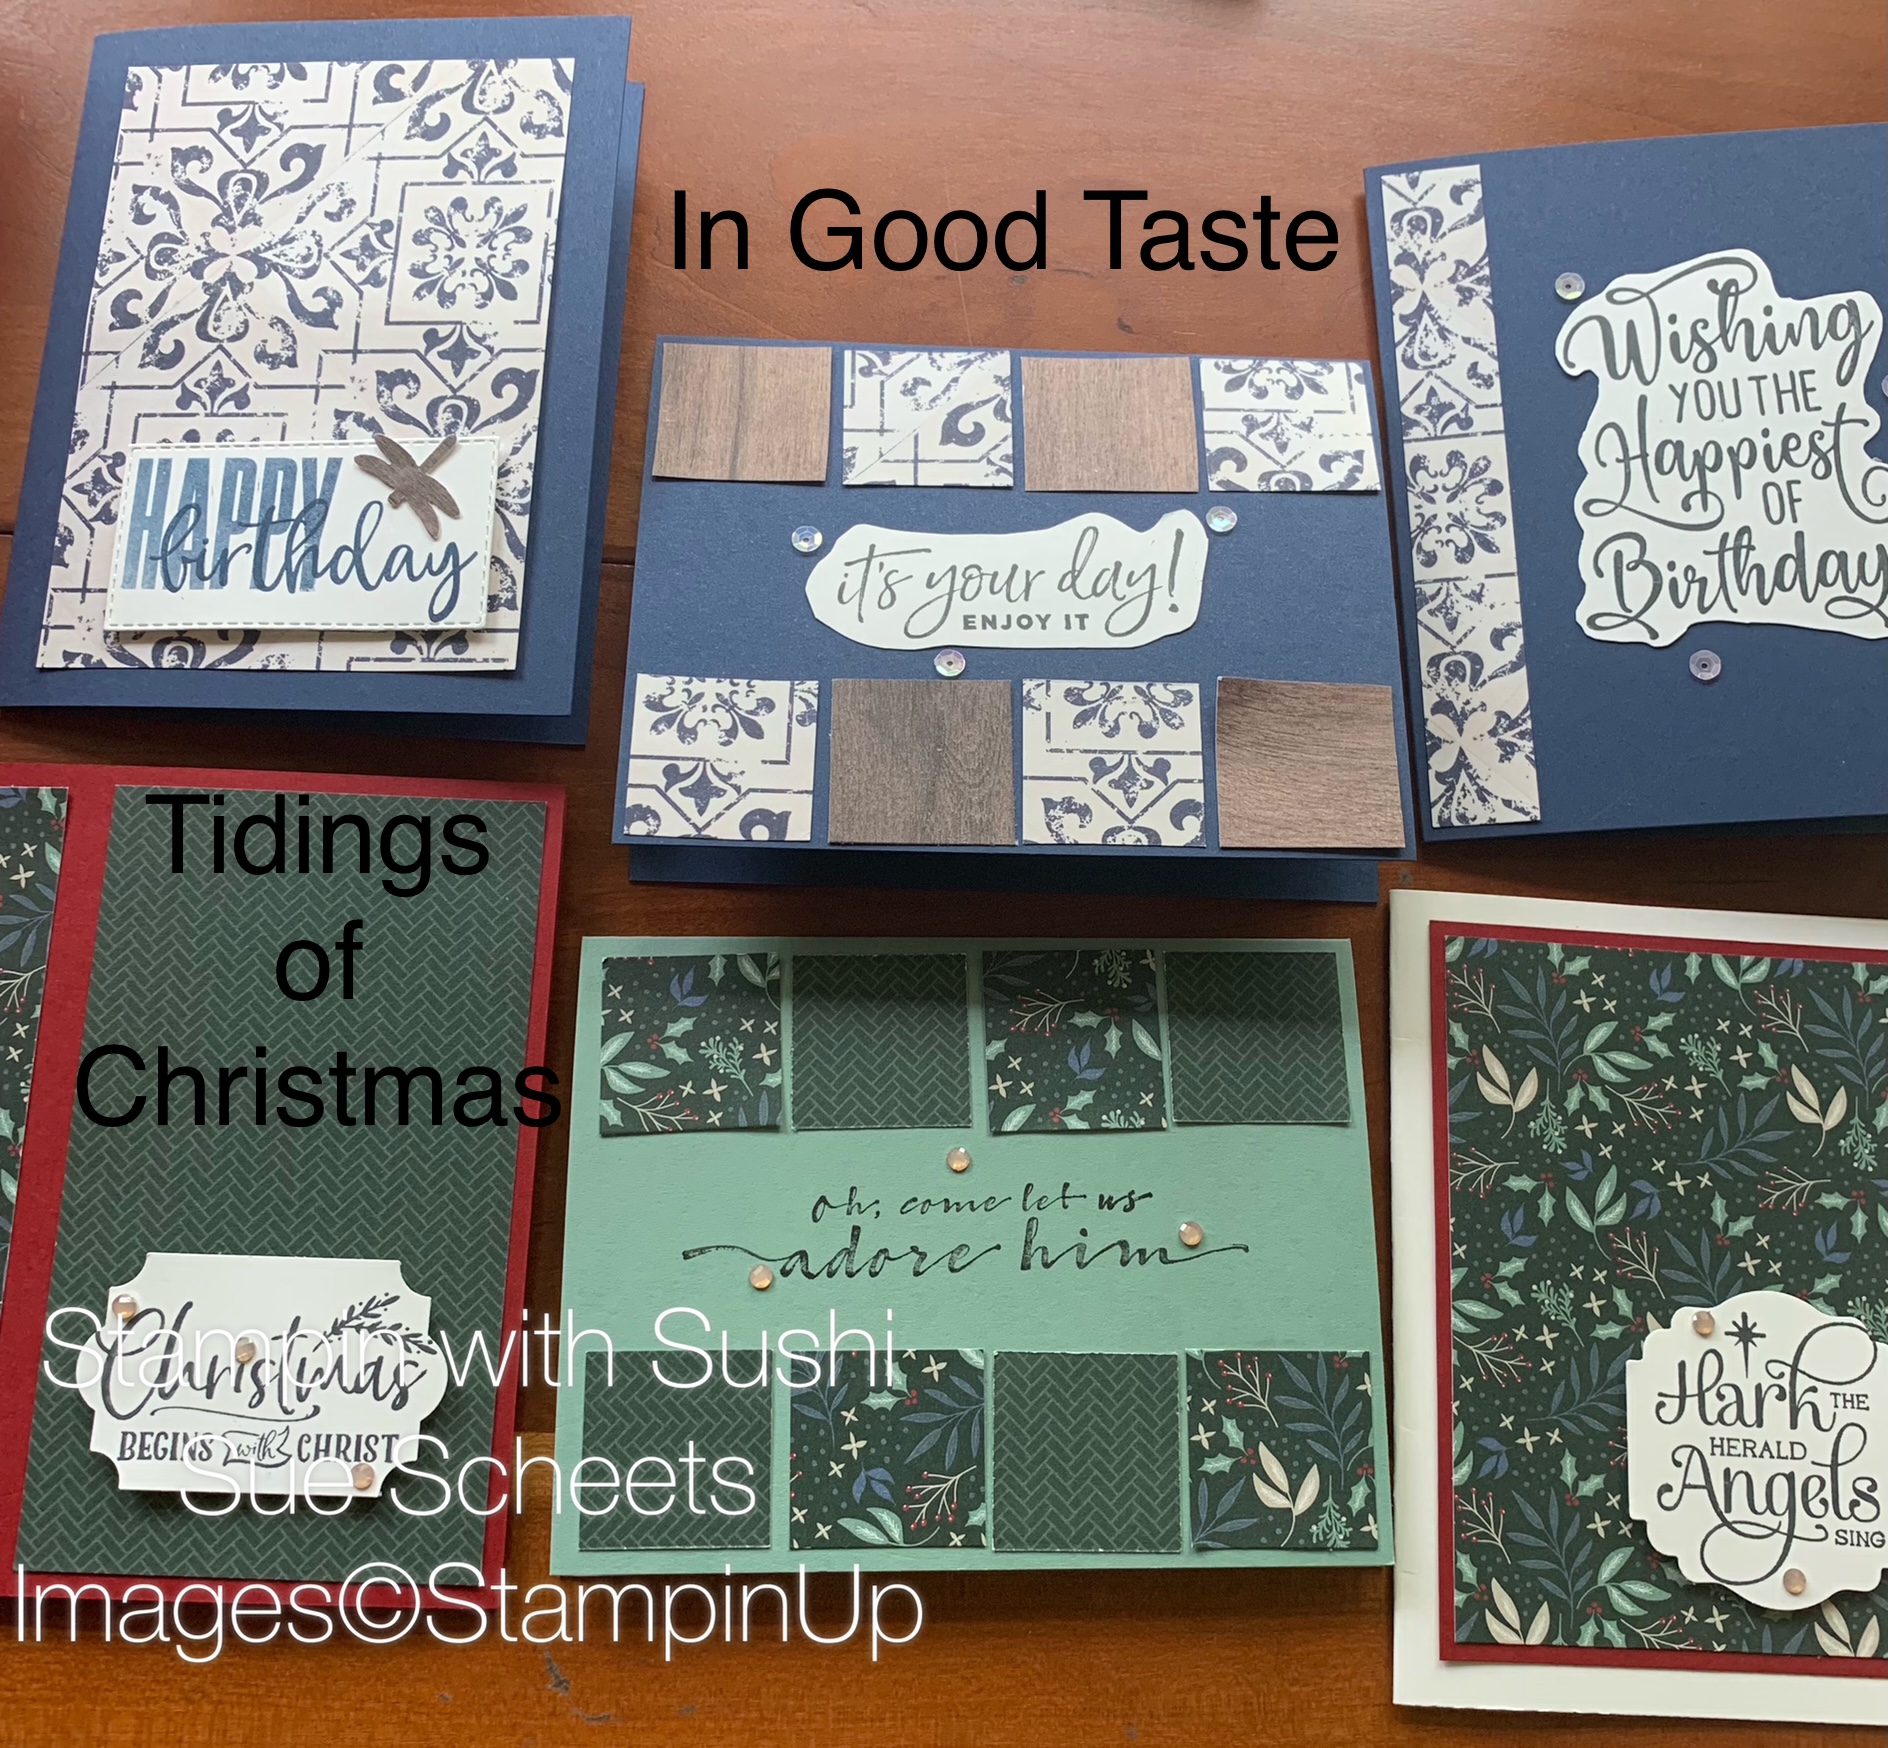
Today, I am sharing a simple 6 by 6 one sheet wonder that makes 3 cards and shown how it looks with all the designer papers that are on sale till August 2. I love how each paper makes the cards look so different.  What are your favorite papers that are on sale.


Product List

Checkout my homework, to details for the one sheet wonder and some of the cards I made in this video.

I don't know about you, but I love any time I can use designer paper and make simple cards to send to friends.

Come back tomorrow to check out the step it up cards I have made this week. 
Till then, 
Happy Stamping
Sushi

Monday, September 24, 2018

Stamparatus-Make it Simple Monday


    When I first saw this stamp set, I wondered how on earth a person could line up all the parts and have it look decent. Well, the Stamparatus is how that can happen. I have decided to acquaint you with the Stamparatus this week and show you all the wonderful things you can do with it.

I am calling this simple because you use the Stamparatus in the most simple way to create the saying.


Here is a great video that shows you all that the Stamparatus is capable of doing.


Set up the Stamparatus by attaching each plate.

1. First decide on the size of card stock you want to stamp on and place in the stamp Stamparatus.  You need to use the pad that comes with it along with some kind of scrap paper on top.

2. Decide where you want to place the card stock.  I usually place it in the upper right hand corner.  Anchor it with one of the magnets.

3. Place the outline stamp upside down where you want it on the card stock. Then, pull one of the plates down and it will pick up your stamp. Ink up the stamp and bring the plate down and up and your outline in now on your card stock. (When I use this at Cedarhurst, an assisted living facility, I tell the ladies to shut and open the door.

4. Decide where to place the second stamp, place it upside down and use the top plate to pick it up and stamp it. 

Now, you are wondering, what about the 3rd stamp?  This is the great part of the Stamparatus.

5. Hold one of the plates at a 50 degree angle, remove it and then turn it over and place it back where it came from.  

6. Now you can place the third stamp on the card stock upside down, pick it up with the plate you switched, ink and stamp.  You did not have to remove the stamp and replace it with another, and now you can make several cards with this stamp because each stamp remains in its spot.

If you like watching videos, here is a Stampin'Up! video that shows additional ways to use this stamp set and the Stamparatus.


I hope you can now see why I chose this card as a Simple card.  Tomorrow, I will show you how to create a template that will enable you to use the Stamparatus to make a wreath.

I hope you all had a great weekend.  My husband and I usually have pretty simple quiet uneventful lives, but this weekend we went to the New Chicago Brass Band concert on Friday night, and then last night to a show where the presenter impersonated Patsy Cline.  Great music both nights and fun to get out.

It has started to become fall here, my favorite season.
I hope you enjoy your day what ever the weather.
Happy Stamping,
Sushi

Don't forget.... 

to follow this page, and if you want to know when I post, sign up for an email notification. 

 If you live in the Jacksonville area, I will be glad to add you to my email list.  Just sign up on the right hand side of this page.

If you want to duplicate this card, you can click on any of the items below and you will be connected to my store.  


Product List
Daisy Punch
[143713]
$18.00
Stamparatus
[146276]
$49.00
https://www.youtube.com/watch?v=B2o3rBfUiGw

Monday, August 20, 2018

All is Bright Designer Paper-Envelope Punch Board

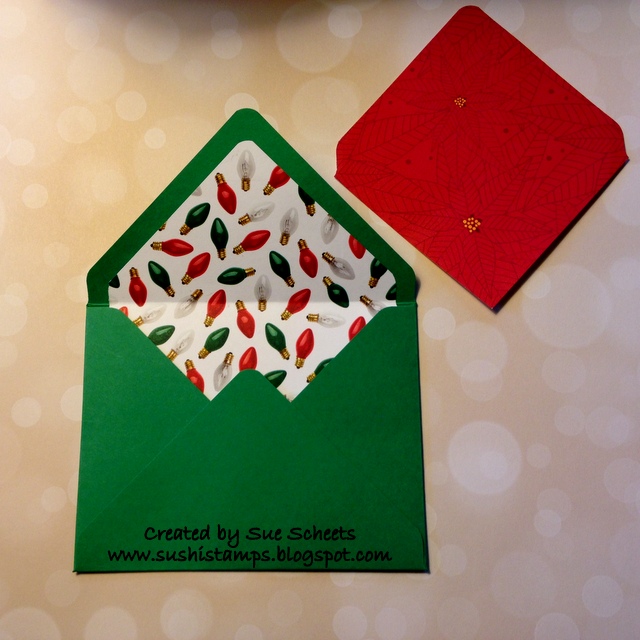
The entire envelope is made from designer paper.  I love doing this because both sides of the paper show up.

  I had such fun this past weekend in Champaign, IL at Vacation Stamping School.  About 100 demonstrators gathered together to share what we love with each other.  I felt privileged to be asked to share ideas on how to use designer paper.  We were encouraged to share ideas that could be used by New, Casual, and Avid stampers.
 I decided I would share ways to use designer paper.  I don't know about you but I love designer paper and seem to collect quite a bit of it.

My first ideas was to use the envelope punch board to make an envelope.  It takes a piece of paper that is 8 by 8 to make one standard sized envelope. This would be an easy project for a beginning stamper.

The directions are on the board and you can make over 60 different sized envelopes. That is amazing to me.  I love it and use it lots.  

My second idea was to make a liner for a card stock envelope.

The inside of the envelope is the designer paper.  It is a great way to use up your scraps.
First of all, I made the envelope out of Call Me Clover card stock.
Then I used a 4 by 4 piece of designer paper to create the liner. This liner will fit in a standard envelope only.

Line the piece of designer paper with the left edge at  the 4 inch mark and punch.
Find the opposite corner, flip the paper over and lay that side on the 4 inch mark and punch once more. Your punches should be on opposite corners. Round the corner using the top of the punch board, and you are now ready to attach the liner to the inside of the top flap.

CAUTION:  Glue the top two sides only so that the liner does not buckle when attach to the card.

The third thing I want to share is how to use the Punch Board to make a card holder.  Tomorrow I will post a video showing how to make the card holder. Here are a couple of pictures to get you excited about the video.
I hope you can see that there is more than one score line on each side.
When the holder is glued together it will look like this.
Can you picture making lots of envelopes, lots of liners and lots of card holders with all your designer paper?  Don't have an envelope punch board?  You can order it here by clicking on the pictures below.  They will take you to my shopping area.

   Tomorrow I will be sharing a Facebook Live, as I will be doing every Tuesday at 9:00.  I will try to post it here after I have made the video.

Have a great evening.  Here is Illinois it is not quite so humid.  I plan to take an evening walk or bike ride after dinner. 
See you tomorrow,
Sushi


Product List

Monday, July 16, 2018

Christmas Through the Year-Designer paper

 Greetings,
I got home last night from a wonderful family reunion.  I was able to see all my siblings except for my sister who lives in Oregon, all my children except Chris who lives in St.Louis, and 5 of my grandchildren.  We had wonderful weather, lots of games, visits to amazing places, great food and lots of good times celebrating each other.

This week I am focusing on Christmas cards, Christmas in July.  I have a monthly class I have held for about 4 years called Christmas Through the Year.  Each month people make 3 cards from the same design for $5.00.  At the end of the year they have 36 handmade cards ready to go.  I learned about this class idea at a Stampin'Up! convention several years ago from a demonstrator who was in her 80's.  

Today's card is a great way to use up little scraps of designer paper. It was very easy to create.  Even though I used last catalog's Christmas paper, it would be easy to duplicate this design with this year's paper.

Tomorrow I will share a card I featured at the Christmas class, and at a local assisted living facility.  Everyone was able to have a great looking card because they used the Stamparatus for exact stamping.

It is great to be back home and stamping again.
Sushi


Product List

Wednesday, December 20, 2017

Butterfly Friends Stocking-Drink Mix


 I love the idea of decorating whatever the gift, item might be.  So instead of just putting a Singles to Go in the stocking I decided to place it inside a cute looking holder.


1. Cut card stock 10 1/2 by 1 1/4".
2. Score at 4 7/8 and 5 1/8.
3. Accent piece cut at 4 1/4 by 1"

How easy is that!  Can't you see this made with all kinds of Designer paper for all kinds of seasons and occasions.

Tomorrow I will share a cute little post-it-note holder.  Come back and check it out.

Thursday, December 7, 2017

Christmas Ornament-Designer Paper

Simple but good looking, that is my style.

1. Start out with a clear ornament.

2. Cut strips of designer paper measuring 2 inches by 1/2 inch or any size that appeals to you.

3. Roll each strip tightly around a pencil or thin paint brush.

4. Keep the roll as tight as possible and push it through the opening of the ornament.  It should unroll a little as it goes into the ornament.

5. Add some foil or glimmer paper rolls for accent colors.

6. Tie a ribbon on the top and hang from your tree.

I can see gifting this ornament to a person that loves music.

Tomorrow I will share how I used the Eastern Medallion thinlits to make a garland for my tree.

Thursday, November 30, 2017

Snowflake Sentiments-Black and White and Red all Over

 I love the look of a black and white card, how about you? How did I make the center of the card?

1. I knew I wanted the center to be about 1 inch wide, so I cute my card stock 1 inch shorter than I normally would.  5 inches by 2 3/4 rather than 3 3/4.

2. Next I cut a swirled piece about 2/3 down from the top of the designer paper.

3. Place the top and bottom cut piece so that it centers on the sides of the card and attach it to the card base with dimensionals. Now you have a white center piece in which to place a saying.


4. I fussy cut the saying so I could place it where I wanted in the white space.


Since I wanted to make sure I used all the parts of this bundle I created this card to showcase the snowflakes and the swirls.  

The designer paper stack called Quilted Christmas made the perfect background, while the Cherry Cobbler card stock was a great color for the focal points of the card.

The dotted strip is actually a thin piece of Washi tape to hold the accent piece in place.

Finally, tomorrow I will share with you some 3 by 3 cards I made that would be perfect to use as tags on gifts.

Thursday, September 21, 2017

Card Cafe Creations-Painted Autumn Designer paper

Don't you love the colors in this sheet of Painted Autumn designer paper.  I have always been drawn to the fall colors.  This card is very easy to create.

1. Two colors of card stock, and one piece of designer paper.

2. Another saying from Happy Birthday Gorgeous.

3. Layered shapes.  Everyday Label punch, Layering ovals both plain and scalloped edges

4. The final touch is a flower and leaves from the Touches of Nature Elements.

You don't need a lot of stamping when the designer paper is so elegant.

The final project I am featuring this week is an Acetate Card box that will hold all these cards and envelopes.  

Wednesday, July 19, 2017

Scrapbook Week-High Tide


  Can you see what is the old in this layout?  How about the new?

I was able to use most of what I had left from the By the Sea designer paper for the backgrounds of this layout.  The Old.

The new was the Light house, and birds from the set called High Tide. I was so glad that this set was in the new catalog because I did not use it as much as I wanted when it came out in the Occasions Catalog.

Tomorrow I will show you a layout made with retired products, but suggest how you could make the same layout with new product.  Come back to see how easy it is to copy each layout.

Tuesday, July 18, 2017

Scrapbook Week-Using Scraps

  During March I knew it was getting close to the end of the catalog year and I wanted to make a layout that would help use some of my leftover designer paper.  The banners were so easy to make because of the triple banner punch.  What would you put on a page with this title?

  When May came I still had a lot of designer paper left to use so I came up with this layout.  I did add the accent pieces made with the new Eastern Palace stamp set which I have fallen in love with.


Tomorrow I will show you how I included the old with the new on another layout from June.

Friday, July 14, 2017

5 Favorites-Oh So Eclectic

  What I love about this card I found on Pinterest posted by BJ Peters.  I like a lot of the cards she posts so am providing you a link to her blog since you might like them too.

1. First off I love the color Lemon Lime Twist

2. Secondly, I love the embossing folder called Layered Leaves.  It is one of the thicker folders that comes out with a very layered image.

3. Finally, I love the stamp set, the images, the matching thinlits and of course the matching designer paper.  

Thanks BJ for a great card design.

This ends my week of favorites.  Next week I will be returning from a great adventure in Maine with my family.  I will feature my latest scrapbook layouts so come back and see what I made using old and new products.

Monday, November 14, 2016

Candy Cane Lane designer paper-Miscellaneous Monday


As you know, I love using designer paper on my cards.  Well, this paper called Candy Cane Lane is full of cute little images.  When I ordered the paper I decided not to order the matching stamp set and just use the paper for my cards.

This was a swap I got at OnStage where the creator cut out the cute little  house and made that the high point of the card.

Come back tomorrow to see a sample of a double z card using this same designer paper.

Friday, October 28, 2016

Designer Paper-Fix it Friday

  I love the blue and white colors of this designer paper called Floral Boutique, one of the designer papers that are in the special that ends Monday.  

For this card I made a slit in the side of the designer paper and folded it back so that both sides of the designer paper were showing.  I cut out one of the flowers on a sheet of designer paper for the accent and the saying is from the coordinating stamp set called, Floral Phrases.

Same paper just reversed to accentuate a different side of the paper.

A different sheet of the card stock, rotated 90 degrees.

Same angle with the paper flipped over.

There are lots more ways to use designer paper that make your card making simple and attractive.  Have fun trying some of your own designs.

Come back on Monday to see what Holiday stamp I will be featuring next week.  Have a wonderful weekend.