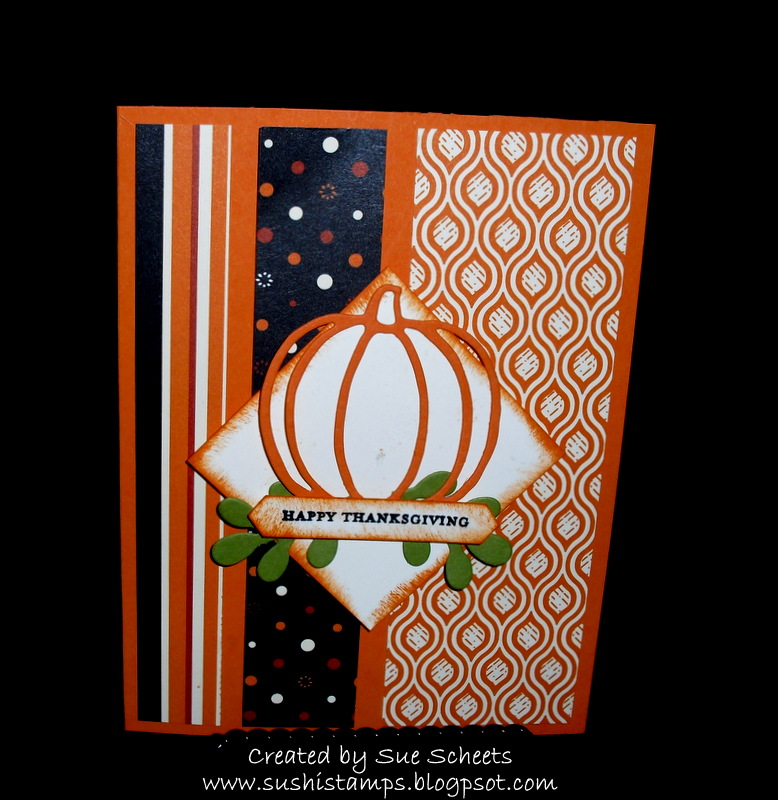
I love this black and Old Olive color combination. Did you know the black paper is Christmas paper? What I love about the SU papers are that one side can be seasonal and the other allows us to use them for a longer period of time.
This stamp from the Labels of Love stamp set can be used for a variety of Occasions.
New Years
Birthdays
Anniversary
a promotion
And I'm sure lots more.
Come back tomorrow to see the stamp that can be used for Valentine's Day.
Check back later today for more Stamparatus info.
Showing posts with label Stampin with Sushi classes. Show all posts
Thursday, November 16, 2017
Friday, October 20, 2017
November Card Cafe-Thank you gift
Have you made anything with these cute Pizza Boxes yet? They are easy to assemble and will hold lots of little things. This is the Thank You for RSVPing gift people will make in my November Card Cafe. I am thinking some Dove chocolate will fit nicely inside.
Has this week gotten you excited about the Pick a Pumpkin bundle?
Are you wondering what I might feature next week? Come back and see what I have made with my Halloween sets.
Has this week gotten you excited about the Pick a Pumpkin bundle?
Are you wondering what I might feature next week? Come back and see what I have made with my Halloween sets.
Thursday, October 19, 2017
November Card Cafe-Pick a Pumpkin bundle
Do you see where the copper is used as an accent on this card?
The pumpkin outline in the back and one of the leaf branches are made using Copper Foil.
The branch on the left side of the card was embossed using copper embossing powder.
And notice the work Autumn. I used the letters from the set called Labeler Alphabet. I did not have a stamp with the word Autumn and was wondering what I could do , when I remembered this alphabet. I love how it looks on this card.
Check out the blog blogloven.com to see this card and additional card creations.
I have shown you the 4 designs that anyone coming to my card cafe in November will be creating. Each person will make two cards for each design with a total of 8 cards. When someone RSVP's by October 23rd they will be able to make what I am showing you tomorrow as a thank you gift. Come back and see.
The pumpkin outline in the back and one of the leaf branches are made using Copper Foil.
The branch on the left side of the card was embossed using copper embossing powder.
And notice the work Autumn. I used the letters from the set called Labeler Alphabet. I did not have a stamp with the word Autumn and was wondering what I could do , when I remembered this alphabet. I love how it looks on this card.
Check out the blog blogloven.com to see this card and additional card creations.
I have shown you the 4 designs that anyone coming to my card cafe in November will be creating. Each person will make two cards for each design with a total of 8 cards. When someone RSVP's by October 23rd they will be able to make what I am showing you tomorrow as a thank you gift. Come back and see.
Wednesday, October 18, 2017
November Card Cafe-Pick a Pumpkin
When I looked at Pinterest, this card jumped off the page for me. It was created by Dawn from dostampers.typepad.com.
Colors used, Soft Suede, Crumb cake, Sahara Sand, Early Espresso.
Not a bit of orange but an elegant card.
I love the wreath that was made using the new Jute twine.
And the touch that makes a card for me is the background. In this case the Pinewood Plank 3D dynamic embossing folder was used and really stands out.
Did you know if you lightly spray water on the card stock before embossing your image will stand out even more?
Did you know that these embossing folders are so thick that you only need to use one cutting pad to emboss them?
Tomorrow I will share a card that uses the Copper Foil to add some extra to the card.
Colors used, Soft Suede, Crumb cake, Sahara Sand, Early Espresso.
Not a bit of orange but an elegant card.
I love the wreath that was made using the new Jute twine.
And the touch that makes a card for me is the background. In this case the Pinewood Plank 3D dynamic embossing folder was used and really stands out.
Did you know if you lightly spray water on the card stock before embossing your image will stand out even more?
Did you know that these embossing folders are so thick that you only need to use one cutting pad to emboss them?
Tomorrow I will share a card that uses the Copper Foil to add some extra to the card.
Tuesday, October 17, 2017
November Card Cafe Creations-Pick a Pumpkin bundle
Fall makes me think of Thanksgiving. This is the year that all my kids gather with their families on Thanksgiving so I am really looking forward to that time together. I have been thinking of different ways to decorate the table with stamping.
Do you recognize the background paper on this card? It is the reverse side of the Halloween designer paper called Spooky Night. I love that this paper can be used even longer than Halloween.
The pumpkin in this card is one of the thinlits that is included in the bundle without a matching stamp.
If you have not started using the adhesive sheets, this is a great card in which to start using them. I backed a long sheet of card stock with the adhesive to make it easy to attach this skinny little pumpkin onto the finished card.
The card for tomorrow uses neutral colors and makes a different kind of a Fall card.
Do you recognize the background paper on this card? It is the reverse side of the Halloween designer paper called Spooky Night. I love that this paper can be used even longer than Halloween.
The pumpkin in this card is one of the thinlits that is included in the bundle without a matching stamp.
If you have not started using the adhesive sheets, this is a great card in which to start using them. I backed a long sheet of card stock with the adhesive to make it easy to attach this skinny little pumpkin onto the finished card.
The card for tomorrow uses neutral colors and makes a different kind of a Fall card.
Monday, October 16, 2017
November Card Cafe-Pick a Pumpkin
Fall is one of my favorite seasons. How about you? The Pick a Pumpkin set is perfect for all kinds of fall cards. I love sets that have stamps that can be cut out with framelits and thinlits and this set is a favorite. There are several thinlits that are additional to the stamps in the set. I am featuring this bundle in my November Card Cafe.
Today's card is quite simple and inspired by a card shown on melsinkyfingers.com
Card stock- Cajun Craze, Early Espresso, Very Vanilla, Old Olive, and Painted Autumn Designer paper
Ink- Perfect Pumpkin, Early Espresso
Copper Trim
Everyday Labels Punch
I wanted some early espresso card stock behind my saying so I punched a label out and then cut it in half to back my saying. Easy and got the look that I wanted.
Tomorrow I will share a card I made for Thanksgiving.
Friday, September 22, 2017
Cafe Card Creations-Painted Harvest Bundle
Did you notice these Acetate card boxes in the Holiday catalog? There are great for gifting cards to people. I have also found out the following can be placed inside the boxes...
Giordelli chocolates
testtubes filled with candy
You can emboss the boxes on the front by running it in the embossing folder.
And the most obvious. Each box will hold 5 cards and envelopes.
1. I placed a belly band around the box
3 inches by 11 of the card stock
2 1/2 inches by 12 of the designer paper
2. I glued one edge the same on both pieces of paper and then wrapped it around the box as a unit. I attached the pieces together on the back of the box, making sure there was enough give that the belly band could be slid off and on the box.
So this is the end of the October Card Cafe Creations. In case you are not sure what a Card Cafe involves. It is a class I offer once a month.
1. There are 4 card designs all using the same bundle. Stampers make two of each design.
2. If they RSVP by the date of the class they get to make a 5th project. In October it will be the card box.
3. If they wish to purchase the bundle the day of the class, then the class is free.
Next week I will be featuring the projects you can make in my Hooray for Halloween class. Stop by and see them. And if you like what you see on my blog, please follow my blog.
Giordelli chocolates
testtubes filled with candy
You can emboss the boxes on the front by running it in the embossing folder.
And the most obvious. Each box will hold 5 cards and envelopes.
1. I placed a belly band around the box
3 inches by 11 of the card stock
2 1/2 inches by 12 of the designer paper
2. I glued one edge the same on both pieces of paper and then wrapped it around the box as a unit. I attached the pieces together on the back of the box, making sure there was enough give that the belly band could be slid off and on the box.
So this is the end of the October Card Cafe Creations. In case you are not sure what a Card Cafe involves. It is a class I offer once a month.
1. There are 4 card designs all using the same bundle. Stampers make two of each design.
2. If they RSVP by the date of the class they get to make a 5th project. In October it will be the card box.
3. If they wish to purchase the bundle the day of the class, then the class is free.
Next week I will be featuring the projects you can make in my Hooray for Halloween class. Stop by and see them. And if you like what you see on my blog, please follow my blog.
Monday, September 18, 2017
Card Cafe Creations-Painted Harvest Bundle
Are you in love with this set yet? It was the first one to get my attention when I opened the Holiday Catalog. I have to say I keep seeing more great ways to use the stamp set. In addition there is a wonderful leaf punch that punches out the leaf stamp. And finally the coordinating designer paper is my favorite in the Holiday catalog.
1. The stamp set is multi layered and has an unfinished look to the first layer. That is intentional, but if it bothers you, you can re ink the stamp and rotate the stamp before stamping a second time. The second layer creates a detailed petal. The amazing thing about this stamp set is that you can use just one color, or two different colors to create the sun flower.
2. The leaf is also multi layered. I find I am most successful if I stamp the detailed stamp first in a darker color. Then when I stamp the solid stamp I have something to see that helps me place the second stamp better.
3. The punch is handy to punch out the leaves. Be sure and stamp the image close to an edge of the card stock. It makes the punching so much easier.
4. The designer paper coordinates with an awesome color combination.
Cajun Craze, Crushed Curry, Daffodil Delight, Early Espresso, Garden Green, Lemon-Lime Twist, Peekaboo Peach, Soft Sky, Tangerine Tango.
Wow some of these colors, I never would have put together, but they look great when you do.
Tomorrow I will show you a great technique I learned about at an event I went to in Champagne.
1. The stamp set is multi layered and has an unfinished look to the first layer. That is intentional, but if it bothers you, you can re ink the stamp and rotate the stamp before stamping a second time. The second layer creates a detailed petal. The amazing thing about this stamp set is that you can use just one color, or two different colors to create the sun flower.
2. The leaf is also multi layered. I find I am most successful if I stamp the detailed stamp first in a darker color. Then when I stamp the solid stamp I have something to see that helps me place the second stamp better.
3. The punch is handy to punch out the leaves. Be sure and stamp the image close to an edge of the card stock. It makes the punching so much easier.
4. The designer paper coordinates with an awesome color combination.
Cajun Craze, Crushed Curry, Daffodil Delight, Early Espresso, Garden Green, Lemon-Lime Twist, Peekaboo Peach, Soft Sky, Tangerine Tango.
Wow some of these colors, I never would have put together, but they look great when you do.
Tomorrow I will show you a great technique I learned about at an event I went to in Champagne.
Friday, September 1, 2017
Card Cafe Creations-Colorful Seasons
An amazing card for an amazing person. This had a Japanese look to me with the moon and the peach blossom flowers on a delicate branch.
1. Punch out a circle the size you would like for the moon.
2. Attach it to the paper will something that is not permanent.
3. Use a brayer and roll it all over the background paper.
4. Pull off your circle and there is your moon.
I found this card on Pinterest from a blog called Stamp with Amy K.
Next week look for some cards made with some of my favorite stamps from the Holiday Catalog. If you do not have your catalog by now, contact me and I will make sure you receive one.
Thanks for stopping by at Sushi Stamps.
1. Punch out a circle the size you would like for the moon.
2. Attach it to the paper will something that is not permanent.
3. Use a brayer and roll it all over the background paper.
4. Pull off your circle and there is your moon.
I found this card on Pinterest from a blog called Stamp with Amy K.
Next week look for some cards made with some of my favorite stamps from the Holiday Catalog. If you do not have your catalog by now, contact me and I will make sure you receive one.
Thanks for stopping by at Sushi Stamps.
Thursday, August 31, 2017
Card Cafe Creations-Colorful Seasons
Can you picture this card made with Berry Blast, Crushed Curry and Dapper Denim? This design would be so simple to create in each of these colors. Why these particular colors? They are the featured colors in the Color Theory designer paper stack.
Sign up for this card cafe if you are in the Jacksonville, Illinois area and make the card I featured yesterday free.
Tomorrow's card features the branch from this set, the flower framelits and sponging. Come back to check it out.
Sign up for this card cafe if you are in the Jacksonville, Illinois area and make the card I featured yesterday free.
Tomorrow's card features the branch from this set, the flower framelits and sponging. Come back to check it out.
Tuesday, August 29, 2017
Card Cafe Creations-Colorful Seasons
Do you wonder how the leaf color is made so varied? It is created using the Baby Wipe technique. You will be able to make 2 of this card at my Cafe Creations class on Monday, September 4th.
I received this card as a swap at a Vacation Stamping School in Champaign at the beginning of this month. And I loved it.
1. Take a Baby Wipe or two and layer them in a shallow container.
2. Drop a variety of re-inkers onto the Baby Wipe. This is now your ink pad.
3. Press your stamp onto the Baby Wipes and then onto your card. You can reuse these Baby Wipes over and over again re-inking if they seem a little dry.
What a simple great idea to make a simple but stunning card.
Tomorrow I will show off the card you will be able to make one of if you RSVP by Thursday, August 31st.
I received this card as a swap at a Vacation Stamping School in Champaign at the beginning of this month. And I loved it.
1. Take a Baby Wipe or two and layer them in a shallow container.
2. Drop a variety of re-inkers onto the Baby Wipe. This is now your ink pad.
3. Press your stamp onto the Baby Wipes and then onto your card. You can reuse these Baby Wipes over and over again re-inking if they seem a little dry.
What a simple great idea to make a simple but stunning card.
Tomorrow I will show off the card you will be able to make one of if you RSVP by Thursday, August 31st.
Friday, August 18, 2017
Everything New card Buffet-At Home with You
When I made this card I wanted the door to be the focal point and I wanted to show off the Wood Textures designer paper.
1. The door is cut out with a thinlit and the window part of the door is also. There is another piece I did not use on this card that will make the door so it can open to reveal something on the inside.
2. I love the message at the side of the door. Can't you think of a few people that message applies to and they are not necessarily family.
3. I thought this might be a good card to send to a male. It seems I have a lot of cards and stamps that have a definite female look to them so this card appealed to me as one to send to a special male in my life. My husband is the one I think of immediately. We have an anniversary coming up in October and I think he would love this card.
What a fun week this has been sharing the cards that were offered in my card buffet. Next week I will be sharing cards made with items from the new soon to be current Holiday catalog. When I looked at that catalog I wondered how I would be able to afford all the stamp sets I love. Come back on Monday to see some of my favorite items from the Holiday catalog.
1. The door is cut out with a thinlit and the window part of the door is also. There is another piece I did not use on this card that will make the door so it can open to reveal something on the inside.
2. I love the message at the side of the door. Can't you think of a few people that message applies to and they are not necessarily family.
3. I thought this might be a good card to send to a male. It seems I have a lot of cards and stamps that have a definite female look to them so this card appealed to me as one to send to a special male in my life. My husband is the one I think of immediately. We have an anniversary coming up in October and I think he would love this card.
What a fun week this has been sharing the cards that were offered in my card buffet. Next week I will be sharing cards made with items from the new soon to be current Holiday catalog. When I looked at that catalog I wondered how I would be able to afford all the stamp sets I love. Come back on Monday to see some of my favorite items from the Holiday catalog.
Thursday, August 17, 2017
Everything New card class- Lemon Zest
How do you feel about the new in-color Lemon-Lime Twist? As you can tell by cards I make, I love it. It is vibrant, colorful and stands out on any card you place it. Have you also noticed that it is a popular color in clothing right now. That is how Stampin'Up! decides what the new in-colors should be.
1. Parts of this stamp (the lemon and the leaves) can be punched out. Yea love it when I don't have to hand cut items.
2. There are actually 6 lime slices on the background piece. 3 are made full strength and 3 are stamped before reinking the stamp.
3. The little strip of Foil Frenzy Specialty designer paper actually has some strips of Lemon-Lime color in between the black. I thought it was gold until I got a really close look.
Can you tell I gravitate towards simple cards. You don't need much on your card to make it stunning. This card was created by my upline Robin who had all the supplies ready for us to recreate the card.
The final card for the week will be make using the set called At Home with another matching thinlit to help cut out the items in the set. Come back tomorrow to see it.
1. Parts of this stamp (the lemon and the leaves) can be punched out. Yea love it when I don't have to hand cut items.
2. There are actually 6 lime slices on the background piece. 3 are made full strength and 3 are stamped before reinking the stamp.
3. The little strip of Foil Frenzy Specialty designer paper actually has some strips of Lemon-Lime color in between the black. I thought it was gold until I got a really close look.
Can you tell I gravitate towards simple cards. You don't need much on your card to make it stunning. This card was created by my upline Robin who had all the supplies ready for us to recreate the card.
The final card for the week will be make using the set called At Home with another matching thinlit to help cut out the items in the set. Come back tomorrow to see it.
Tuesday, August 15, 2017
Everything New card buffet-Coffee Cafe
I looked all over the stamp set for the coffee image when you spill or drip your coffee. At first I thought maybe I had already misplaced one of the stamps, and then I looked at the designer paper. Cute!
1. The designer paper is called Coffee Break and I love the colors: Early Espresso, Garden Green, Pear Pizzazz, Soft Sky, Soft Suede, and Whisper White.
2. The leaves surrounding the saying are cut out from one of the sheets of designer paper.
3. The copper ribbon is also new to the catalog.
This makes for a simple but cute looking card and was created by Dawn Olchefske.
Tomorrow I will feature a card made with the Lovely Inside and Out stamp set and matching thinlits.
Monday, August 14, 2017
Everything New Card Buffet-Lovely Friends
Have you ever been all set to do something and then you can not get on the Internet for some unknown reason. Well, that happened more than once last week to me. But glad to say the Internet is now up and running so here comes some great cards this week.
I had an Everything New card buffet last week and have chosen 5 cards to share with you. Most of the items are new.
1. The stamp set is great with sayings and cute 2 step flowers. Lovely Friends is the name.
2. The Color Theory designer paper stack is the background of this card. If you have not ordered this yet, on of the things I love about these 6 by 6 paper stacks is they are not attached with that gummy label on the bottom.
3. The card was inspired by a posting on Pinterest by Billie Moan of Rambling Rose studio.
Tomorrow I will show off a card using the Coffee Cafe stamp and Coffee Break designer paper.
Monday, May 15, 2017
Spring Has Sprung-Eastern Palace Suite
| Stamp set, thinlits, and gold stickers are featured in this card. |
Greetings! Isn't this a lovely spring! I have accomplished my goal of spring cleaning and am ready for some blogging.
This week I will be featuring projects made with the Eastern Palace Suite. Yes, this is a new catalog item, but it can also be ordered in May. What fun to have a new catalog item early.
I will be presenting a class on May 31st featuring items from the Eastern Palace suite. You will be making 3 cards in this class. The cards you will make are featured in today's blog post.
Stamps, thinlits, stickers and the cute tassels are featured in this card. |
| Another tassel, a sticker and some of the great designer paper are featured on this card. |
Come back tomorrow to see some more cards I have created using this very vesatile suite.
Monday, February 27, 2017
Lift Me Up-Miscellaneous Monday
Doesn't this card make you feel like you are lifted up a little? This is another bundle that I love from the Occasions catalog. There are 16 stamps and 15 Thinlits to cut out most of the designs. Don't you love it when the stamps and thinlits match. It makes card making so much easier. Here are the coordinating items used in this set.
1. Lift Me Up stamp set
2. Up and Away Thinlit dies
3. Carried Away designer paper
You might wonder why you cannot find this designer paper in the Occasions catalog. That is because it is one of the free items you can earn in the Sale a Bration catalog.
Here's how you can do that....
Order the bundle for $45.75 Clear Mount and then add to your order a Package of Whisper White envelopes for $6.50 and you have enough to receive the designer paper for free.
On Thursday, March 30th I will have a class where you can make 12 cards similar to the one I have featured using this bundle. The class will be free if you order the bundle. Contact me for more information.
Come back tomorrow and the rest of this week to see some more ideas on how to use these items.
1. Lift Me Up stamp set
2. Up and Away Thinlit dies
3. Carried Away designer paper
You might wonder why you cannot find this designer paper in the Occasions catalog. That is because it is one of the free items you can earn in the Sale a Bration catalog.
Here's how you can do that....
Order the bundle for $45.75 Clear Mount and then add to your order a Package of Whisper White envelopes for $6.50 and you have enough to receive the designer paper for free.
On Thursday, March 30th I will have a class where you can make 12 cards similar to the one I have featured using this bundle. The class will be free if you order the bundle. Contact me for more information.
Come back tomorrow and the rest of this week to see some more ideas on how to use these items.
Tuesday, February 21, 2017
Cool Treats Class-Technique Tuesday
Doesn't this ice cream cone look good enough to eat? This card looks like a simple open the card up and look inside fold, but it is actually a triple fold card. What do I love about this stamp set and matching framelit?
1. Every image has its own thinlit to help you cut it out easily.
2. There are thinlits that place scoring lines on the cone so that it ends up with a 3 dimensional look.
3. There are an amazing 36 stamps in the set and 17 matching thinlits. Quite a bargain.
Come back tomorrow to see a WOW card made with this set.
Wednesday, March 2, 2016
Wednesday Wow-Lovely as a Tree Christmas card
Does this card look like it might be difficult to make? Well, it isn't. Stampers came to my house last Thursday and made this card in the Christmas Year Round card class.
1. Emboss a piece of vellum using the Softly Falling embossing folder.
2. Stamp the trees in Mellow Moss along the bottom of the extra piece of white cardstock, and on the envelope and in the inside of the card.
3. Make the banners using the triple banner punch. Stamp some snowflakes on the banners to add some color.
4. Stamp the sayings, and add some bling and silver twine and your card is finished.
Come back tomorrow for a look at this months Paper Pumpkin cards.
Monday, November 9, 2015
Lighthearted Leaves
This card was so much fun to make. When I first saw the stamp set I knew I had to have it and would be coloring it in some way more than once.
1. Emboss in gold embossing powder
2. Using and aqua painters and pools of color in the lid of your ink pad color in various parts of you leaf.
3. With the lightest color ink collect a bit of ink with your aqua painter to outline the leaf to give it depth.
I wonder if I could make this leaf look like a zentangle?
1. Emboss in gold embossing powder
2. Using and aqua painters and pools of color in the lid of your ink pad color in various parts of you leaf.
3. With the lightest color ink collect a bit of ink with your aqua painter to outline the leaf to give it depth.
I wonder if I could make this leaf look like a zentangle?
Subscribe to:
Posts (Atom)