Showing posts with label Stampin Blends. Show all posts

Friday, July 6, 2018

Animal Outings-Fancy Fold Friday

 I had so much fun using all the animals from this set (except for the frog) along the folded edges in this cards.


1. First I scored the card stock in half, then at 2 1/8" on one half.  I did this to 2 sheets of card stock. I then folded on the scores lines till I have a fold like above. The two cards are glued together. I trimmed the piece that is on the inside 1/8" on the left side.

2.  Next, I put the top fold through the embossing folder using the Layered Leaves folder. I wanted to images to stand out a bit more so I ran a Versa mark pad over the top.

3. I stamped, cut out and colored each animal.  Two are attached on the left hand side and one of the right hand side.  Make sure that you only glue half of each animal onto the folded edge.


Finally, add a saying on the inside.  I also stamped some leaves using Versa Mark.  I just wanted a subtle look.

What fun I had this week.  Is this bundle now on your wish list.  I received the stamp set at the last On Stage I went to in Milwaukee, Wisconsin.  Once I got the matching framelits, I have really had fun using the set.  Not just for kids.

Next week I will be featuring cards for my Brilliant Brights class on July 20th.  Each card will feature the colors in the Brights family. Come back and see how well the colors in this family go together.

If you decide to take advantage of the Join the fun offer of a family of ink pads, and stamps of your choice, you could have this bundle and the brights along with $80 more. Click on the link above for more details.

Hope your summer is going great with some time for creating,
Till Monday, 
Sushi


Product List

Wednesday, July 4, 2018

Animal Outing-Wednesday WOW


This card made me think of a WOW card because of all the different layers and techniques I used on the card.

1.Stampin first, then cutting out the images with the matching framelits.  You have to love how easy that makes it.

2. Creating a background for the stamped focal point using the Pattern Party Decorative Masks and sponging the cloud images.


3. Using the Designer paper pack of the new in-colors as background for the focal point.  Easy to match colors that way.


4. Coloring in the stamped images with the Stampin Blends.  They make coloring so easy and blending easy as well.

Tomorrow, I will share two cards I made using the framelits I have not used yet to create a fun template.

Today, I hope you will be able to celebrate the birth of our country with your family and friends.

Happy 4th of July,
Sushi


Product List

Wednesday, March 21, 2018

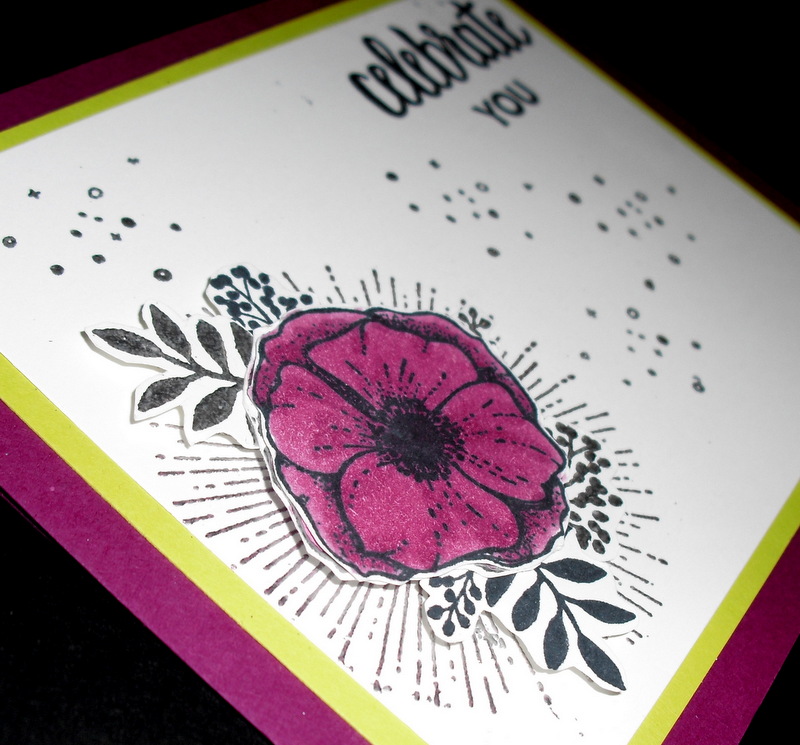
Amazing You stamp set-Sale a bration

I love to add embossing to my cards. I think it adds a WOW factor. Here's my step by step on how I made this card. 

1.The stamp set that looks like the rays of the sun, one set of leaves, the Celebrate you, and the dots are all embossed in silver.

2. The flower and one set of leaves (part of the flower stamp) are stamped in black memento ink.

3. The leaves are cut off from the flower and attached with dimensionals to give the flower some layers.


4. The color is added with the Rich Razzleberry Stampin Blends.

The final product makes me feel like I just produced a WOW card.

Tomorrow I will show you  how to take one layout and make several more just like with some simple changes.

Product List

Wednesday, March 7, 2018

Springtime Foils- Sale a Bration week

Simple is good right? Today I am featuring the Springtime Foils specialty designer paper which was part of the second group of Sale a Bration items.  I couldn't tell too much about the paper till I got it into my hands.  It is great.

The foil in this card is the background and is copper dots.  
How to make the diagonal strip.

1. Cut the card stock into 1 3/4 inch strip and 2 inch strip about 
5 1/2 -6 inches long

2. Glue the strips together and attach them to the card at an angle.  

3. Cut off the extra card stock on each end.


 I colored in the leaves on card #2 using my Pool Party Blends.  
The card is square, but will fit in a standard envelope.  4 x 8 inches.


This next card uses 2 inch strips of the striped and leaf papers.  I colored in the leaves on this card with my stampin write marker.  I wanted to match the card stock.


Do you enjoy coloring?  Well, I do so this next card was perfect for me.
I used the stampin Blends to color the flowers and leaves.  I tried mixing the pink and coral colors together to create the look of these flowers.


 The final card for today is my favorite.  I used thinlit background from the stamp set Eclectic Layers.  I have used other parts of these thinlits on several different cards, but never this background piece.  I love the look.


Can you see the striped piece of Springtime Foils underneath the cut out.  I brayered it with Bermuda Bay ink to match the card base and the flower.

I colored the flower and leaves with my Blends.


Such a fun group of papers to make cards with.  

Tomorrow I will feature cards made with Eclectic Expressions stamp set another new release product.


Product List

Tuesday, March 6, 2018

Lots of Lavender-Sale a Bration week


  Lots of Lavender appealed to me right away when I first looked at the Sale a Bration catalog.  But I really have only used it a couple of times.  So many stamps, so little time..... you know how that feels I am sure.  So, I had a lot of fun creating the samples for today.  I made sure to use all the different stamps in the set.  Once I did that I found the set to be quite amazing.

I love to make cards using just one color.  I found a similar sample on Pinterest and decided to try to duplicate it.  

Do you notice the green leaves?  When I first saw the card I thought I would use my Blends to color in the leaves.  Not necessary because there are two stamps in the set to help you fill in the leaves easily.  One stamp is for the leaves on the left side, one for the leaves on the right.

The saying is from a hostess set from the Occasions catalog called Yay You.


Next card is a rerun of a card I featured on my blog for Blends week.  Same stamp but colored with blends.  Such a different look.


If you follow my blog you might recognize this card from Brusho week.  That's what I used on the background, and then colored the stamp in with Blends again.


 Did you know that this cute little garland is part of the Lots of Lavender stamp set?  There are 4 additional stamps that help fill in the large flower, 2 for the leaves since they are directional and one for the two little buds.  

1. When you stamp a stamp that has multiple layers like this one.  First, stamp the darkest layer.

2. Then you can look through the photopolymer stamp to see where to place the next stamp in a lighter color.

Both of the tiny buds are on the same stamp and placed apart so they match up exactly with the larger stamped garland.


This last card was so pretty, I copied it exactly just changed up some of the colors and the saying. I watched a well done video by Nigezza.  Her blog is www.nigezza.blogspot.com.

The open lacy accent piece and the leaves in the background are from the Petal Palette bundle.

Tomorrow, I will share some cards made with the Springtime Foils specialty paper.  It was a part of the second set of Sale a Bration items. Product List