Showing posts with label framelit. Show all posts

Friday, June 10, 2016

Remarkable You-Fix it Friday


  Do you ever go to the catalog for ideas?  I went there for the basic card today.  This card was found on page 128.  I really liked it for its simplicity and I just plain love the leaves image in this stamp set.


  Here is how I fixed up the card by making it a little more complicated.  

1. I added some black to accent the black color of the stamped image using the Lots of Labels framelit.  

2. I lengthened the saying by adding one more word from the saying that comes with the stamp set.  

3. I added an accent leaf onto the bottom of the saying.

Which card do you like the best?

And here is what the cards for the week look like in a group. What was your favorite card this week?


Such fun!! Come back next Monday to see what I will do with the first set that is new to the catalog......Painter's Palate.

Don't forget that today is the last day to sign up as a brand new customer to Paper Pumpkin when your first month will be just....$5.  What a deal.


Wednesday, March 30, 2016

Wednesday Wow-White on White Christmas Card

   Do you think the look of white on white is a wow?  I love the elegance of this card.  

Whisper White card stock
Dazzling Diamonds Glimmer paper
5/8 inch Organza Ribbon
Stars Framelits
Lucky Stars embossing folder
Wink of Stella Clear embossing pen

Stampers who come to my Christmas Through the Year class in April will be able to make 3 of these cards,  Want more information, contact me.

Come back tomorrow to see how I used some scraps to make the same card over and over.

Saturday, October 3, 2015

Six-Sided Sampler


     I love the colors in this card don't you?  This was another card featured in Robin's Everything Fall card class.  Sometimes I make myself look through my stamp sets and find one that I have not used for quite a while.  Robin said that is why this card featured the Six-Sided Sampler stamp set.  What do I love about this card?

Grey and Lost Lagoon look great together

The dots in the background from the Gorgeous Grunge stamp set

The way the new framelit Bold Butterfly is incorporated with the old stamp set.

The touch of silver glimmer paper

Finally the simple saying Hello Sweet Friend

    I know this card will show up in one of my card buffets soon.

Monday, August 24, 2015

Wetlands-Get Well card buffet


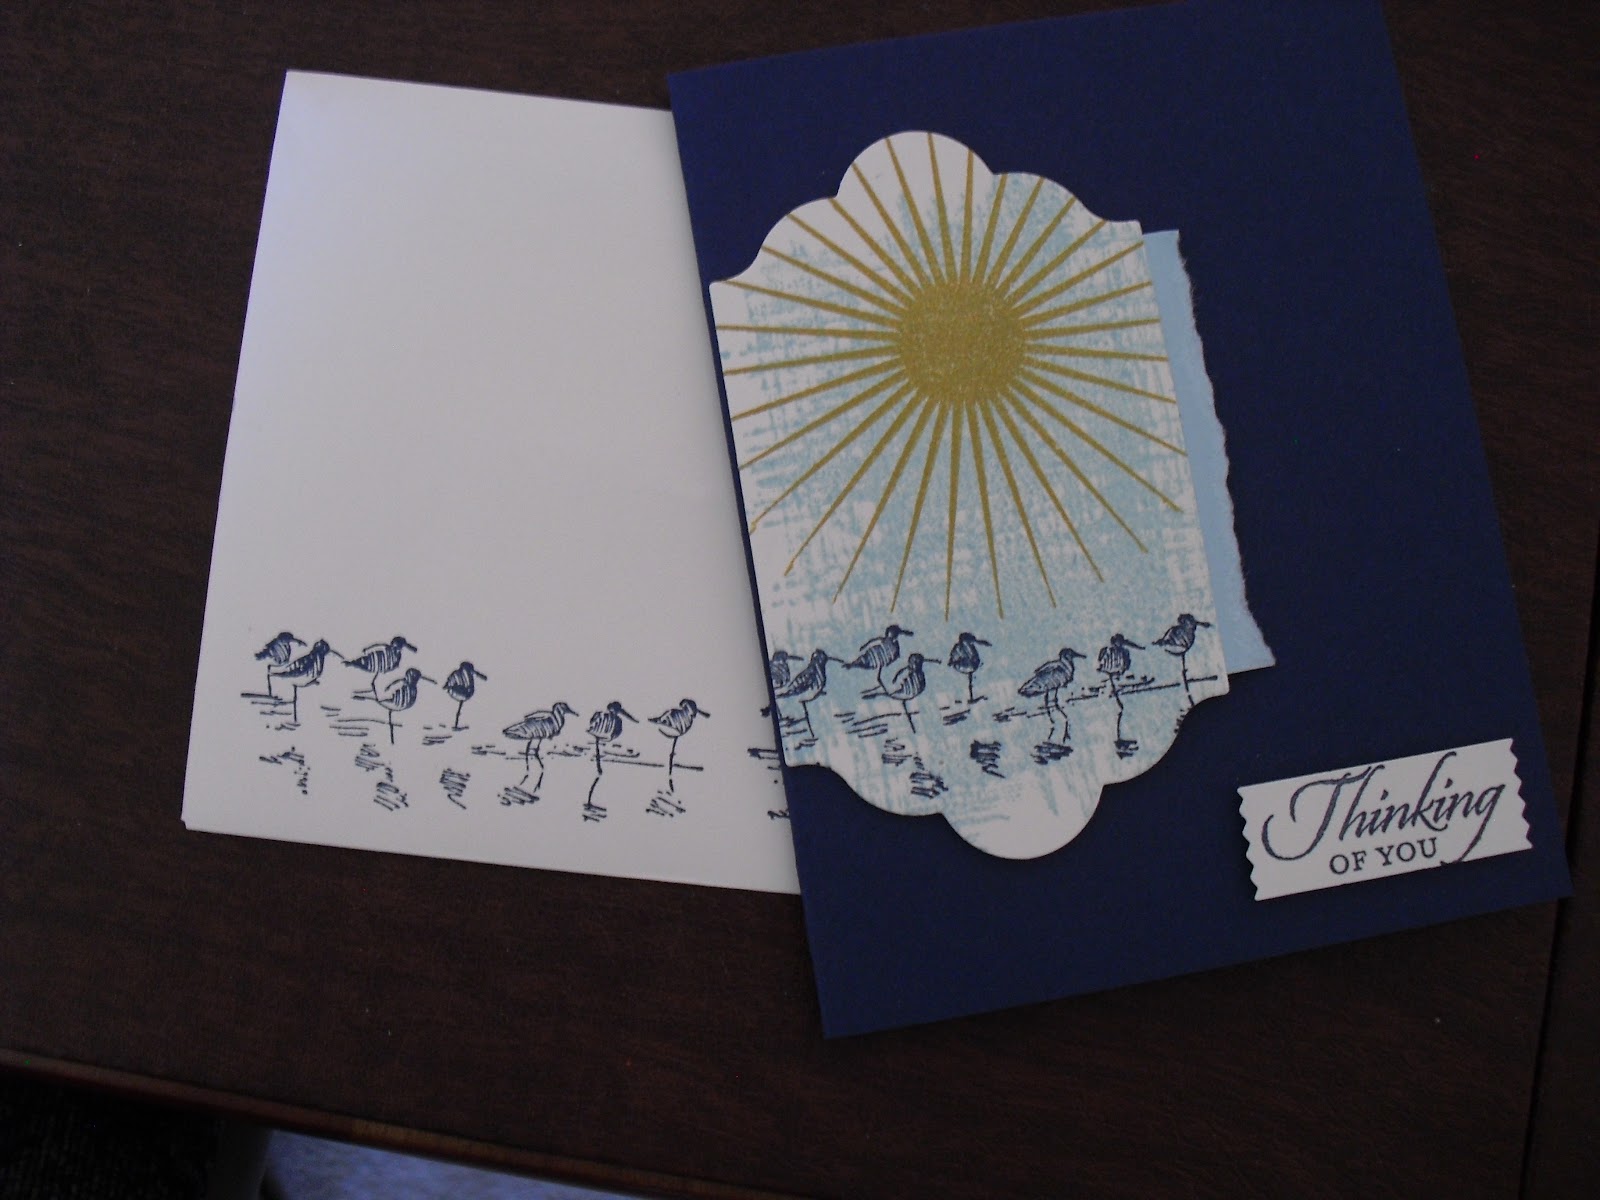
     Can you figure out what stamp sets are used in this card?  Wetlands for the birds, Kinda Eclectic for the sun, and You've Got This for the background.  After stamping all the images I used Lots of Labels framelits to cut out the image.  This was based on a swap I received at convention.  And I love it. How about you?

Saturday, September 27, 2014

Holiday Home card-Scrappin Saturday


   Do you save all your card stock pieces?  I do except for the ones that are smaller than 1/2 and inch.  This card would be a great one to use some of your leftover pieces.  I got the idea from our demonstrator magazine called Stampin Success.  It has several parts to the card that I love.

1. The stamp set called Holiday Home.  It is photopolymer, multi seasonal, and cute!

2. The tiny scraps of card stock used to create the hills.

3. That there is a matching framelit set to cut out the houses.

What parts of this card do you love?

Thursday, September 18, 2014

Curvy Keepsakes Box Pumpkin-3-D Thursday


 One of the intriguing items in the Holiday Catalog is the Curvy Keepsakes Box.  You need to cut out two of the framelits to make one box.  I have to admit when I first looked at it in the catalog I thought it looked like it might be hard to make.  But I used my QR reader and watched this video on how to use the framelit and I thought it might be easy.  Then, I went on Pinterest and looked at all the wonderful samples people were making using the box and decided then and there is was a must have!!

  I found this pumpkin on Cindy Wilkinson's blog, Just Sponge it, and wanted to make one of my own just like it. Does it look hard to make, well it is not.

1. You will need a full sheet of card stock to make one box.  Just cut out the framelit two times.

2. Glue the base together.  I used the new fusion tape.  It worked well.  The only thing to remember when using that tape is that when you are done taping, you stop taping like you are making a check mark.  

3. Pull up the edges with the loops until they meet and then bring the edges with the slits over the top of the loops.  No more glue needed and your box is finished.

Supplies used

Stamp set Work of Art, Flower Fusion
Framelits Flower Fare, Curvy Keepsake Box
Card stock Pumpkin Pie, Mossy Meadow
Ribbon White and Tangerine Tango Two-toned trim
Ink Tangelo Twist

  Check out Pinterest and see all the cute samples people are making and see if you think this framelit is a must have.


Monday, April 14, 2014

Oh Happy Day with the primary colors


   I love when things match.  When I was deciding what to do for the primary colored card I looked in my cabinet and noticed the Starburst framelits, and the matching stamp set called Starburst Sayings.  I had such fun trying to decide what colors to use with what framelit, and what accents to use on the pieces when I had them all laid out on the card.  This card made my day a happy one.

Added Supplies needed for card
Daffodil Delight, Whisper White card stock
Birthday Basics, Brights Designer paper
Real Red and Daffodil Delight ink
Brights Glimmer brads
Rhinestones
1/8 inch Daffodil Delight grosgrain ribbon

Thursday, April 10, 2014

Banners and Flowers


     Do you like using designer papers?  I like to use them because they coordinate so well with each other.  For this card I used the Retro Fresh DSP for everything except the smallest flower.  And the great thing about using the DSP is I could have created this very same card using different papers or different DSP all together and then see a different looking card.

Supplies
Teeny Tiny Wishes stamp set
Retro Fresh designer paper
Banners Framelit
Blossom and Pansy punches
In Color Boutique Details
Baked Brown Sugar card stock

   What colors would you use to recreate this card?

Wednesday, January 22, 2014

Christmas Throughout the Year


     Wouldn't you love to be prepared for Christmas early enough that you can relax and enjoy yourself?  Well, I am starting a class called Christmas throughout the year.  It will take place once a month and be very simple for everyone involved. Check out my website for the details.  This is how the class will run.

1. I will create one Christmas card design a month.

2. People will sign up to attend and make 3 copies of the same card.

3. In one years time people attending will have 36 Christmas cards ready to go.

   I love how this first card turned out.  The wreath is made using the Daydream Medallion stamp set and matching Floral Frames Framelit. Where did I find red rhinestones?  I made them using a Sharpie marker. 

Hint of the Day:  Sharpie markers are the only marker that will not rub off of the rhinestone or pearl once they are dry.

Friday, June 21, 2013

Simple Chalk Talk Thank You


     Simple image plus fancy background equals great looking card.  This is the last image from the Chalk Talk stamp set.  I once again cut the image out using the Chalk Talk Framelits.  There are 3 little pieces in the framelits that can be used with any of the images to make a hole for ribbons.  I used one on this card and attached 3 coordination colors of 1/8 inch ribbon to bring out the colors of the background paper.  I tied the ribbons together with some of the matching Baker's twine.  I have someone I plan to send this card out to today, and can easily make several more with this simple card format.
I hope you have enjoyed the tour of the Chalk Talk stamp set and how it can be used to make some simple cards.

Wednesday, June 19, 2013

Simple Does It

   
     Do you ever need a card really fast and have none on hand?  This card was so easy to make that it would solve that problem for you. The central stamped image is two of the images from the Chalk Talk stamp set placed on top of each other.  Once again I was able to use the Magnetic Platform and Chalk talk framelits to quickly and easily cut out the stamped images.  I wanted to add something that helped the card pop so I found the Dahlia in color flowers did the trick. Another simple card ready to go and ready to duplicate.
Supplies used
Quatrefancy Specialty designer paper
Whisper White, Blushing Bride, Soft Sky,  card stock
Primrose Petals Dahlia buttons
Chalk Talk stamp set, and Framelit

Tuesday, June 18, 2013

Chalk Talk Simple Card


     Since this stamped image was so big, I wanted a great background.  I looked through the designer paper called Soho Subway and discovered this piece that had some grey and other striking colors in it.  This is another card from the Chalk Talk stamp set which I cut out using the matching Chalk Talk framelit and the MAGNETIC PLATFORM.  I cannot state enough how awesome the platform is.  I placed my card stock down, put the framelit over it and it stayed in place!  I used some of the Regal Candy Dots as a color accent on the stamped piece, and finished off the card with some Pacific Point striped ribbon. Another simple but striking card.

Sunday, June 9, 2013

An Original card from Abby


     While I was assembling the flower accents for the napkin holders, Abby told me about an inspiration she had for making a dress card.  We assembled the supplies and other than giving her a few hints on adhesive or how to stamp the background stamp, she was on her own.  I was very impressed with her end product.  I think I'll have a sign up form ready for her in 8 years.  What do you think?

Products used
Magnetic Platform (Abby can use this without any supervision)
Dress Up Framelit
En Francais background stamp
Black ink
1/8 inch Basic Black ribbon
Basic Black, Real Red Very Vanilla cardstock
Pearls
Fabric Flower ( retired from the Spring Catalog)
Everyday Enchantment (Retired designer paper still available  on the Clearance Rack)