Showing posts with label Christmas. Show all posts

Tuesday, November 1, 2016

Home Decor-Wall Art


  Do you like to decorate your home for Christmas?  I do and think it is fun now and then to create something other than cards using paper and stamps.  I saw this idea on the cover of the Stampin Success magazine that we get as demonstrators with Stampin'Up!  It was fun to make and easy to boot.  When can you make this?

Decorate your home for Christmas

Saturday, November 12th 10:00 to 3:30

There are 3 projects to choose from

Come when you want and stay till the projects are finished

RSVP by Monday, November 7th

This framed tree project will cost $10 if you bring a frame, $25 if I provide a frame similar to this picture.

Come back tomorrow to see another project you can make on this fun crafting day

Wednesday, September 9, 2015

Oh What Fun Tag kit

An overview of the tag designs
A gold foil doily and silver snow flake made these tags stand out.
     How would you like to get your Christmas Present Tags ready way ahead of time?  This kit called Oh What Fun and the coordination stamp set with the same name accomplished that for me and was really fun to make.  There are 10 designs with 3 tags for each design.  I followed the directions that came with the kit and found them easy.  Sometimes I just want to create something without having to think too much.  This was just what I needed.  
The same three colors were used on all the tags.  Mint Macaron, Garden Green, and Real Red.
A couple of the tags had jingle bells.

The golden snowflake and tie made these cards perfect.

I feel great about having 30 gift tags ready to go.  Now, I will just have to remember where I have put them in 3 months time!


Sunday, December 14, 2014

Anything But a Card, Simple Sunday


     A handmade ornament makes a great Christmas gift topper, or a gift for a special friend.  This is a simple ornament that looks great.

Bow maker Big Shot die
Circle punches, 1 center of bow, 1 1/4 face, 1 1/4 plus 1 3/4 for halo

A Round Array stamp set for the design in the center of the bow

How simple is that!  I think that several of these angels, each one made a little bit different would look elegant on a tree.  What do you think?

Saturday, December 13, 2014

Anything But a Card-Scrappin Saturday


     Nothing looks better on a present than a handmade tag.  With your handmade tag your gift wrap paper can be very plain. To help them out, each stamper made 3 simple tags that could easily use leftover scraps.
All 3 tags used our new tag topper punches.  Love how easy it is to make great tag toppers.

Tag 1  Eveyday Wishes stamp set
           Scraps of Silver glimmer paper, Whisper White and Cherry Cobbler

Tag 2 Punches Galore
          Festival of Trees punch, Star punch, 2 1/2 inch circle punch
          Crumb Cake card stock, Nordic Noel DSP, Trim the Tree DSP

Tag 3 White Christmas, So Very Happy stamp set
          Nordic Noel DSP, Real Red, Whisper White, Garden Green card stock


Friday, December 12, 2014

Fix it Friday


     I knew that when I went to Knollwood this month I wanted to create a card that looked like Santa.  The ladies ask me each year for a Santa card and I have no Santa stamps.  I thought this card was so cute and reminded me of the treat boxes I wanted to give the ladies. Punches and a stamp that's all I needed for such a cute card.


I also thought this card would be a cute card to make in my Christmas Through the Year class but knew I needed to step it up a bit.  Can you see what I did?

1. Used the Fancy Fan embossing folder on Santa's shirt

2. Used the Arrows embossing folder on the belt to give it more texture

3. Finally made holes in the buttons and added some baker's twine to make the buttons look real.

Still a really cute card, but the extra texture makes it even better than the simple version.

Tuesday, December 2, 2014

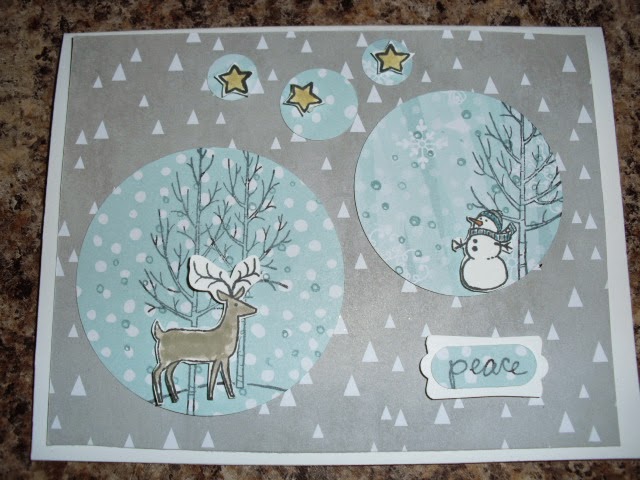
White Christmas-Template Tuesday


     Have you been keeping track of the number of stamps in this stamp set?  I have used 5 from the set on this card.  Since I have been back posting on my blog, I have been trying to enter some challenges to keep my creative juices flowing.  The challenge for this card was to follow the sketch from Pals Paper Arts.  It was fun to combine the stamp set and the sketch.
 

Stamps used:
    Deer
    Snow
    Snowman
    Star
    Tree

How many more images do you think there are in this set? And the big question will I be able to find a way to use all the images?  Check back each day and see.

Thursday, November 7, 2013

3-D Thursday More Reindeer treat holders


    Have you ever had so much fun with something it is hard to stop?  Well, Linda and I have had so much fun creating little treat holders it seems we don't want to stop.  This is one of the latest creations.

1. Cut brown card stock to measure 7 1/2 by 1 3/4 inches.  Score it at 1/2. 3 1/4,4 1/4, 7 inches.

2. Fold on score lines.  The top and bottom folds will be at the top of the treat holder.

3. Use the following punches to make the reindeer
   Owl punch
   Leaf from bird punch for the antlers
   1/2 punch for nose and white of the eye
   Small punch ( I call mine the school punch because I used it a lot when I was teaching.

3. Place the dum dum on the inside with some glue dots on the bottom.  Attach sticky strip to each of the 1/2 inch folds to hold the top together.

4. Final touch, tie a red ribbon around the top of the dum dum stick and your treat is finished.

Wonder what we will come up with next/

Thursday, October 31, 2013

3-D Thursday, Tic Tac holder


     Another day with Linda, another fun treat container.  Linda found this idea somewhere out there in the internet.  She had the idea in her head and we did our own thing.  I had never seen the idea so this is what I came up with.  We are a great team, she comes up with the ideas, and punches out the parts, and I do the assembling.

Not sure how well the picture turned out, but the bottom ball of the snowman is punched out so the white Tic Tacs show through.  Whomever thought of this idea was very clever.  Wouldn't this make a great stocking stuffer?

Saturday, October 26, 2013

Scrappin Saturday-Using up Little pieces


     Here is our latest creation.  Linda comes up with the ideas and I help her put the creations together.  I think we make a great team.  Don't you love how the antlers are the candy canes.  This made the reindeer a little top heavy so we put a tiny kit kat bar on the inside.  Now they stand up.  Other than the body can you see all the scraps we used to make this creature.


     The original sample we were copying had a jack-o-lantern face on the pumpkin, but without the face this could be a great table decoration for Thanksgiving.  Can you guess what is in the inside of this pumpkin?  If you guessed a dum dum sucker then you were correct.

   This has been so much fun we are wondering what holiday we can make things for next.


Saturday, October 19, 2013

Scrappin Saturday-Using up Scraps

    
     Today is the day that I was hoping to have a new scrapbook layout to share.  But, I don't quite have one ready.  So, I thought scrappin could also mean using little scraps of paper for a project.  So that is what I did.  Linda came over and we made these darling snowmen treat holders.  Can you see all the scraps we used?  Do you wonder what we have inside each little snowman?  Well, we used Kit Kat mini bars, but anything that size would fit in just fine. 

Monday, October 14, 2013

Miscellaneous Monday-Another Freshly Made Sketch


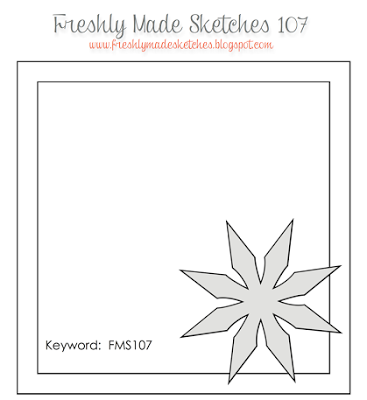
     I think I am hooked in trying out the weekly sketches from this website Freshly Made Sketches.  This week, I decided to make a Christmas card with the sketch and if I liked I would make it one of the featured cards for my clubs this month.

    
     I really liked this card but it did not have the WOW factor I was looking for.  You see I am trying to get my card selected for the week.


     I looked at the card stock that was leftover after I made two snowflakes with the Festive Flurry stamp set and matching framelit for the above card.  I thought to myself,  "That looks like it could be a stencil." So, I used two colors that were in the Winter Frost designer paper and sponged the snowflake background.  Next, I used the Festive Flurry framelit to make an accent snowflake. I finished it off using a Vintage Faceted designer button with a baker's twine bow.  The final touch was the saying from the set More Merry Messages.  I loved the end result.  Which card is your favorite?

Friday, January 11, 2013

Cards from Friends

From Arlene
From Elaine
From Becky
From Kathy
From Anna
From Robin
 
     Sadly, it is time to put Christmas away.  While I was gathering up cards, projects, and decorations I decided to share with you the rest of the hand made cards I was sent this year.  Each of them was unique in its own way.
  I loved the way Arlene used the technique called stamping off with her trees.
  Elaine put her own twist to a card we made in class, and I love the monochromatic look to the card.
   I must copy the wonderful elf on Becky's card and use it next year.
   The sponging of an accent color on Kathy's tree adds a great touch to her card.
   Anna slipped a current picture of my great neice and nephew under the corner of the ornament on her card.
   Robin used the tri-fold card from My Digital Studio for her card, and on the back is her family's Top 10 for 2012.
 
     Thank you to everyone who thought of me this year with a handmade card.  I appreciate all the effort and caring that went into the creating and feel priviledged to have received the result of your efforts. Now, on to a new and exciting 2013!

Thursday, January 3, 2013

Candy Canes from Leslie


     Leslie is my closest upline.  Here's how that goes.  My sister Karen, is the demonstrator that I joined up under, Karen joined up under Leslie, so Leslie is what is called my upline.  Leslie sent me this adorable Christmas card.  Inside she wrote her message on a post-it note, so I could remove the note and send the card onto someone else.  I love that idea, but decided this year to keep the card for inspiration.  There are several of my favorite items in this card.  If you haven't been able to guess what they are by now I will tell you.....
   Designer paper
   Framelits
   Ribbon
   Matching stamp set
    Framelits are as good as punches in my eyes.  You stamp the image of your choice, place a framelit over the image then run both items through the Big Shot and it is just like you punched the image out in the first place.  I am wondering what your favorite tools are that StampinUp carries?

Wednesday, January 2, 2013

Ho, Ho, Ho

 
     Dana, one of my downline and friends,  made this card and sent it to me for Christmas.  Here is what I love about it.
 
           1. Simple design
           2.  The use of the punches to take the place of the O's
           3.  The solid background cut from the Big Shot Top Note die.
           4.  The Designer paper mixed in with the solid colors.
 
    Thanks Dana for a great card.
 
    Now, I'm thinking how can I use this layout to make a card for Valentine's Day.  Look for my version of Dana's card in the next few days.
 

Tuesday, January 1, 2013

Happy New Year


     One of the things I love about the Christmas season is giving and receiving Christmas cards.  This year it seemed I received more hand made cards than usual and those are always my favorites.  This card was sent by my sister Nan, who lives in Eugene, Oregon.  She has a very distinctive style of stamping, simple designs that are very symmetrical.  The background of this card is embossed with glitter and looks just like it looked around here yesterday; soft, silent snow drifting onto the branches of trees.  Don't you love the simple dash of red of the bird on the tree.
     My wish for everyone this coming year is to have peace, time with loved ones, and an appreciation of others.

Thursday, December 20, 2012

Snow for Christmas (Just not too much)


     I don't know about you but I am feeling a little bit of pressure to finish all the things I want to before my kids come home.  When I had a headache for three days, I stopped and thought hard about things and decided the most important thing for me about Christmas this year was to enjoy the family that is coming to visit.  My kids (4) and their families only come home for Christmas every 2 years so I do not want to be so stressed out by trying like a madwoman to get everything done that I can not enjoy them. So, here's to enjoying what we do even if we do not complete all the items on the list.
     This card was the make n take for one of the Jubilant Butterfly meetings.  Here are the reasons I like this card.
   1.  The image is from one stamp that you can buy individually.
   2.  The colorful background is made using strips of Holiday Cheer designer paper.
   3.  There is a little bit of glitter on the snow using the Silver Dazzling Details.
   4.  The card can be completed in under 10 minutes.
What are the reasons that you like this card?
Supplies needed:
Holiday Cheer designer paper
Whisper White, Cherry Cobbler, Gumball Green card stock
Silver Dazzling Diamonds
Frosty Friends, Sweet Essentials stamp sets
Owl punch ( heart)
Gumball Green 3/4"stitched satin ribbon


Wednesday, December 19, 2012

Kissmas Trees by the Dozen


     Aren't these the cutest things.  I have seen samples all over the internet and actually watched a video on how to make them.  I wanted something simple to take to Knollwood with me when I went last week so I made 12 trees.  I never know how many ladies will show up and wanted to make sure I had enough for everyone.  I came home with extras and gave them to the Scrapbook Your Life ladies that came last week.  They were a lot of fun to make but I had one serious problem with them.  There was leftover candy.  I have a serious problem with milk chocolate so the leftovers kept calling out my name.  I solved that problem really fast by eating everyone of the leftovers in one evening. Who would you give a cute gift like this to?

Tuesday, December 18, 2012

Knollwood leftovers


     I usually take two cards with me when I go to Knollwood.  Making the cards with the ladies,takes about 1 hour and by then the ladies are ready for a different kind of activity.  When I made the card I posted on Sunday, I had lots of punched pieces leftover.  Not one to waste, I wondered what I could do with those punches and came up with this card.  The ladies loved the card and I loved that the leftover pieces had a use that I liked.  So, what did I do ahead of time for this card?  I punched out one more ornament, embossed the Cherry Cobbler ornament with polka dots, punched out the Decorative Label, and tied 45 bows.  Yes, that is not a typo, I tied 45 bows.  It was not as hard as it sounds, because I did it while watching, listening, to a TV show. What would you do with the leftover ornament punches?
Supplies needed:
Polka Dot designer paper
Whisper White, Cherry Cobbler Old Olive card stock
Old Olive ink
Ornament, Decorative Label punches
Cherry Cobbler, Old Olive 1/8" taffeta ribbon


Monday, December 17, 2012

Ornament Exchange


     When the Super Snails, my downline group, met this month we had an ornament exchange.  It was really fun.  Each person that came brought an ornament or two that they made and we played a simple game to decide which one would be ours.  I loved the variety in the ornaments that were exchanged.  The last picture is the ornament that I made.  I had seen an ornament like this on Patty Bennett's website which led me to a video on how to make the ornament.  Basically you use the Circle big shot die, cut it in half, and glue parts together.  The lacy look on the skirt was made by the Paper Doily Sizzlit.  The only item on the angel that is not a StampinUp  product is the pearl I used for the angel's head.  I used the wonderfully sticky Multipurpose Liquid glue to hold all the parts together. Wouldn't these look great all over a Christmas tree?
Supplies needed:
Snow Festival designer paper
Whisper White card stock
Circle die, Paper Doily sizzlit for big shot
White baker's twine
Neutral button 
 

Sunday, December 16, 2012

Stampin at Knollwood


     Once a month I go to a local Assisted Living Facility and make cards with a wonderful group of ladies.  Most of the ladies who come are in their 80's and it feels like I am once again with my mom when I go.  I have learned a few things about working with Seniors from the four years I have been going to Knollwood.
    1.  Simple is best.
    2.  It is hard for most of the ladies to use the punches, so I prepunch everything that I can ahead of time.
    3. When stamping a saying, stamp on something that can be attached onto the ,in case something ends up being crooked, it can be re stamped.
    4.  They love to place a stamped by you stamp on the back of the card.
    5.  They will love whatever I bring for them to make.
    6.  It can change my attitude in a positive manner for the rest of the day.

     I prepunched the ornament on the front of the card holding both the accent sheet and the card front together as I punched.  The ladies stamped the inside ornament and I punched it out for them.  The inside ornament was glued into the punched out hole on the front and therefore perfectly placed. A simple but cute card.
Supplies needed:
Cherry Cobbler, Whisper White card stock
Old Olive ink
Ornament punch
Candlelight Christmas designer paper (Holiday catalog)
Rhinestones
Cherry Cobbler seam binding