Do you recognize these designer papers? They are called Picture Perfect 6 by 6 designer series paper. One side is a picture of a party element and the other side is a design in the same colors. Fun to flip then over like I did.
A favorite thinlit to use on anything related to a birthday is this one. It is called the Happy Birthday thinlit. I can be hard to lay down on paper with getting glue everywhere until you back it with a piece of adhesive sheet.
Tomorrow I will share with you a layout I made in February for Valentine's Day, Anniversary, Birthday, or any special event for someone you love.
Product List
Showing posts with label Picture Perfect Party designer paper. Show all posts
Thursday, March 29, 2018
Friday, February 23, 2018
Birthday Wit-Fun Friday
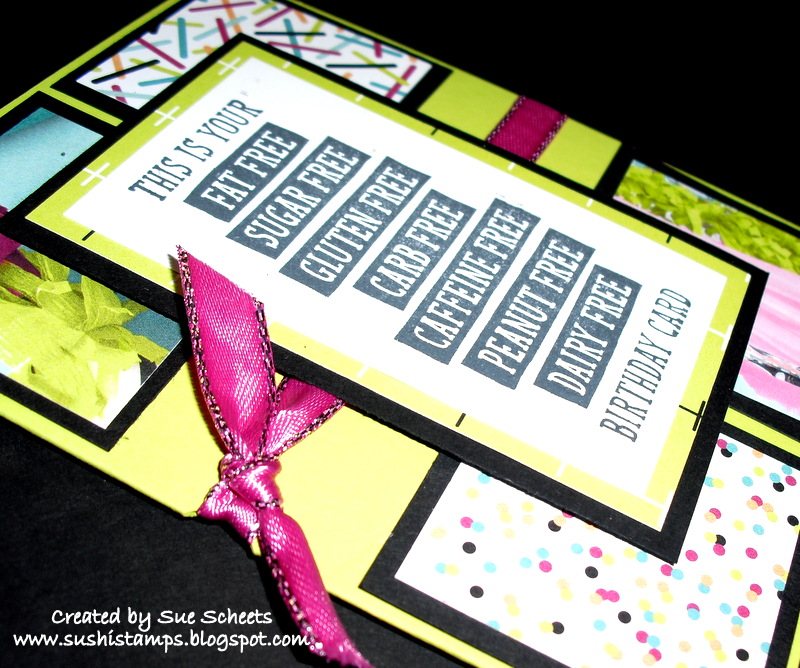
Check out the designer paper in the background. I showcased 4 of the designs in the Picture Perfect Party designer paper. 2 show the photos, and 2 show the designs. Can't you see how you could repeat this card by using different papers in the designer paper spot.
Can you see why I like this stamp from the Birthday Wit stamp set the best? It kind of says it all about all the things we have to worry about any more. So lets just send a card with nothing to worry about on it except to just enjoy your birthday. Do you know someone that would enjoy this card?
Hasn't this been a fun week? Next week will be Magical. Come back for some really fun cards that will make you smile.
Thursday, February 22, 2018
Happy Birthday Thinlit-Template Thursday
I love these bows. This paper is so much fun to use. One side is photos of birthday items, and the other is designs using the same colors. Can't you see duplicating this card using a different piece of the Picture Perfect Party designer paper on each card.
When you sign up for my Everything Birthday Card Cafe, you will receive a pack of this designer paper as part of the class fee. Great deal!
I love using this Happy Birthday Thinlit die. Does is look hard to glue onto the page? There are two things you can use to attach it to your card stock.
1. The Fine tip Glue pen. It gives you a very tiny bit of glue that allows you to attach very small pieces of card stock to your backing. The one caution when using this is to put the lid back on after every use to keep the glue from drying in the shaft.
2. Multipurpose Adhesive Sheets. First, you take the layer with the writing on it off of a section of the adhesive sheet. Then you attach the sheet on the back of your cardstock. Finally, cut out the words with your Big Shot. Make sure the adhesive backed sheet is on the bottom where you can't see it. Otherwise your words will come out backwards. (Voice of experience speaking)
3. Now take the remaining part of the Adhesive sheet off the back of your words and the are ready to attach to your project. No mess for you or your paper.
Tomorrow I will share a way to show off a lot of the designer paper in a simple card.
Product List
When you sign up for my Everything Birthday Card Cafe, you will receive a pack of this designer paper as part of the class fee. Great deal!
I love using this Happy Birthday Thinlit die. Does is look hard to glue onto the page? There are two things you can use to attach it to your card stock.
1. The Fine tip Glue pen. It gives you a very tiny bit of glue that allows you to attach very small pieces of card stock to your backing. The one caution when using this is to put the lid back on after every use to keep the glue from drying in the shaft.
2. Multipurpose Adhesive Sheets. First, you take the layer with the writing on it off of a section of the adhesive sheet. Then you attach the sheet on the back of your cardstock. Finally, cut out the words with your Big Shot. Make sure the adhesive backed sheet is on the bottom where you can't see it. Otherwise your words will come out backwards. (Voice of experience speaking)
3. Now take the remaining part of the Adhesive sheet off the back of your words and the are ready to attach to your project. No mess for you or your paper.
Tomorrow I will share a way to show off a lot of the designer paper in a simple card.
Product List
Wednesday, February 21, 2018
Birthday Wit-Wednesday WOW
Aren't those little blowers the cutest thing ever? They are actually make using 3 stamps. But if you follow the multiple stamp process they are easy to put together.
1. Stamp the blower part first.
2. Look through the stamp to place the fringe piece next.
3. Stamp the solid long piece third.
4. Add dots or stripes or both on top of the solid piece and you have a cute blower that looks ready to use.
I think the Birthday Wit stamp set is clever with a bit of humor. When I showed this card to my husband, his comment was.."finally, they have a stamp set with some humor to it." Friday's card has my favorite saying from this set. Be sure and check it out.
Tomorrow I will share a card that would be easy to duplicate using a different piece of the Picture Perfect Party designer paper on each card.
Product List
1. Stamp the blower part first.
2. Look through the stamp to place the fringe piece next.
3. Stamp the solid long piece third.
4. Add dots or stripes or both on top of the solid piece and you have a cute blower that looks ready to use.
I think the Birthday Wit stamp set is clever with a bit of humor. When I showed this card to my husband, his comment was.."finally, they have a stamp set with some humor to it." Friday's card has my favorite saying from this set. Be sure and check it out.
Tomorrow I will share a card that would be easy to duplicate using a different piece of the Picture Perfect Party designer paper on each card.
Product List
Monday, February 19, 2018
Picture Perfect Party designer paper-Miscellaneous Monday
Do you like to make a simple easy card? Well, this card is very easy and here is why.
1. Most of the card is designer paper.
2. There is a simple saying on the card that can be cut out using the Big Shot.
3. A tiny little bow sets off the card.
This is one of the cards that will be featured in my Everything Birthday Card Cafe to be held on March 5th. So, if you live anywhere near me sign up and come for a fun afternoon or evening. Need more details, then contact me at sue.scheets@gmail.com.
A new week, and a new chance to win a card by leaving a comment on my blog. Hope to hear from someone this week.
Tomorrow I am going to show you a card made with a two step stamp.
Product List
1. Most of the card is designer paper.
2. There is a simple saying on the card that can be cut out using the Big Shot.
3. A tiny little bow sets off the card.
This is one of the cards that will be featured in my Everything Birthday Card Cafe to be held on March 5th. So, if you live anywhere near me sign up and come for a fun afternoon or evening. Need more details, then contact me at sue.scheets@gmail.com.
A new week, and a new chance to win a card by leaving a comment on my blog. Hope to hear from someone this week.
Tomorrow I am going to show you a card made with a two step stamp.
Product List
Subscribe to:
Posts (Atom)