I will be taking a short break from blogging. I have to have surgery on my foot, and need to prop my leg for the next 3 days. I'll be back as soon as I can.
Sushi the Stamper
Scrappin' and Stampin' It's what I love to do
Friday, October 24, 2014
Thursday, October 23, 2014
Paper Pumpkin Week-Bootiful Bags

Halloween treat bags ready to go to three great guys I see 4 days a week. But I was able to make so much more with this cute paper pumpkin kit.
 |
| A Sushi Original, yes I designed this one myself. |
 |
| Created by Rachel Tessman at Stamp Your Art Out. |
 |
| Boni Montane cut apart one of the bags to make this cute card. |
 |
| A bunch of cute cards inspired by cards I found on Pinterest. |
 |
| Finally a new batch of mini cards using up all the wonderful stickers I found in the kit.
Isn't this fun! Tomorrow I will be featuring some cards and 3-D items I made using the Pinwheel Party kit.
|
Wednesday, October 22, 2014
Paper Pumpkin Week-Wish Big

I would send this card to my grandchildren, who would you send it to? This Paper Pumpkin kit had enough supplies to make 6 cards and 6 boxes like the samples above. But guess what I made with all the supplies.......
 |
| Love the simple candles in this card made by Susan Campfield. |
 |
| Forgot about how much fun a shaker card could be. Thanks to Alison Stachera for this cute card idea. |
 |
| Cutting off an inch on the right hand side made a great place to attach some stars. Found this idea on the blog called My Pumpkin Challenge. |
 |
| Simple card made by stampin pretty |
 |
| Card sample found on stampwithtammy. |
 |
| Rachel Tessman created this awesome scrapbook layout with the components of the card kit. |
 |
| Finally you have to have some mini cards to use for thank yous.
Check back tomorrow to see what can be done with the Boo-Tiful Bags Paper Pumpkin kit.
|
Tuesday, October 21, 2014
Paper Pumpkin Week-Seriously Amazing
 |
| These were the cards described in the kit. |
 |
| klompenstampers is where I got my inspiration to punch some circles out of the background papers. |
 |
| I found this card's inspiration from stampinpretty. |
 |
| jamillastampingrounds.BlogSpot.com is where I found this great idea. Note how she used the reinforcers in a totally different way. |
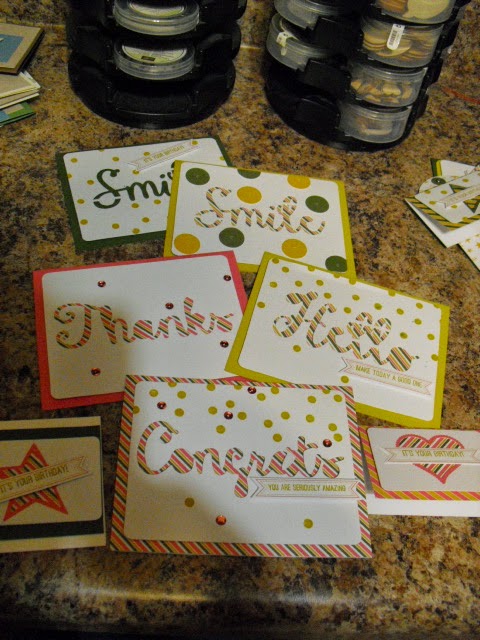 |
| Lots of supplies for lots of cards. |
 |
| Some Sushi Originals. Does this tempt you to consider becoming a subscriber to My Paper Pumpkin. Check out the website and if you want to join then list me, Sue Scheets as your demonstrator. I would love to help you with these fun stamping kits |
Monday, October 20, 2014
Paper Pumpkin Week-Hey Man
 |
| The first cards are made just like the sample. |
The first box I made up was called Hey Man and could have been cards for Father's Day. (Yes, that was 4 months ago!) My father is no longer with me, so I decided to make them into birthday cards, for all the males in my family.
I always make one set of cards just like the sample and then I go to Pinterest and search.
 |
| Made by Debbie Henderson |
 |
| Made by Rachel Tessman of Stamp Your Art Out. She makes a video of Paper Pumpkin alternate ideas each month. |
 |
| Made by the blogger from remarkablycreated.com |
 |
| Sushi Original cards that I created using some of the leftover supplies. |
 |
| There were even enough leftovers to make some mini cards I use as Thank You cards in my customer's orders. |
Saturday, October 18, 2014
Freaky Friends-Scrappin Saturday

Next week, I will be featuring My Paper Pumpkin kits and all the alternative cards I have made with the supplies. I am finally getting caught up.
Friday, October 17, 2014
Freaky Friends-Fix it Fast Friday

I love Washi tape! This fast Halloween card made with Freaky Friends will make any one you send it to smile. Can't you see duplicating this card many times and on each card place on of the images in the stamp set. Voila you have a cute set of cards ready to go!
Thursday, October 16, 2014
Freaky Friends-3-D Thursday


I used the new Kraft paper to cut out the box, but decorated it using Versa Mark and one of the stamps from the Holiday Invitation stamp set.
What would you put in this cute little box?
Wednesday, October 15, 2014
Freaky Friends- Wednesday Wow

Do you wonder how those splotches in the background of this card are made? They are made using a fun technique I found on the site called The Friday Mashup and here is the simple way you can make them yourself.
1. Drop a small amount of reinker on a section of cardstock. I used white and the colors Basic Black, Blackberry Bliss, and Tangelo Twist.
2. Take a straw and blow as hard as you can onto the reinker dot. Move the card around and blow everywhere you see some wet ink.
3. Drop another color close the the last one you used and continue the process until you get the look you want.
When I looked at my finished background all I could think of was using the eyes from Freaky Friends and emboss them in gold. I loved my finished card. What do you think?
Check out this challenge site called Fab Friday and enter a card of your own design using their current challenge.

Tuesday, October 14, 2014
Freaky Friends-Template Tuesday

1. I was able to use a little bit of the tree on one of the pages of the Motley Monsters designer paper for my up and down focus.
2. I stamped all the little monsters from Freaky Friends that I had not used before and decided they might look cute standing on each other's heads.
3. The saying looked cute in a word bubble.
Check out yesterdays post and see if you can notice how I changed up the template.
Monday, October 13, 2014
Freaky Friends, Miscellaneous Monday

Does this cute witch make you smile like she does me? I made this card for the challenge on the Freshly Made Sketches site.

Look for some more cards this week, made with Freaky Friends this week's featured stamp set.
Sunday, October 12, 2014
Freaky Friends-Simple Sunday

Another trip to Ohio, a successful garage sale with my daughter, and now back to stamping. This week, I am going to feature Freaky Friends in my postings. I thought I would start out with a cute but simple card. Where did I find this idea, why looking on Pinterest of course.
1. Cardstock is cut from a 12 by 12 sheet of Whisper White sized 3 by 6.
2. Designer paper from Back to Black cut 3 by 3 is attached to the top of the notecard.
3. Vellum cardstock cut 3 by 3 is attached on the left hand side of the card front with 2 glue dots.
Now, how easy is that.
Other supplies used:
White and Tangerine Tango two-toned trim
Memento Black ink stamped directly onto the vellum
Freaky Friends stamp set
I think these will be my October thank you cards. They are so cute and so easy.
Sunday, October 5, 2014
Kinda Eclectic-Simple Sunday
 |
| Final card the top Super Snails will receive in their gift box. |
A card does not have to be detailed to get across the message and to be good looking. The star image in the Kinda Eclectic stamp set is so stunning that is does not need a lot to make it stamp out. The centers of the stars are made using 2 gold buttons of different sizes one on top of the other. I know I would feel good receiving a card like this, wouldn't you?
I have had a great time finding ideas to use this great stamp set in many different ways. I wonder what stamp set will be featured next week......maybe something for Halloween.
Saturday, October 4, 2014
Kinda Eclectic-Scrappin Saturday
 |
| 3rd card the Super Snails of the Year will be receiving made using the Kinda Eclectic stamp set. |
Do you save your scraps of card stock and designer paper? I do unless the piece is less than 1/2 inch wide. This card has several items on it that could be made from scraps.
1. Butterflies from scraps of vanilla card stock
2. Large oval of vanilla could be a scrap, just make sure you stamp first then punch out your oval.
3. The Wisteria Wonder Decorative Label punch was made with a small scrap.
So, if you have been throwing out your scraps, you might think about saving them in a small folder right next to your full sheets of card stock. You never know when you might be able to use them.
Friday, October 3, 2014
Kinda Eclectic Fix it Friday

This card was another make n take from convention using the stamp set Kinda Eclectic. It was fun to make and used almost all the stamps in the set. One of the things we learn how to do is step up a card. So, we made a second version of this card only stepped it up a bit. See if you can notice how we stepped it up.

2. We inked up the honeycomb embossing folder, then pressed our card stock onto the inked side.
3. We added loops of linen thread as accents behind the saying.
4. Finally, we added a thin strip of designer paper to help the saying stand out.
Which is your favorite version?
Thursday, October 2, 2014
Kinda Eclectic Notebook-3-D Thursday

Don't you love having a little notebook in your purse for when you need to jot down something important. I use one to write down titles of books someone has recommended or movies I want to see. This little notebook was one of the make n takes at convention this year. And once again it uses the stamp set Kinda Eclectic. What would you use this cute little notebook for?
Wednesday, October 1, 2014
Golden Kinda Eclectic-Wednesday Wow

Do you like the look of embossing as much as I do? I remember when I first started stamping the idea of embossing sounded like too much work. Of course, then I did not have a heat tool and used the toaster, or the burner to help melt the powder. And yes, that was a lot of work. But now using our wonderful heat tool make the embossing so easy.
So, this is day 3 of using the Kinda Eclectic stamp set. I like this look because it uses just part of several of the stamps in the set. Grey and gold look great together and give the card a rich look. The embellishment at the bottom is a gold button with a pearl in the middle. The antenna of the butterfly were made using a loop of linen thread.
What colors make a card a wow card for you?
Subscribe to:
Posts (Atom)