Wednesday, July 31, 2013

Fancy Folded Flower


     Yesterday I held my first Technique Tuesday class.  The featured technique was called Fancy Folds. I featured the This and That Epic Day designer paper.  I tried to find a tutorial to make the card and could not find one.  So, here is my attempt.

1. Cut a 12 by 12 sheet of cardstock into a 4 by 12 piece.

2. Score the cardstock at 2,4,8,and10 inches.

3. Make an accordion fold so the outside edges meet in the center.

4. Open one edge, center the punch you want to use so that 1/2 half of the punched image is against the folded edge.

5. Mark the top and bottom edges of the punched image on the opposite fold, align the punch on the pencil marks and punch that edge.


6. If you were successful the punched edges should line up.
Attach some designer paper on top of the top edge making sure to just glue the top, bottom and outside edge.

7. Turn the top flap over and repunch the designer paper. Repeat for other folded edge.

8. Finish your card with your choice of embellishments and sayings.

Tuesday, July 30, 2013

Pop Up Medallion


     Doesn't this card look like it would be too big to fit into an envelope?  Well, what makes it look so big is the circle punch added behind the top layers of cardstock.  I love the color combination in the Birthday Basics designer paper and used them as the accent colors.
    Who would you give this card to?

Monday, July 29, 2013

An Elephant for a Birthday card


   Everyone loves an elephant!  Usually I do not like the colors of red and orange together in the same card, but I do love how they look here.  A couple of tricks make this card pop.

1. Stamp the elephant twice.  The second time just cut out his hat.

2. To make the red accent piece that is placed behind the Happy birthday fit just right.  First cut the red rectangle a little bit bigger than the framelit, the add two 1 inch circles on each side to finish the accent piece.

Who would you give this elephant card to?

Sunday, July 28, 2013

Balloons for your Birthday


     Every birthday party needs some balloons.  These were so easy to make.

1. Punch out the balloon using the 1 3/4 inch punch.

2. Punch a smaller circle using the 1 3/8 inch punch. 

3. Set the circle aside.  Place your punch against one edge of the circle and punch out a sliver that looks like the moon.  Cut the top off the sliver for the accent in the balloon.  

   Now, what can be easier than that!

Saturday, July 27, 2013

Pretty Idea for a Punch


    Can you picture the reaction a little girl would have to receiving this card for her birthday?  I received this quite a while ago as a swap idea and fell in love.  I love anything that has to do with punches.

1.  The skirt is embossed on card stock vellum and then punched out.  Any design will work.

2. The top of the dress is the retired label punch, but the top of one of the Dress Up Framelits would also work.

3. The string of pearls was taken from the pearls that are attached together so therefore quite easy to match up.

   This was a featured card in my Birthday cards for kids class.  As my grandson used to say Love it Love it Love it.

Friday, July 26, 2013

Look What a Punch can Do

Turn the Curly label punch into a purse


     Wouldn't this be a cute card for a teenager, or a little girl?  The Curly Label punch has two sides, a long and a short.  If you fold the long layer down about 1/4 inch you have the base of your purse.  How do you make the handle?

1.  Punch the large oval punch making sure you have room on all edges to punch another shape.

2.  Place the scalloped oval punch around the hole that is left from your first punch.  Center it and then punch.  Now you can cut what is leftover and you have two handles.

Easy Peasy!

Another great way to use Designer paper and take advantage of the special that ends July 31st.  Buy 3 get 1 free!
 

Thursday, July 25, 2013

Designer Paper makes the card


     I love using Designer Paper as the background for a card.  It really sets the tone for the rest of the card.  This is one of the cards we made in the Kids Birthday card class held yesterday.  Once I made the decision to use the Birthday Basics background paper, I just picked coordination colors for the accent pieces.

Colors; Basic Grey, Bermuda Bay, Gumball Green

Stamp Set: Chalk Talk

Framelit: Chalk Board

This is the last week to take advantage of the Designer Paper Sale.

BUY 3 GET ONE FREE! I have my list ready, how about you?

Wednesday, July 24, 2013

Dream Card

Dream inspired card


     The 25th year convention was so inspiring, exciting, and exhausting.  I was so glad to get home to my own bed and my own house.  I had a great sleep and a wonderful dream.  Shelli Gardner (CEO of StampinUp) came to my house to help me redecorate.  We had wonderful conversations and the start of the decorating was a dress form.  So, of course I had to make a card to commemorate such a wonderful dream.

Supplies used
Dress Up, Bitty Banners Framelits
Afternoon Picnic Designer paper
Basic Grey, Whisper White card stock
Pearls
Candy Dots
Express Yourself Hostess stamp set


Saturday, July 20, 2013

First Convention Gift, the Backpack


    This was the long awaited convention bag.  We usually see it when we check in, but this year it was the first things everyone at convention received.  It is silver and white, has lots of pockets and zippers and very comfortable to wear.

Friday, July 19, 2013

Riverton Campus tours

Amanda, Sue and Cyndi at Riverton Campus


    Today convention started with tours of the Riverton Campus where all the Stampin'Up! orders are filled. We had a great time looking over the facility.  Cyndi had never been to convention before so it was great fun to experience it all through her eyes.


Wednesday, July 17, 2013

Twist card technique

Outside of the Twist card


   Yesterday was the July meeting of the Press Club.  Each month we make 2 cards based on a technique.  This month the featured technique is 3-D cards.  The first card the girls made last night was this twist card.  I found a great tutorial on how to make the card on Julie Davison's blog.  You can see it here.  She is such an inspiration to me.
   Even though the card looks very complicated it involves just two scoring lines on an 11 by 4 1/4 piece of cardstock.

Inside of Twist card with a pocket for a gift card

Supplies used
Sweetly Framed Hostess set
Bermuda Bay card stock and ink
Birthday Basics designer paper (Special going on Buy 3 DSP get one free)
Itty Bitty Shapes, Decorative Label, Pansy, Bird builder, punches
Basic Pearls

Getting ready to leave for Utah and the annual Stampin'Up! convention.  Look for postings the rest of this week for the exciting things I know we are going to see.

Tuesday, July 16, 2013

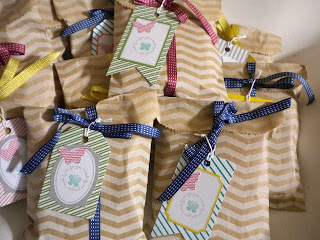
Goodie Bags for Butterfly Friends


   About 13 people from my upline's group called The Butterfly Friends are going to be at convention.  I wanted to be able to give each one something simple so I ordered the Tag a Bag Gift Bags and the Tag a Bag Accessory kit and made up these bags for those attending.  What do you think is inside each bag?  Email me your answer and I will let you know if you are correct or not.


   All the bags ready to be packed in my suitcase for the flight to Salt Lake City. Watch for future postings about the convention.

Monday, July 15, 2013

Gifts for My Roommates


     I have made some gifts for my roommates, kind of a tradition stampers have been doing for years.  The outside of the folder looks like this picture.

   When you open up the folder this is what you see.  The two pockets on the left side can hold stamps, credit card, business cards, receipts, the center portion opens up and there is a pen that has the same Designer paper inside to help it match.

   When you open up the inside you find a little notebook that can be used for whatever you want.  The entire folder can fit in your purse or carry-on luggage.  A item to have on hand when taking a trip. I hope they like this gift. contact me if you would like the directions to make a gift like this of your own.

Sunday, July 14, 2013

Cards for the Seniors


     Last Thursday was my day to go to Knollwood and stamp with the seniors.  This is the first card they made.  I had posted a similar card I copied from Mary Fish.  I changed it up for the seniors thinking they would like to vary the colors they placed on each square and I was right. Notice that the saying has been stamped and then punched out.  I learned very quickly that I needed to do that because the ladies often rock the stamp and get unwanted lines.  Nothing like a punch to eliminate unwanted lines.


     I designed this card to help me use up some retired designer paper.  The ladies love using Designer paper and often use the reverse side from what I did.  They placed the pieces on their cards in several different ways which sometimes looked better than mine.


Saturday, July 13, 2013

Washi Tape Fun


     I decided that one of my swaps for convention needed to be a Washi tape swap.  I love using the tape.  In just a short time I had 20 swaps made using the new Season of Style Washi tape that is featured in the Holiday Catalog.  I was able to preorder the tape and customers will be able to order it starting August 1.  Look for your catalog in the mail soon if you are one of my customers.

    Now that I was inspired, I decided to use the new Witches Brew Washi tape also in the Holiday catalog to make a similar card.  I love using the same template to make several different cards.


    Which card do you like the best?  I wonder what other Washi tape cards I can make using this same template?


Thursday, July 11, 2013

More DSp Fun


   One of the things I love using is Designer Paper and I have had such great fun trying out all the different patterns I have with the same sketch.  This paper is called Birthday Basics.  Most of the designs in the package have balloons, candles, what you would expect on birthday paper, but this design is really different.  I love the color combination and actually tried to copy the flower image in the paper as my accent piece. Following the sketch has really opened up my creativity. I handed out this sketch to my downline on Tuesday and can not wait to see what they do with it.  Why don't you try to make a card using the same sketch I did?

Wednesday, July 10, 2013

Strawberry Slush is Enough


     For this card I wanted to make everything the same color. Strawberry Slush is a new in-color and I decided it would be my featured color. So how did I use it in my card?

1. Mosaic Madness Designer paper

  The special for July is buy 3 designer papers, get one for free!  Since I love using Designer paper in my projects this was right up my alley

2. Butterfly punch both large and small

3. Delicate Details Lace tape

4. Label Love stamp set and matching punch Artisan Label


     Can  you see that I turned this sketch 90 degrees to create this layout?  There are so many ways to use one sketch. What colors would you use to make this card?  How would you turn the sketch to make a card of your own?

Tuesday, July 9, 2013

Designer Paper Does it All


     This design from the Soho Subway designer paper did not need much to finish off the card.  I used a simple saying and some punches that brought out the color of the DSP to finish off the card.  The ribbon accent was made by taking two pieces of the Baked Brown Sugar ruffle stretch trim, one on each side of the burlap inspired trim and placing it behind the accent piece.
    The July special is buy 3 Designer papers receive a 4th for free.  Love this special and all the possibilities the DSP offers.
    Does this layout look a little familiar to you.  I am still using the Freshly Made Sketch on my cards I am featuring this week.


     Here are the simple changes I made to the sketch today.
1.  I turned the position of the card
2.  I used 3 layers for the accent piece
3. I centered the background strip
   This has been great fun and using the sketch turned me into a stamping machine. I just decided what the challenge this month will be for my downline.  I can't wait to see what they come up with using this sketch.


Monday, July 8, 2013

Freshly Made Sketches

     What is about this sketch that appealed to me?  First of all the sketch is simple which I am discovering is my style.  Simple with a twist.  If you look at yesterday's post you will see that I followed this sketch almost exactly as it is here.
     Well, I wanted to try several different ways to show the same sketch.  Simple with my twist.


    Here is how I changed up the sketch a little bit.

1. I cut out the Pool Party embossed Dahlia and attached it to square of Crumb Cake

2. I used a piece of Soho Subway designer paper as the background.

3. I placed Crumb Cake ribbon below the accent piece instead of behind it.

4. I added a saying on top of the accent.

   Small changes but a totally different look from yesterday's card.  Using this sketch unleashed a bout of creativity as you will see in the next few posts.  I think I may make this as one of my convention swaps.  Would you swap me for this card?

Sunday, July 7, 2013

A Sketch for a New Card


     How do you find a new idea for a card?  If one has not appeared to me in my sleep, I often try a blog that features card ideas.  Here are a few I like.

1. freshlymadesketches.blogspot.com
     These sketches are very simple, but detailed.  There are some rules to follow if you want to submit your sketch.  I used sketch #93 for this card I made today.

2. SUO Challenge
  The challenge for this site this week was to make a card using your favorite SU product.  This site is for StampinUp products only

3. Pals Paper Arts
   The challenge for this week was to use three current colors.  You are not limited to SU only stamps, just the colors.

There are a lot more challenge sites out there and they really help get your creative juices flowing.   I am going to try this simple sketch with different card stock, DSP and embellishments to see how I can change up the look.  Why don't you try to make a card of your own.

Saturday, July 6, 2013

Look What Came in the Mail!


     One of my favorite things about being a StampinUp demonstrator is attending the Annual convention in Salt Lake city.  It is one of the most positive experiences I have had.  So yesterday I was so excited when I checked out the mail to see an envelope with my name tag which is the one thing you have to have in order to get into the convention.  This afternoon I will be making my swaps and will share them with you the rest of this week.
   The countdown begins......

Friday, July 5, 2013

1 Template, 2 Different Looks


     Sometimes I am just not too sure what kind of card I want to make so I look at previously made cards that I really liked.  I knew I wanted to make a card using Washi Tape, so I looked at the samples from my Washi Tape class.   

    The card on the left was the one from the class, the card on the right is my different look.  Can you see what I changed?

1.  The Honeycomb embossing folder looked to busy for the new card so I just used the Polka dot folder.

2, I changed up the colors of the card to match the Gingham Garden Washi Tape.

3. I used two flower punches instead of the banner

4.  The saying is from the new hostess set called Express Yourself.

     Now, I have two different looks from the same template.  What look can you make from this template?

Thursday, July 4, 2013

June My Paper Pumpkin cards


   My red box came a couple of weeks ago mid lots of company, so finally when my friend Linda came over yesterday to stamp I was able to make up the cards.  I loved the design and saying this month, simple yet attractive.  This first card is made using the original design.  But, I love to research other ideas and change up the cards a bit so I went to my laptop. Here's where I got my ideas.

1. Went to Pinterest
2. Typed in Paper Pumpkin in the search box
3. Scrolled through posted ideas till I found some I liked
4. Either copied the idea exactly, or made my own changes.


     I found a card where the creator stamped the word hello in the windows.  I used the Photopolymer set called Designer Type and found that even though the letters were very tiny, it was easy to place the letters exactly where I wanted them because I could see through the stamp and the block for perfect placement.

 
    I used the ladybug stamp from the set A Fitting Occasion, left out the Soft Suede color and used even more of the adhesive backed hexagons provided in the kit.  I even popped up the bottom ladybug. For the saying I used the one provided in the first kit everyone receives when they join Paper Pumpkin.


  One of the ideas I found on Pinterest showed using just a portion of the card front so I created this card.  The button is from the new In-Color collection called Boutique Details.


     Of course I had  to find something to do with the leftover section of the card, so I created a 4 by 4 card with matching envelope and another image from  the A Fitting Occasion set to make this look more appropriate for a male.  I inked up just the Hello part of the saying stamp for some variety in the saying.


    I still had some leftover hexagons so I made this card with the extras.  When I finished this card, I had no more leftovers and had made 6 cards out of the supplies for 4.  I love My Paper Pumpkin and can't wait to see what the kit is for this month.

   If this sounds like something you might like, then you can sign up by going to paperpumpkin.com and listing me, Sue Scheets as your demonstrator.  Join the monthly fun!


Wednesday, July 3, 2013

Scrapbook Your Life for June


     Monday was the latest Scrapbook Your Life class.  I was trying to think of a layout that would show something other than flowers and looked at layouts on the internet.  I found a card that had this cute BBQ grill and thought that would make a good start to a summer layout. The smoke is from the Everything Eleanor stamp set, the letters are gulp from a "retired" big shot die called Serif Essentials. I usually get rid of all my retired items, but cannot seem to let myself get rid of the big shot ABC's I have purchased over the years. They are just perfect for scrapbook pages.


     Since I like to create 2-page spreads what goes better with a grill than a hamburger, hot dog and some cold lemonade. When my scrappers made the page, they talked about using this for Father's Day, 4th of July, of just some days of summer fun.  What pictures would you put on these pages?

Monday, July 1, 2013

Mosaic punch flower card


     Who would have thought to turn the Mosaic punch into a flower?  Connie Babbert, that is who.  I found this card when I was browsing for Occasion cards and loved it.  The background paper helped determine the colors of the flower and I love this combination.  I changed Connie's card a little but kept most of it the way she designed it.

My changes:

The Very Vanilla card stock has been embossed with the Wood grain embossing folder

The saying is from the Banner Greetings hostess set

The flower petals have not been paper pierced

Connie's color choices

Crisp Cantaloupe
Calypso Coral
Pistachio Pudding
Soho Subway designer paper

What color combinations would you choose to make a similar card/