Tuesday, September 30, 2014

Straw-Blowing Kinda Eclectic-Technique Tuesday

Kinda Eclectic with the straw blowing background, and an entry for a Friday Mashup


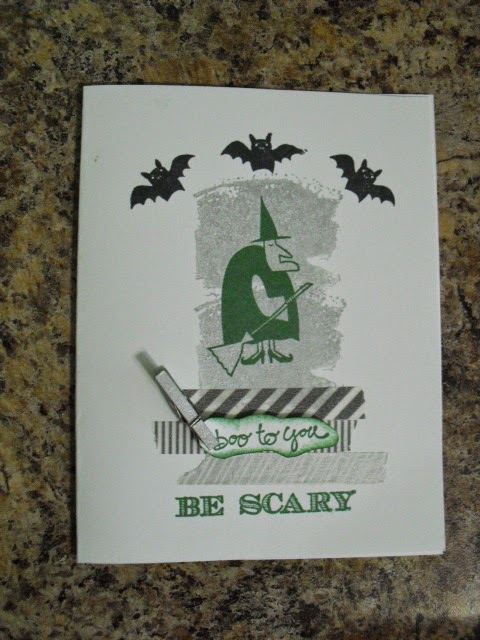
     What do you think of this background?  Personally I thought it was so much fun to make.  You might wonder where I found the idea for the background.  I found it on the blog called The Friday Mashup.  I have not completed a challenge for quite some time and decided today was the day to try a new one.


 The Friday Mashup gives you two challenges.  The first was to use the colors, Bermuda Bay, Crushed Curry, and Basic Black.  The second was the use the Straw-Blowing technique.  You can choose either challenge or mash them up and use both.  As you can see I tried to use both.

Straw Blowing
1. Place a drop of reinker on a piece of card stock. 

2. Take and straw and blow the ink across the paper into whatever pattern it chooses to go.

3. Continue to drop reinker and blow the ink until the background becomes what you like.

  Do you notice anything similar to the stamp set used today and the one I used yesterday?  They are the same stamp set. I am going to try and feature only one stamp set each week for each daily focus.  I hope that it will show you the versatility of the stamp set and a variety of ways it can be used. Why don't you try this great technique on a card of your own?

Monday, September 29, 2014

Kinda Eclectic -Miscellaneous Monday

The first card in the box which features the leaves from the stamp set.

    I love what I do! I have a wonderful downline that help me love what I do.  I got an idea from my friend Julie Davison to let my top sales earners of my downline know how much I appreciate them.  So, I have been working on a surprise kit that I will be sending my top 3 recruits from this past stamping year in the mail tomorrow. The best part of this is they have no idea this is coming.  Here is what they will receive.....

1. The stamp set Kinda Eclectic which we received at convention.  None of the top 3 demonstrators were able to go to convention this year,so I thought they might like to receive one of the items we received.

2. 4 cards that I made that show off the different parts of the stamp set.

3. Some Baked Brown Sugar thick baker's twine, which I love
and the in-color clothes pins.

  I plan to ship these items to them in one of our Paper Pumpkin boxes and include a certificate of appreciation for their hard work. I wish I could be a little mouse to see their expressions when they open the boxes. 

Sunday, September 28, 2014

You Rock-Simple Sunday


  Who would you give this card to?  All the ladies at Knollwood, a assisted living facility I volunteer at each month, made this card last month and loved it!  Everyone at convention got a single stamp set and this is the one that I received.  Love it!!  I can see making cards for my downline that I could send out when they have a special occasion worth noting. 
  You might be wondering what the background to the card is.  I purchased the designer paper stack called All Abloom and use the papers for backgrounds when I go to Knollwood.  The ladies love being able to choose which side they use on the card. Simple but Fun card to make. Who rocks in your life/

Saturday, September 27, 2014

Holiday Home card-Scrappin Saturday


   Do you save all your card stock pieces?  I do except for the ones that are smaller than 1/2 and inch.  This card would be a great one to use some of your leftover pieces.  I got the idea from our demonstrator magazine called Stampin Success.  It has several parts to the card that I love.

1. The stamp set called Holiday Home.  It is photopolymer, multi seasonal, and cute!

2. The tiny scraps of card stock used to create the hills.

3. That there is a matching framelit set to cut out the houses.

What parts of this card do you love?

Friday, September 26, 2014

Christmas Through the Year -Fix it Friday


     This was the Christmas card we made in August in my Christmas Through the year classes.  Where did I get my inspiration you might wonder?  Well, I looked through the Holiday catalog and found a card sample made with this same stamp set Endless Wishes.  See if you can tell how I fixed it.

 
1. I change the color scheme to Coastal Cabana and Smoky Slate.
 
2. I used Washi tape from the Sweet Sadie and Beach House collections.
 
3. I placed the silver ribbon on top of the Beach House washi tape using my silicone pad and my snail adhesive.
 
4. I stamped the greeting below the washi tape instead of above the washi tape. I found it easier to evenly place the words.
 
Don't forget to try copying or slightly changing the wonderful card samples you can find in our catalogs to fix them your way.


Thursday, September 25, 2014

Curvy Keepsakes Scarecrow-3-D Thursday


     I love all the creations people are making using the Curvy Keepsakes Box Framelit.  I went on Pinterest and searched under the name of the box and found oodles of cute items.  Witch, cat, giraffe, lady bug, and this darling scarecrow.  This will be one of the featured items you can make in my Hooray for Halloween class on Saturday, October 11th at 12:30.  Can't wait to show you some of the other items you can make.

Wednesday, September 24, 2014

Saran Wrap Technique-Wednesday Wow


     Would you like to know an alternate use for Saran Wrap?  Well, when looking for new techniques the other day I found out about this one.  My Press Club technique cards have been focusing on different backgrounds for the past month or two and I thought this technique was perfect for a fall background.

1. Take a piece of Saran Wrap that is bigger than the card stock you will be using.  I used a 3 by 4 inch piece of water color card stock as my background paper.

2. Ink up the wrap with 2 or 3 colors of ink taking care not to overlap the colors.

3. Wet your watercolor paper, then with the ink side down smoosh your wrap over the water color paper twisting and turning the wrap and pressing it into the paper. 

4. When you lift it off it will be wet, so you can blow it dry with your heat tool set on the first setting.  The colors will be blended and you should see some lines from your wrap.


Alternate technique

Follow steps 1 and 2 of the first technique but do not follow step 3.  Keep your watercolor paper dry when applying it to the card stock.  You will see a totally different look.


   I am going to see if I can find more techniques that use kitchen items.  Wouldn't that be a fun card class?  Stamping in your kitchen.  Hmmm........

Tuesday, September 23, 2014

Festival of Trees-Template Tuesday


    I can't seem to stop making cards using the same template.  This is my latest, a Christmas card using the Festival of Trees stamp set, some washi tape, Gorgeous Grunge background stamp and the saying from Wondrous Wreath.  The final accent piece is one of the snowflakes from the All is Calm embellishments. If you missed the other cards using this same template just click here and you can see them.  Using a template is a fun way to make a really quick card.

Monday, September 22, 2014

Punch Art Bookworm Card-Miscellaneous Monday


     Fall was the theme for the Fill Your Cardbox class this month.  As I was thinking about all that fall involves, I thought of school, colored leaves, Thanksgiving, and Halloween.  I searched the internet for some basic ideas and found this adorable book worm. Here's how I made him.

1. Punches, oval and circle punches of all sizes. The blacks of his eye is from the cupcake punch.

2. Eye glass ear holders ( not sure what these are really called) are made by punching out one word window, discarding the actual punch and then punching a little above the hole that was made. 

3. Background is the Typeset designer paper, the dictionary page.

   This just makes me smile and I am sure will make the recipient smile also.

Sunday, September 21, 2014

Easy Peasy Background-Simple Sunday

 
   Doesn't this look like it might be hard to create?  Well, it qualifies as a simple card. I got the idea for this card when I noticed one of the blog entries from my friend Julie Davison.  Check out her card here. The background is made with one of the stamps in the Work of Art. 

1. Ink up the stamp using a different color each time to create the look of fall.

2. Stamp the trees from Lovely as a Tree stamp set and the saying from For All Things using Early Espresso Ink.

3. Assemble your card

Now, how simple is that, but in my opinion very striking. I might have to use this technique on a different kind of card.

Thursday, September 18, 2014

Curvy Keepsakes Box Pumpkin-3-D Thursday


 One of the intriguing items in the Holiday Catalog is the Curvy Keepsakes Box.  You need to cut out two of the framelits to make one box.  I have to admit when I first looked at it in the catalog I thought it looked like it might be hard to make.  But I used my QR reader and watched this video on how to use the framelit and I thought it might be easy.  Then, I went on Pinterest and looked at all the wonderful samples people were making using the box and decided then and there is was a must have!!

  I found this pumpkin on Cindy Wilkinson's blog, Just Sponge it, and wanted to make one of my own just like it. Does it look hard to make, well it is not.

1. You will need a full sheet of card stock to make one box.  Just cut out the framelit two times.

2. Glue the base together.  I used the new fusion tape.  It worked well.  The only thing to remember when using that tape is that when you are done taping, you stop taping like you are making a check mark.  

3. Pull up the edges with the loops until they meet and then bring the edges with the slits over the top of the loops.  No more glue needed and your box is finished.

Supplies used

Stamp set Work of Art, Flower Fusion
Framelits Flower Fare, Curvy Keepsake Box
Card stock Pumpkin Pie, Mossy Meadow
Ribbon White and Tangerine Tango Two-toned trim
Ink Tangelo Twist

  Check out Pinterest and see all the cute samples people are making and see if you think this framelit is a must have.


Wednesday, September 17, 2014

Same Template New Design-Wednesday Wow


    I had my card already to post yesterday and guess what happened.  My computer did not cooperate so I could not post.  So, finally things are in working order today. (Actually it was my wireless mouse that would not cooperate and I found out later.....I had placed the new battery in the wrong way.  It is hard some days to be older.)

     I used the design from Monday to create this new card.  See if you can see the changes.  (Doesn't this remind you of the pages you did as a kid where you had to find what was different in each picture?)


1. Background stamp is changed to one from Work of Art.

2. Stamps used are from Freaky Friends, Holiday Invitation, and Good Greetings.

3. Washi tape has been changed to rolls from Epic Day and All is Calm (Holiday Catalog).

3. Mini Clothespin has been used instead of button and linen thread.

  I am on a roll, look for a Christmas card soon using this same template. What card could you make using this template?

Monday, September 15, 2014

For All Things stamp set-Miscellaneous Monday


     It sure feels like fall today, one of my favorite seasons.  This card also makes me feel like fall.  It is one of the featured cards in my Fill Your Cardbox with Fall cards class that is happening today at 12:30 and 6:30.
    You might wonder where I got the idea for this card?  Well, as a demonstrator I receive a magazine once every two months called Stampin Success.  It has lots of good ideas that help me become a better demonstrator.  This was one of the cards featured in the latest addition of the magazine and I loved it.

1. The colors, Hello Honey and Blackberry Bliss

2. The simpleness Washi tape, stamp, button and thread.

3. The stamp set For All Things that made the design easy to reproduce.

  This is another template that would be so easy to duplicate.  Look for tomorrow's post to see how I changed it up.


Friday, September 12, 2014

Halloween Wreath-Fix It Friday


   Do you love decorating for the holidays?  I do and Stampin'Up! has been creating wonderful kits that help me decorate fast and easy.  This is the wreath that they created for Halloween.  My friend, Linda, won the kit at convention but really did not care for it so we traded.  She gave me the kit and I ordered items for her from the Holiday catalog that she liked.  Check out this video  what the original wreath looked like.

  I looked at the kit and made a few changes.

1. I inked up the doilies with black ink as described in the directions but really did not like the look so I left them off the wreath.

2. I made the  banner saying which said Trick or Treat and decided it detracted from the cool look of the wreath

3. Finally, I made the spider out of beads which looks hard, but was only a little time consuming.  I placed it on the wreath on the web where suggested but it did not show up well at all.  So, I decided to change where it was placed so that everyone would be able to see how intricate it was.


  What I learned from this experience is make the project you are doing your own.  The directions are just there as a guide (which I always seem to need) and they you can do what you want with the project. Don't be afraid to Fix It Up whenever you want.
   Want a wreath like this for your house?  I will be holding a class at my home in Jacksonville in October.  Look for announcements of date and time.

Thursday, September 11, 2014

New Gift Card Holder-3-D Thursday

 
   Don't you love finding ways to make life a little easier?  I think this gift card holder is one of those ways.  It is a framelit that can be cut from a 6 inch square piece of card stock or designer paper.  I used the All is Calm designer paper from the Holiday Catalog.  Tags, a heart and circle come along with the framelit.  What would you need a circle for you might ask?


  Check out the back of the holder and see the circles used as a way to close the holder.  I can think of a lot of times I would be able to use this.  But... if you are anything like I am you like the idea of being able to use this for something else.


   Check out the cover for this box.  Yes, it is the gift card holder flattened out to cover a box.  You might wonder what size you should make the box.  Well, I also have that information for you.

Box size  6 5/8 by 7 7/8 inches
Score each side at 2 inches and your box will fit nicely underneath the lid.

  Check out this Stampin'Up! youtube video for directions.  In fact check out more of the videos Stampin'Up! posted for the items that are in the Holiday Catalog.  Don't have one yet, then contact me and I will make sure you have one in your hands.


Wednesday, September 10, 2014

Painting on a Block- Wednesday WOW


    You can never learn enough different techniques in my opinion.  The background on the insert on this card was made using one of my acrylic blocks.  Don't you love it when you can find new uses for old items!

1. Color the block with markers

2. Gently spray a little bit of water over the block.

3. Place a piece of cardstock, I used Whisper White, on top of the block and press. 

  When you lift the paper off of the block you will find a great background for whatever stamp you want to use.

Supplies used:

Woodgrain embossing folder
Crumb Cake, Pool Party, and Whisper White card stock
Burlap Ribbon
Wetlands, and Yippee Skippee stamp sets
Essentials Wooden Elements

Back to the drawing board for some new background techniques.

Monday, September 8, 2014

Thank You Gift for Barb- Miscellaneous Monday


   July was time for my family reunion.  My sister Barb was the host this year.  She has made something for the hostesses the past 3 years and I wanted to make something for her.  What could I do I wondered?  Barb has sewn something for everyone and she is an incredible seamstress.  I decided to make her something that I can do, and that is to stamp.

First I made an envelope box to hold several cards using the envelope punch board. The belly band was made using Burlap and Cotton ribbon with some retired roses and a cut out piece from the Sale a Bration designer paper.

 
Inside the box were 6 identical cards made from the Wetlands stamp set and a tiny envelope holding 6 sayings. I had placed dimensionals on the back of each one of the sayings so the cards could be personalized when they were sent out.  It was fun to make and a gift that symbolized something that I can do. Who would you make a gift like this for?


Sunday, September 7, 2014

Washi Tape Galore-Simple Sunday


   This is a swap I got at convention.  Know what I love about it?

1. Washi tape, fast and easy to use.

2. Simple design easy to duplicate.

3. Great way to showcase my sentiment.

Supplies used:

Whisper White, Crisp Cantaloupe, Basic Black card stock
Scalloped Oval, Extra Large Oval and Modern Label punches
Sweet Sadie washi tape

Saturday, September 6, 2014

Scrappin Saturday-Designer paper leftovers


    Some of the designer paper has such cute designs that you can make a simple card but attractive card just using leftover scraps. This is one of the latest cards I had my ladies at Knollwood make.  They loved the look of the card.  I had everything they needed to make the card in the envelope including the punched out stars.

Current Catalog supplies used:
   Maritime designer paper
   Coastal Cabana, Whisper White, Night of Navy and Real Red card stock
   Night of Navy ink
   Star, Word Window, Modern Label punches
  

Friday, September 5, 2014

Fix-It Friday-Christmas Change Up


   Wouldn't you like to find this card in your mailbox a few weeks before Christmas?  Well, the stampers that have been coming to my Christmas Through the Year classes were able to make this card in July.  It was simple to make and fun to color in.  One of the ladies that has been coming to my class is visually impaired and the color would have been virtually impossible for her to do.  So, I thought and talked to Vicki about an alternative technique that she could use.


   And this is what we came up with.  We used one of the stamps from the Work of Art stamp set to create a colorful background that simulated the marker colors the other stampers used to color in the letters. Then Vicki stamped the saying on top of the background and embossed it in the same way everyone else did.  The final card looked just as good as the original design.  In face I like this card just as much as the first design I made.  Which card do you like the best

Holiday Catalog Supplies Used
    Mingle All the Way stamp set

Current Catalog Supplies used
    Pistachio Pudding, Whisper White, Cherry Cobbler, card stock
    Pistachio Pudding, Cherry Cobbler, Mossy Meadow, Real Red markers or
    Pistachio Pudding, Cherry Cobbler ink stamped off
    Brights candy dots
    VersaMark ink pad
    Black embossing powder
Mossy Meadow stitched satin ribbon


Thursday, September 4, 2014

3-D Thursday-Last Framed Art


   Can you believe a year has almost passed since I started my Framed Art class?  Wow, where did the time go?  I have 2 people that are interested in making framed art pictures and will be starting up a new class in October.  If you check out blog posts that are labeled Framed Art you should be able to see several of the pictures we made this year.  Contact me if you are interested in joining the class.

Holiday Catalog Supplies Used  
     Color Me Autumn designer paper

Current Catalog Supplies Used
     Old Olive, Early Espresso, Soft Suede card stock
     Blackberry Bliss ink
     Skinny Mini ABC's
     Autumn Accents bigz die
     Crushed Curry Chevron ribbon
     Argyle embossing folder


Wednesday, September 3, 2014

Wednesday Wow- Ink Pad Pizazz Technique

I used the Wetlands stamp set to make this scene.

  
     One of my favorite presenters at Convention was Michelle Zindorf.  She showed us how she created her scenes in a simple manner using ink pads.

1. Start with a light sky color, I used Soft Sky. Placing your ink pad at about a 45 degree angle to the paper brush it across your paper.  It will leave an uneven streak of color.  Do this until you like the look.

2. Next take a darker color you would like in your sky.  I used Marina Mist.  Use the same process with this color on top of your first color.

3. Next choose 2 colors for your grassy area.  Starting with the light color first and overlapping your sky area a tiny bit, color the grass.  When you use the darker color start it in front of the light color to create a look of distance.

4. Using an mask, make an image with your stamp on the side of your paper.  The final image will be made once you have moved the mask off the page.
I had such fun making these scenes.  This card uses the set The Open Sea and shows rolling waves at sunset.

Another card with the Wetlands stamp set to show the birds along the shore.

This technique is so much fun to make and such a WOW to show your friends.  What would your card look like using the Ink Pad Pizazz Technique?


Tuesday, September 2, 2014

Beautiful Background for Technique Tuesday


   One of my favorite things to do to help me get new ideas is look through blogs.  I recently found this idea on Mary Ellen Stites blog and thought the results were stunning.  I changed up the colors and introduced this to my Press Club members in August.  Each month they make 2 technique cards and place a minimum order.  Every 5th month they are the hostess and earn all the free products. For the next few months we are making cards that focus on background techniques. To copy this technique follow these steps.....

1. Stamp the image of your choice in Versamark on white or vanilla cards stock. I used the flower from the stamp set called Regarding Dahlias.

2. Emboss using the white embossing powder.

3. Sponge your flowers using a yellow color.  I used Daffodil Delight.  Then sponge the center only using a contrasting color.  I used Crisp Cantaloupe. 

4. Finally sponge around each flower using your favorite background color.  I used Pistachio Pudding.

The background part of this card is the color that I have placed behind my embossed images.  What colors would you use, or what stamp set would you stamp?  I think it would be fun to try different colors of embossing powder for a totally different result.

If you would like to join our club just give me a heads up and I will give you more details.

Monday, September 1, 2014

I'm Back and I've Missed My Blog


     Family seemed to fill my time this summer and I really loved seeing everyone.  But I missed my blogging and am really glad to be back.

    One event I love to hold every summer is my Hostess Appreciation Brunch.  I invite any one who is hostess at a party the past Stampin'Up! year, any club member, and any one who had a party order.  This year the number of people who attended the brunch was small, but we had a great time.

    Brunch was Oven Pancake, with fresh peaches and a choice of beverages.  Next was an auction of 3-D items from the past stamping year, and finally everyone made an exclusive make n take I never repeat during the year.

  First we made an envelope box using the envelope punch board. I used some extra retired designer paper that was just perfect for the project.


  Next we made some cards to go inside the envelope box using the Gold Soiree designer paper. Each person was able to personalize the cards with an initial.

 
  We each made 5 cards which fit perfectly into the box, then tied a ribbon around the box to keep it shut and act like a belly band, and finally added some of the wonderful retired roses we carried a couple of years ago as an accent piece.

   We each talked about ways to make this project for friends and family and ended our day with lots of fun and inspiration.
If this sounds like something you would like to be a part of, then contact me and we will talk about setting a date for your own private party with friends.