Friday, July 30, 2021

Put it together Friday-One Sheet Layered Pocket card


Supplies needed:
Card base of Card Stock or Designer paper 8.5 x 11
2 pieces of neutral card stock cut 3.5 x 5
Coordinating color cut 2 x 4.25
Differrent coordinating color cut 2 x 5.5
Ribbon
Saying and embellishments
Neutral card stock to use as an easel cut 11 x 3 
Score this at 4.25, 8.5, 9.5, 10.5

Watch the video below to learn how to put the card together.


This is what the card looks like when everything is put in its place.I made this card using parts of the July paper pumpkin kit.


These are the pieces that are included on the front of the card, in the pockets. A bookmark, and tag in the front pocket .In the back pocket is an easel that you can place on a book shelf to admire.


 This is what the inside of the card looks like, with a place you can write a message.


Paper Pumpkin week has come to a close.  I had great fun making lots of cards with this cute kit.  I hope you got some ideas that you can use with your kit.  If you are not a member then sign up and use me Sue Scheets as your demonstator.

I'll have a new post on Wednesday, August 4th when I will share with you the new Suite for the month of August, the Beauty of the Earth.


Product List
Beauty Of The Earth Suite Collection (English)

[155843]
$73.50

Till then,
Happy Stamping,
Sushi

Thursday, July 29, 2021

Step it up Thursday-using paper pumpkin kits

Today is one of the days I find most challenging and fun.  Stepping up 3 cards from one simple template.


For my basic card I followed the template just as it was.   

1. The strip at the top is from one of the cards in the July 2021 The Adventure Begins paper pumpkin kit. 

2.The large and small banners are  cut from the envelope.  

3. The stamp and saying are from the July 2020 Summer Nights paper pumpkin kit


Here's how I stepped up the template to the next level.

1.I stamped a background using versa mark.

2.I added a scene on top of the large banner.

3. The saying was the top banner.

4. A tree was the final element.


My final step up had the following additions.

1. A stamped layer on top of the card base.

2. Gold strip under the saying.

3.Banner, jar, and fireflies we added from the Summer Nights kit.

                                              low


This was fun for me.  In the video below I explain what was behind the changes I made on each card.


Tomorrow, I will be showing you how to put together the card of the week.  One Sheet Layered Pocket card.  

Till then,
Happy Stamping,
Sushi

Wednesday, July 28, 2021

What is it Wednesday-Paper Pumpkin Meets Gilded Leafing

This week is Paper Pumpkin week. I love this week.  I make one card for each design and then let my imagination go wild.  


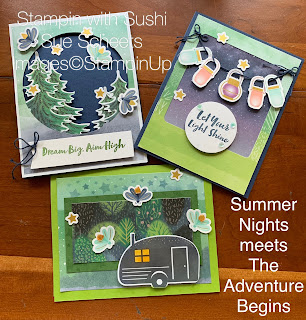
These first cards are alternates of the Adventure Begins kit.  The card on the left is made from the front of the envelope.  Yes, I like to cut apart the envelopes and this one has lots of possibilities. The card on the right uses the inside layer of the card on a standard card base.


When I was making the cards I remembered the kit from last July called Summer Nights.  What I remembered most was the lanterns and the fireflies and how cute they were. I had lots of extra supplies so I used them on these cards.


 The last few cards I am featuring use the Gilded Leafing along with The Adventure begins kit.  For the card with traailer, I outlined the trailer with Tombow glue and set it aside until the glye dried.  It will dry tacky which is what I wanted. Once it was dry and tacky I rubbed gilded leafing on the glue and the leafing stuck.  I love the results on the card on the top left.  Notice the golden fireflies on the tree.

The card on the top right used glue for the fireflies bodies and on the bottom of that smae card I placed strip of tear and tape strips.  Once I pulled the top layer off I could press the leafing onto the sticky strip and get a really great effect.

The final card was created using different sized glue dots that come in the paper pumpkin kits.  I made the dots and when they were dry staamped the image of the firefly on top.

I am not finished and may share the rest of my creations on Tuesday when I show cards I have received during the week.


Product List

What do you think?  Are you ready to try using Gilded Leafing?  Are you ready to sign up For Paper Pumpkin?  The August kit has been designed by Shelli Gardner, the creator of Stampin'Up!/

Check out this video that explains her ideas behind the kit. Click on the word video to get the link for her video.

Tomorrow, I will be stepping up cards based on the template of the week. And guess what.......I will be using the current paper pumpkin kit called The Adventure Begins.

Till then,
Happy Stamping,
Sushi


Wednesday, July 21, 2021

What is it Wednesday-6 Embossing Techniques

If you like using embossing folders in your card making, here are some different techniques you can use..

1. Ink up one side of your embossing folding by gently rubbing your ink pad as straight as possible over the image fold it and then emboss..  In this card the back ground was raised so that is where the ink went making the flowers pop up as white images.


 Now, ink up the opposite side of the folder and follow the same steps as for #1.  Ink, fold, emboss.  This time the flowers were raised so they caught the ink and the background is white.


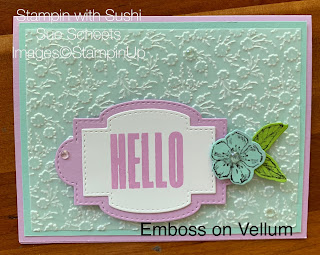
2.   Emboss using a piece of Vellum Card stock.  The images will come out white.


3.  Emboss on Foil.  The images come our very sharp and shiny.  For this card I punched out the foil with the dragon fly punch.


4. First, I embossed the basic white card stock using the Painted Texture folder.  Then, I ran the same piece through a second time using a new folder from the mini that comes out August 3. It is called Timeworn Type. With a closer look you should be able to see both images on the embossing.


After embossing twice with the same folders, I gently rubbed the surface using a blending brush.  It help show off the embossed images a little better.


5. Before embossing I used Stamin Markers to color the card stock in graduated colors.  Then I spreitsed the paper with water and finally embossed with the snowflake folder.  (This might be a retired folder.)


6. For my finally technique, I used blends and spritzed them with alcohol.  I think this method blended the colors better.


Cn you till that I had a great time playing with these different techniques on my embossing folders.  See if you can come up with a different technique and let me know. 


Product List

Which technique is your favorite.  Leave a comment and I will send you that card.

Tomorrow I will be stepping up a card 3 times using the oldie but goodie, Forever Blossoms.

Till then,
Happy stamping
 Sushi

Friday, July 16, 2021

Put it together Friday-6x6 3 from 1


The card of the week is pretty easy. I found it listed with metric measurements and was able to transfer them to standard measurement.  So a big thankyou to Jess Luna for her original design. You start with one 6 x 6 piece of designer paper (DSP) and then cut it according to the following instructions.


1. Cut a  3/4 inch strip from the bottom of your DSP. Trim this strip to 5 1/4. You should end up with a 3/4 inch square.

2. From the left hand side of the DSP cut a piece that is 2 1/2 wide.

3. Take that strip and cut it in half.  Each mew strip should measure 1 1/4.

4. Place each strip on top of the other and cut the strips into 1 1/4 inch squares.  You should end up with 8 squares and a little piece left over.

5. Cut your remaining piece of DSP so it measures 3 1/2 x 4 3/4.  Now you have your pieces ready to make your 3 cards. 

ch

Choose 3 card bases 5 1/2 x 8 1/2 in either 3 coordination colors, or from the same color card stock.
The first card uses the 8-1 1/4  inch squares.  Place them on the top and bottom of your card in any order.


This second card uses the large piece of DSP.  Center it on the card base of your choice.

The final card uses the small strip.  I can be place where ever your wish. 

Now you can add sayings and ribbon and whatever embellishments your wish.


Product List

This is such a fun way to make a lot of cute simple cards.  Here are some I made with the Tidings of Christmas paper.


What a fun week!  Now, for a fun weekend.  May daughter, Debbie who lives in Tennessee is coming for a quick visit with her two kids.  I have not seen them for almost 2 years.  Can't wait till they arrive tomorrow.  I hope you all will have a great weekend of your own.

Come back Wednesday for What is it Wednesday.  I will be sharing several different things you can do with embossing folders. The card will be a Pinwheel Tower card.  Looks difficult, but is quite easy to put together.

Till then, 
Happy Stamping,
Sushi