Showing posts with label Stampin at Knollwood. Show all posts

Friday, March 11, 2016

Fix it Friday-Stampin at Knollwood


Time to stamp at Knollwood with my 80 and 90 year old friends.  I looked through some leftover supplies from cards I have done in my classes and tried to figure out how I could change the card for the ladies at Knollwood to make.

1. I knew stamping the flower and leaves and getting them to match up would be too hard for the ladies to do.

2. I also knew that the starburst framelits were retired and I didn't have them around any more.

So, here are the changes I made.


1. The ladies like birthday cards since that is what they like to send out the most. So, I used the happy birthday from the Tin of Cards stamp set.

2. They are learning how to stamp with making extra lines, so I thought the small flower would be easy for them to stamp on their own while I help others stamp the birthday saying and punch out the circle.

3. I pre-punched the 2" Crushed Curry circle because I learned early on that punching is very hard for them to do.

They loved the card and were very successful stamping the little flower.  Carol, who never wants to stamp actually stamped little flowers all over her envelope and felt very successful.  Its the little things that make people happy isn't it.

Have a great weekend and check back Monday to see what Miscellaneous item I feature on my blog next week.

Friday, February 12, 2016

Fix it Friday-Stamping at Knollwood


   This was Darcy's swap card from last week.  I thought I could adapt it for the senior ladies at Knollwood to make this week.

 Can you see what I changed?

1. I thought it would be too hard for them to use glue stick on the glimmer paper, so I traded the silver bird for a grey one.

2. I eliminated the bow because it adds bulk to the card and might end up costing them more money to mail and instead added some hearts.

The second card they made was a featured card at my Occasions catalog Open House and seemed simple enough for the seniors to create with a couple of changes.


1. I thought the ladies might have trouble with coloring in the flowers, some of them are very shaky.  So instead they stamped images from Work of Art to give the flower stamp some extra color. 

2. I added the Happy Birthday saying instead of stamping right on the card stock.  The ladies tend to rock the stamps and a punch can eliminate unwanted lines.

They loved the cards, and I had fun using a card I already had
created and changing it to meet the needs of my senior friends.

Come back Monday to see what Miscellaneous item I will be featuring.  Have a great weekend and happy stamping.


Thursday, January 21, 2016

Snow Place for Knollwood


     This card will be featured at my Love Buffet card class.  I wanted to use something like this for my class at Knollwood Retirement Village, but knew using the Big Shot to cut out all these pieces would not be practical since most of the ladies use a walker to get to the table we where we make cards.
So here is how I changed the card.......


 1. The ladies did not round the corners, too hard.

2. They stamped the penguin, then the scarf and earmuffs on top of the penguin.  They loved how it looked.

3. Finally we placed a multi layered snowflake in the upper right hand corner.  I did punch that out ahead of time and included it in their envelope. 

4. They love birthday cards so I changed the saying.

    At the end of the class Mary said, we should have made a Valentine's card.  I have to admit I did not even think of that since I have been stuck in cold, snowy January.


Wednesday, January 20, 2016

Birthday at Knollwood

 
     Last week I went to Knollwood to stamp with my friends that live at the retirement village.  Each lady got an envelope and inside the envelope were the following supplies.....

1. pre-cut designer paper
2. pre-punched flowers
3. 3 centers for the flowers that were attached to a glue dot

   I helped the ladies stamp the saying and then punched it out for the card.  Each lady chose which side of the designer paper they wanted to use and made the card look different according to each ladies ideas.
   Hank had never come to my class before and told me she could not make any cards because of her arthritis.  I showed her my knuckles and told her I would help.  At the end of the class she had a big smile on her face and told me she would be sure to come to my class next month.

Monday, December 21, 2015

Stamping at Knollwood with Season of Cheer

 
     At my last visit to Knollwood stamping with the individuals who live there I adapted the card I featured yesterday so they could make it.

1. I used another piece of designer paper from Season of Cheer.  The ladies love deciding which side of the paper they want to use.

2. I a simple stamp from the set called Your Presents.  They stamped and I punched it out.

3. I left off the Snowflake embellishment it was too bulky.  They do not like to have to pay extra postage.

    The ladies loved the card even though it was quite simple.

Sunday, November 15, 2015

Tree Punch for Christmas

  Sometimes I use up retired supplies when I take cards to Knollwood with me.  The ladies that stamp with me are in their 80's and love the class but would never order any supplies.  So, this is the perfect place to make use of retired cardstock.  Last year I had leftovers from the Christmas paper stack.  Here is the card I came up with to help use up that leftover dsp.

1. I pre-embossed the white cardstock to make that part easier for the ladies.

2. I showed them how to use a sponge to add color to the embossed image and to the snow.

3. They had fun tearing the cardstock to make the mound of snow on the ground.

4. They love using our designer paper because they can choose which ever side of the paper they like the best.

   The ladies have really nice looking Christmas cards and I have very little of my retired Christmas paper leftover.  Good for both of us.

Saturday, November 14, 2015

Inspiration for a Christmas card

   I ordered some small calendars to use in a class in December from a company called Taylored Expressions.  The calendars were shipped out the same day I ordered them and came with a card idea and a free thinlit.  I loved the card idea and decided to see what I could do with Stampin'Up! supplies.


     This is one of the cards the ladies at Knollwood will be making this month.

I used Perfect Pines framelits to make the trees on the white cardstock and the green tree.  They were perfect for this card because there are 3 different sized trees.

The Merry Moments designer paper worked well for the background behind the cut trees, and the green tree in the front.

Teeny Tiny wishes made a nice small saying to place on the torn snow that covers the trunks of each tree.

   At first I was going to throw this idea sheet out, but then I looked at the design a bit closer and decided I could duplicate it.  So, don't hesitate to try and copy any old picture you find.

Saturday, September 19, 2015

Serene Silouhettes for Knollwood


     When I was getting ready to go to Knollwood last week, I remembered that Mary wanted harder cards to make.  I thought maybe I would try having the ladies do more stamping than I usually do.  So this is the card I used as my sample.  I knew some things needed to be changed.

1. The ladies would not want a ribbon or bow on the card since that would cost more money to mail.

2. They like to make birthday cards and I could not find a saying that fit into the oval punch featured here. 

3.They would have a hard time sponging around the edges of the punched shape.

So here is how I changed the card....


They loved  the card and were so impressed with the result of inking the stamp once and stamping with it 3 times.  Mary said it was fun but still not what she considered a harder card.

Saturday, August 15, 2015

Knollwood- DSP Creativity


     Can you see how I used the various papers from the Adventure Bound designer paper pack.

1. I created the bird using the water paper because I thought it looked a bit like feathers.

2.  The grass made a great looking branch.

3. I used the brick background to make the flowers and the grey on the back of the same paper for the dot in the center of the flower.

  You might wonder how the seniors could get the teeny tiny center on the flowers.  I used our new fine tip glue pen to attach the centers on the flowers.  It will make gluing tiny items so easy and will be available to purchase on September 4th. Are you as excited as I was about this new item?

Friday, August 14, 2015

Knollwood-Plenty of Punches


   It was hard to believe that it was time to go to Knollwood and stamp with the Seniors that live in this assisted living facility.  Today was the day.  Since none of the ladies have the income to purchase anything from me, I find this a good place to use up some of my leftover retired items.  I love designer paper and find I end every year with more than I used.  The background and the accent pieces were punched out of leftovers from the Stacked with Love designer paper stack.

Sunday, July 12, 2015

Stamping with the Elderly and Gorgeous Grunge


   This month at Knollwood, I wanted to try and design a card that the ladies could stamp and not worry about making a perfect image.  I immediately thought of using Gorgeous Grunge since a little mistake would hardly be noticeable.  Everyone had a great time stamping the background except for Maxine.  I overheard her say, "Well, I don't know exactly what it is but it sure is ugly!"  I guess she doesn't like the collage effect.

Saturday, July 11, 2015

Stamping with the Elderly-Designer Paper Focus


     At the end of every stamping year I end up with leftover materials that have retired.  So, I try to use them when I go and stamp with my lady friends at the local Assisted Living facility.  This time I decided to use the leftover papers from the Moonlight designer paper stack.  I have already learned a few things I need to do before I meet with the ladies.

1. Prepunch any punched items because they have a hard time pressing the punch all the way.

2. Prestamp some of the smaller words because they tend to rock the stamp and get extra lines where they are not wanted.

3. Use designer paper whenever possible so they have some choices about which side of the paper to use. 

   I love using the paper stacks for these cards because all the designs coordinate and make it easy to use any side of the paper for the card.

   I've mentioned before a reason I love to go is it reminds me of stamping and card making with my mother who passed away two weeks before she turned 90.  It's just like being with mom again.


Sunday, September 28, 2014

You Rock-Simple Sunday


  Who would you give this card to?  All the ladies at Knollwood, a assisted living facility I volunteer at each month, made this card last month and loved it!  Everyone at convention got a single stamp set and this is the one that I received.  Love it!!  I can see making cards for my downline that I could send out when they have a special occasion worth noting. 
  You might be wondering what the background to the card is.  I purchased the designer paper stack called All Abloom and use the papers for backgrounds when I go to Knollwood.  The ladies love being able to choose which side they use on the card. Simple but Fun card to make. Who rocks in your life/

Saturday, September 6, 2014

Scrappin Saturday-Designer paper leftovers


    Some of the designer paper has such cute designs that you can make a simple card but attractive card just using leftover scraps. This is one of the latest cards I had my ladies at Knollwood make.  They loved the look of the card.  I had everything they needed to make the card in the envelope including the punched out stars.

Current Catalog supplies used:
   Maritime designer paper
   Coastal Cabana, Whisper White, Night of Navy and Real Red card stock
   Night of Navy ink
   Star, Word Window, Modern Label punches
  

Saturday, July 12, 2014

Scrappin Saturday-Knollwood scrap card


    What do you do with leftover scraps of designer paper?  I save mine, but sometimes they just accumulate.  Well, when I went to Knollwood last week I thought of a way to use some of those scraps.  The ladies loved the card I created and had fun making their version.

Supplies used:

Scraps from a very old designer series paper stack
Card stock from retired in-colors
Flower punches
Teeny Tiny Wishes stamp set
Window punch

  There were lots of pieces but very little stamping.  A perfect combination for my  Knollwood Retirement Village stamping friends.

Friday, June 20, 2014

Fix it Friday-Bow Ties for Knollwood

My original card for Fill Your Card Box with Male birthday cards


This is how I changed the original card to take to Knollwood to use with my Senior friends.  Can you see the changes I made and guess why I made them.
 
1. The paper has been changed.  I did that because no one at Knollwood can afford to place an order so it is a good place to use up retired paper.
 
2. There are no buttons, just small circles in the center of each bow tie.  The ladies do not like cards where they have to pay extra money for bulk so I try to avoid whenever I can.
 
3. There is no embossing on the background paper.  The ladies can use the embossing machine, but it is hard to monitor and since I do this by myself I did not want to bring the machine.  I decided against pre-embossing the background paper.  The designs were busy enough and the card looked fine with the added embossing.
 
The ladies loved the card and had fun choosing which side of the DSP they wanted to use.  You should consider taking cards to a Senior Center for the individuals who live there to make.  I find this a very rewarding day.
 

Saturday, June 7, 2014

Stamping at Knollwood part 2


  I had several leftover card kits from my Congratulations Fill Your card box class and decided to alter the card so the ladies from Knollwood would be able to make them.


1. The ladies like to make birthday cards, so I first changed the sentiment and made it something that could be attached to the card.

2. Instead of using the Banners Framelits, I had each lady cut the v at the bottom of the banner.

3. Buttons make the card bulkier and then cost more to mail so instead of a button I punched out a tiny flower out of a piece of the designer paper. 

   When I first went to Knollwood several years ago, I had the ladies do everything .  I quickly learned that I needed to adapt what I had the ladies do to allow each person to have some success and decision in what the card would look like. 
   I love going to Knollwood and working with the Seniors.  They are so grateful, and have such a great time it can totally turn around my mood of the day.  The extra plus is, I feel like I am with my mom again.  She did love so much to be creative.


Friday, June 6, 2014

Stamping at Knollwood Retirement Village


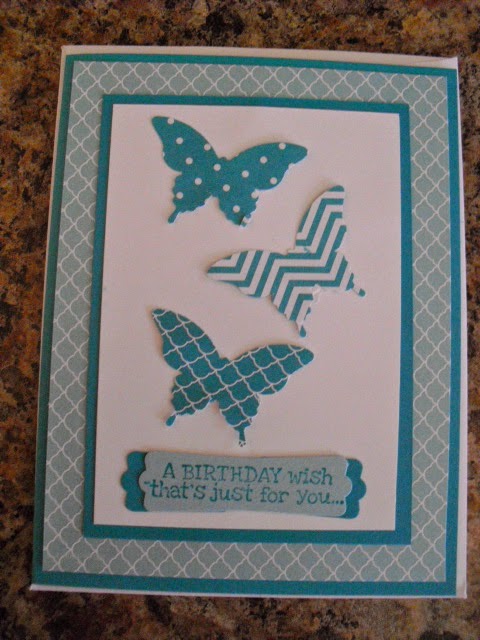
    This is the original card I designed for my Fill Your card box class.  I realized it would be too hard for the ladies I make cards with at Knollwood.  Most of the ladies are in their 80's and have a hard time squeezing our punches.


     This is the card we made at Knollwood with some changes I made to accommodate the needs of the ladies that attend.

1. I changed the stamping to pre-punched butterflies.  The stamping would have taken too long and I would have done all the punching.

2. The background was not embossed.  With the designer paper I used the card was busy enough and did not need the texture to make it look good.

3. The saying is added on as a separate part of the card to allow for smudging, or double images.  The main card is not ruined and it still looks good.

   I prepared most of the items ahead of time and placed them all in the card envelope.  The ladies still had a chance to stamp, and could arrange the items any way they wished.  Using designer paper makes it easy to have choice in whichever design they want to use. Everyone enjoyed the cards they made and were proud of what they created.

Saturday, March 15, 2014

Two for One Washi Tape card


    Do you like the idea of making one card turn into two?  Well, the card I did at Knollwood assisted living facility this month was just that.  I had been wanting to try Washi tape with my stamping friends and created this simple card based on one I had done a while ago with my stampers. I had enough colors of Washi tape to give each lady two colors.  The tearing of the tape was very easy for them.  I did the punching of the butterflies.  Okay you ask how can I make another card from this card?


     The punched out butterflies helped make the second card.  I thought the results looked good and fit my requirements for Stamping at Knollwood: simple, cute looking, and easy to make.  How would you design a two for one card?

Monday, February 17, 2014

Stepping up a card


     When I went to Knollwood assisted Living this month I created a card that would look nice but not be too hard to create.  I like to use designer paper because then the ladies choose which side they want to use.  I liked the card. but thought it needed a bit of stepping up before I could use it in a class.

 
1. I added a scalloped border trim on the top and the bottom of the designer paper.  I chose this trim because of the scalloped look of the DSP.
 
2. I cut out the stamp which is one of the stamps from the Everyday Occasions card kit.  I then glued it onto one of the colors from the DSP Coastal Cabana to add some contrasting color to the card.
 
   Sometimes adding a little bit to a card can kick it up a notch.  What would you do to change the first card?