Showing posts with label stitched shapes framelits. Show all posts

Friday, September 14, 2018

Falling For Leaves-Fun Fact Friday

Aren't these detailed leaves just stunning?  These were made with some of the thinlits that are a part of the Falling for Leaves bundle. They are quite detailed and could be a problem cutting them out.

I recently  learned a new technique for cutting that has made this part effortless.

1. Place your thinlit on the Big Shot cutting plate with the cutting edge up.  Yes, up not down, like we usually do.

2. Place your paper on top of the thinlit and run it through the Big Shot 2 or 3 times.

3. Turn the thinlit over and rub the brush from the Big Shot die brush over the thinlit 2 or 3 times with a firm hand.

4. When you turn the thinlit over your image will be cut out and released from the thinlit.  If it is not released then use a paper piercing tool on some of the tiny holes to help release the paper.

Since I have been using this technique with my detailed thinlits I have decreased my frustration level considerably  Try it and see if you like this way better.

I feel like I am ready for Fall Occasions with the cards I have presented this week.  These sets can be yours by clicking on the supplies I have listed each day at the end of my post.  By clicking on the actual supply you will be automatically connected to my store and can start a shopping list. 

If you would like to be informed each time I post on my blog you can sign up on the right hand sign of the page, by sending me your email address.

If you would like to receive my newsletter, then you can sign up for that in the appropriate spot.

Next week, I will be sharing cards that will be featured in my Simply Subtles card class.  Come check them out.

Tomorrow, I will be spending the day with my second favorite hobby, sewing.  We will be sewing a quilt that is made from fabric called a Jelly Roll.  I will share a picture on Monday IF I get the top pieced.

Whatever is your pleasure, enjoy your weekend,
Happy Stamping,
Sushi


Product List

Thursday, June 28, 2018

Rooted in nature-Template Thursday


I love following a template.  So, I have created 2 more cards with the same template.

Strip of Nature's Poem designer paper
Ribbon or accent piece on the paper
Focal piece
Saying on Wood Textures card stock

For the first card, a swap I received, the tall tree was used, along with some burlap ribbon, and an oval with the saying.  
All 3 cards have the same base of Crumb Cake.  This card has Grapefruit Grove as the second layer to coordinate with the colors in the strip of designer paper, 3 colors of the Nature's twine, and the saying on a banner made from Wood Textures designer paper.


I used the 3 pine trees as the accent pieces.


For the next card I turned the card to show how this template could be used in a different direction.  I decided not to have any trees on this card but to make an arrangement with the leaves.  And instead of ribbon I created 2 tiny strips of contrasting card stock.  

Does the saying look a little different from the stamp set?  There are two stamps that go together to say "Words are never enough, to thank you for all you do".  I decided to cut off the word to and leave just Thank you for all you do.

Come back tomorrow to see the Fun Fold for the week.  It is called the Diagonal Gate Card Fold.  


Product List

Monday, June 25, 2018

Rooted in Nature-Make it Simple Monday


 Do you love stamping with tree stamps?  I have always loved Lovely as a Tree, but fell in love with Rooted in Nature when I saw in the new Stampin'Up! catalog. And here's why......

1. The tree images are different from Lovely as a Tree.
2. They look real, like they were made off photographs.
3. Best of all they have framelits to cut them out.


Today is Make it Simple Monday.  So for this simple card I focused on...

1. Designer paper as the background-Nature's Poem
2. Stamp set for a simple image- Rooted in Nature
3. A focal point that says in all-Rooted in Nature.

This would be an easy card to duplicate or change up with different designer paper and stamp set.

Leave a comment this week and I will send you one of the featured cards.

Tomorrow I will be sharing a card using Brusho on Bubble wrap, and a video showing you how I made the bubble wrap background.

Product List

Wednesday, March 7, 2018

Springtime Foils- Sale a Bration week

Simple is good right? Today I am featuring the Springtime Foils specialty designer paper which was part of the second group of Sale a Bration items.  I couldn't tell too much about the paper till I got it into my hands.  It is great.

The foil in this card is the background and is copper dots.  
How to make the diagonal strip.

1. Cut the card stock into 1 3/4 inch strip and 2 inch strip about 
5 1/2 -6 inches long

2. Glue the strips together and attach them to the card at an angle.  

3. Cut off the extra card stock on each end.


 I colored in the leaves on card #2 using my Pool Party Blends.  
The card is square, but will fit in a standard envelope.  4 x 8 inches.


This next card uses 2 inch strips of the striped and leaf papers.  I colored in the leaves on this card with my stampin write marker.  I wanted to match the card stock.


Do you enjoy coloring?  Well, I do so this next card was perfect for me.
I used the stampin Blends to color the flowers and leaves.  I tried mixing the pink and coral colors together to create the look of these flowers.


 The final card for today is my favorite.  I used thinlit background from the stamp set Eclectic Layers.  I have used other parts of these thinlits on several different cards, but never this background piece.  I love the look.


Can you see the striped piece of Springtime Foils underneath the cut out.  I brayered it with Bermuda Bay ink to match the card base and the flower.

I colored the flower and leaves with my Blends.


Such a fun group of papers to make cards with.  

Tomorrow I will feature cards made with Eclectic Expressions stamp set another new release product.


Product List

Tuesday, February 20, 2018

Picture Perfect Birthday-Technique Tuesday

Don't you just love this cute little bow!  It is made using the technique called two step stamping.  What exactly does that mean?
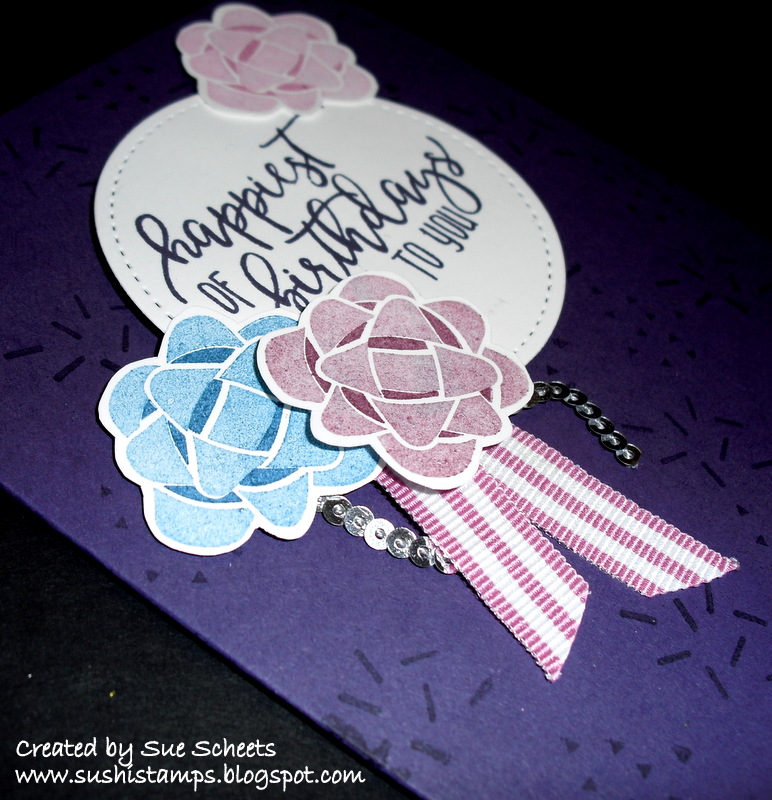
1. First you stamp the darkest color first.  This makes it easy to look through a photoplymer stamp to see exactly where to place the second stamp.

2. Next you use the very same color but stamp it on an extra piece of paper first before placing it on your card stock.

3.  Look through the stamp and find the already stamped piece.  Turn your stamp until the stamps line up perfectly, then stamp and you now have a really cute, complicated looking bow that was made in two easy steps.


Do you like the look of this stamp set?  Check out some of the other  cards I found on my Pinterest page featuring the Picture Perfect Birthday stamp.  Can you find my inspiration for this card?

Tomorrow I will share a WOW card made with this same stamp set.  Till then have some fun stamping.