Tuesday, June 10, 2014
Template Tuesday-Friday Mashup
The little octopus in this stamp set makes me smile. How about you? Sea Street was one of the stamp sets that we could pre-order and I thought to myself...why not. Tuesdays, will be a day that I follow a template. I looked around and found a different kind of a template that I thought I would enjoy. This is called Friday Mashup. They offer two challenges and if you choose you can mashup the challenges and use both on one card. That's what I decided would be fun to try and do.
Challenge: Use different colors of designer paper on your card, or follow the template below, or do both.
Supplies used:
Sea Street and Remembering Your Birthday stamp sets
Whisper White and Night of Navy card stock
Maritime Designer paper
Real Red 1/8" taffeta ribbon
For a girl who really is not into red, white, and blue colors on cards I really like how this turned out. How would you like to get this card for your birthday?
Monday, June 9, 2014
Miscellaneous Monday- clean and simple card challenge
| The card concept 11 Clean and Simple |
Don't you love the simple look of this card? I have decided to organize my blogging a little better. So, I am going back to my daily posting categories. Check out my blogs this week for the daily category.
Miscellaneous Monday will be whatever I want it to be. Today I am trying to stretch myself and be a part of some challenges. I love the challenges mentioned on The Card Concept. As a part of the challenge suggested each week, you make your card in the style of your choice. This week I chose the style of clean and simple.
Supplies used;
Daffodil Delight Blendabilities
Memento Black ink pad
Basic Grey and Whisper White card stock
Basic Grey, Smokey Slate markers
Something to Say stamp set
What would your card look like if you used these colors?
Sunday, June 8, 2014
Summer Wreath Class
Summer is upon us and so is the class to make the final seasonal wreath. Have you ever made a pinwheel? I remember making them when I was much younger out of any kind of paper I could find. If you come to this class you will go home with leftovers.
Supplies used
1 Styrofoam wreath I used a 10 inch white
2 strips of muslin torn at 2 inches and wrapped around the wreath so each time the strip overlapped a bit.
12 4 inch squares of Gold Soiree designer paper
straight pins to pin each pinwheel to the wreath
Various colored buttons for the center of each pinwheel.
8 inches of Natural 7/8 inch cotton ribbon for the hanger
| Spring Wreath |
Check out these links to the other wreaths we made this year, Fall, Winter.
Saturday, June 7, 2014
Stamping at Knollwood part 2
I had several leftover card kits from my Congratulations Fill Your card box class and decided to alter the card so the ladies from Knollwood would be able to make them.
1. The ladies like to make birthday cards, so I first changed the sentiment and made it something that could be attached to the card.
2. Instead of using the Banners Framelits, I had each lady cut the v at the bottom of the banner.
3. Buttons make the card bulkier and then cost more to mail so instead of a button I punched out a tiny flower out of a piece of the designer paper.
When I first went to Knollwood several years ago, I had the ladies do everything . I quickly learned that I needed to adapt what I had the ladies do to allow each person to have some success and decision in what the card would look like.
I love going to Knollwood and working with the Seniors. They are so grateful, and have such a great time it can totally turn around my mood of the day. The extra plus is, I feel like I am with my mom again. She did love so much to be creative.
Friday, June 6, 2014
Stamping at Knollwood Retirement Village
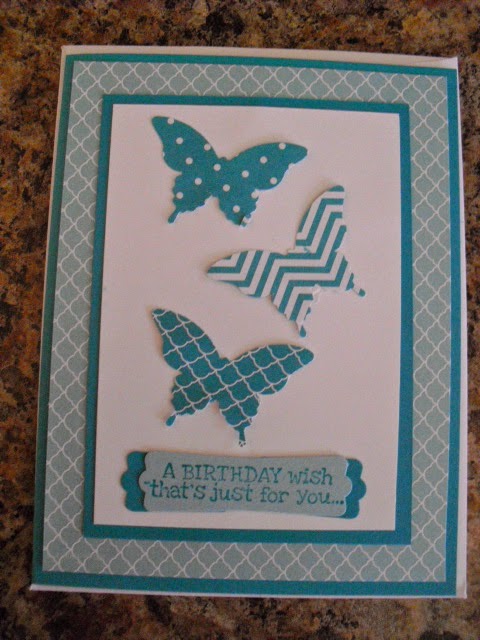
This is the original card I designed for my Fill Your card box class. I realized it would be too hard for the ladies I make cards with at Knollwood. Most of the ladies are in their 80's and have a hard time squeezing our punches.
This is the card we made at Knollwood with some changes I made to accommodate the needs of the ladies that attend.
1. I changed the stamping to pre-punched butterflies. The stamping would have taken too long and I would have done all the punching.
2. The background was not embossed. With the designer paper I used the card was busy enough and did not need the texture to make it look good.
3. The saying is added on as a separate part of the card to allow for smudging, or double images. The main card is not ruined and it still looks good.
I prepared most of the items ahead of time and placed them all in the card envelope. The ladies still had a chance to stamp, and could arrange the items any way they wished. Using designer paper makes it easy to have choice in whichever design they want to use. Everyone enjoyed the cards they made and were proud of what they created.
Subscribe to:
Posts (Atom)