Tuesday, May 31, 2016

Botanical Blooms-Technique Tuesday


Today I am going to show different kinds of backgrounds you can make to display a stamp set.  I have used the stamps and framelits for Botanical Blooms for these cards.  This card uses designer paper for the background.

  Change it up a little by using a background stamp for the background.  The same elements are on the card just different colors and a different background.

  Try creating a background using an embossing folder.  I rubbed a Versa Mark pad over the embossed design to let the image pop a little bit.

 Finally, create your own background using water colors.  I used the new in-colors and my aqua painter to create this look.

Which background was your favorite?  Don't forget to follow my blog and share it with your friends.  

  Come back tomorrow to see a Wow card using this versatile stamp set.

Monday, May 30, 2016

Botanical Blooms-Miscellaneous Monday


This week I am featuring the set Botanical Blooms.  I was so glad that this set and its matching framelits was going to be in the new catalog. Speaking of new catalog....if you do not have one yet contact me and I will see that you get one, or even better if you are close to Jacksonville come to my new catalog party Wednesday, June 1 at 6:00.

Come back tomorrow to see a simple technique that will make each card look totally different.

Friday, May 27, 2016

Sprinkles of Life-Fix it Friday

  I love how the Hearth and Home thinlit is added to the Sprinkles of Life stamp set to show a scene out the window.  When I looked at this I thought of spring. I also thought the saying fit with the 3 birds. And in trying to think of a way to fix this I thought about the 4 seasons.

  Summer and wonderful apples.  So this saying really connected to the picture.

 For the fall look I thumped several fall colored markers on the stamp.  And yes all the leaves spread out all over in fall don't you agree.

There was no snowflake in this set, so I went to a retiring set called White Christmas to get some snowflakes and stars. FUN!

Here's a collective picture of all the Sprinkles of Life cards I made this week.


And aren't you glad this set will be in our new catalog.  I know I am.

Don't forget to follow me and share this website if you enjoy my postings.  Come back next week to see what you can do with the stamp set called Botanical Blooms.

Thursday, May 26, 2016

Sprinkles of Life-Template Thursday

So this ice cream come has been made using the current in colors. The  background is from the stamp set Gorgeous Grunge.  I remember when I received it at a convention and thinking to myself, Ugh will I ever use it.  And of course it is one of my favorites to use for backgrounds. What kind of ice cream do you think each color could represent.  Hmm
Strawberry, Blueberry and Mint, what do you think.

 This card caught my eye as a cute way to do a patriotic card.  I know I will feature this in my Summer Card buffet class that will be held on Monday, June 6th at 12:30 or 6:30.

 This final card has everyone of the new in-colors as a scoop of ice cream and as a piece of the new ribbon as an accent.  I love how well these colors coordinate together.  Which color is your favorite?  I think mine is Sweet Sugarplum.

  Come back tomorrow to see how to use the Hearth a Home Thinlits in a variety of ways.

Wednesday, May 25, 2016

Sprinkles of Life-Wednesday Wow

 I love finding cards when the creator thinks out of the box.  The base of this balloon is actually the cupcake liner from the Sprinkles of Life stamp set.  I found this on Pinterest created by tara fowler crafting. I basically CASEd Tara's idea except made the card a birthday card, and used the retiring window punch.  I am sure going to miss that punch.


This card takes the balloon idea even further.  I found this again on 
Pinterest from the website called lovefromthefairies. Used the retiring in-colors for the balloon and made this another birthday card.

Come back tomorrow for a variety of cupcake cards.  

Tuesday, May 24, 2016

Sprinkles of Life-Technique Tuesday

 I am calling this technique stenciling.

1. I punched out 5 clouds using the matching punch Tree Builder and placed them on a piece of Whisper White card stock.

2. I filled a spritzer with rubbing alcohol and then added several drops of Night of Navy reinker.

3. Spritzed on the paper till I got the sky the color I wanted it to be.

Then I looked at the clouds I had punched out and being a person that does not like to waste things, I made a card out of them.

 Come back tomorrow to see two clever ways to use the cupcake liner.

Monday, May 23, 2016

Sprinkles of Life-Miscellaneous Monday

  Each  year for the past 13-14 years Stampin'Up! has created an exclusive stamp set where the sales benefit the Ronald McDonald House charities.  Last years stamp set was so great and had a matching punch that for the first time ever the stamp set was carried over and became part of the regular stamps offered.  There are so many parts to this set I decided to feature it this week.

Colors Watermelon Wonder, Cucumber Crush, and Cherry on Top Designer paper

If you like the idea of helping out Ronald McDonald House charities, then check out this years stamp and order it.  I will feature it once the new catalog becomes active.  $3 from the sale of each stamp set will be sent to the charity.  

Come back tomorrow to see how I have used the cloud punch for a really cool technique.

If you enjoy reading this blog, then please follow me, like me, and share this with your friends.  Thanks

Friday, May 20, 2016

Hello Sunshine-February Paper Pumpkin

  
Where did Thursday go?  All of sudden at about 8 PM I realized it was Thursday and I had not written my blog post.  This seems to happen more often lately.  It couldn't have anything to do with being 70 could it? At least I still have not put the cereal in the refrigerator, so there is some hope.


This is one of the cards that you could make with the Hello Sunshine kit.  I loved this kit and made a lot of cards with the leftover supplies.  But, for today I decided to make cards using the stamps.  In addition to some leftover supplies with each kit you have 
     Stampin Spots- the colors are not repeated in a 12 month period
     Stamp set that is unique to Paper Pumpkin

I really like the font in this stamp set, and always need birthday cards.

The flowers in the set are really cute.  I include thank you cards in every order so need lots of thank yous.


I love using washi tape on a card

Black and white cards with a touch of color are one of my favorites.  I send congrats cards to my top 3 downline for their monthly sales.
Now, how do I store my stamps from Paper Pumpkin.  I finally have found a system that I think will really work for me.  I have a Project Life scrapbook and the insert pages.


Now I can flip through the pages to find a stamp set I might want to use.


I have really enjoyed Paper Pumpkin week and I hope you have too.  If you don't subscribe and are interested just click on the link at the top of the page and sign up.  My demonstrator name is Sue Scheets.  This should link you to my page.

Have a great weekend and come back Monday for Sprinkles of Life week.  This was last year's Ronald McDonald stamp set and for the first time every has been carried over into the new catalog.  


Wednesday, May 18, 2016

Blissful Bouquet-October 2015 Paper Pumpkin


I actually made these cards in the car on a road trip using just a lap board.  That's how easy it is to make up a Paper Pumpkin kit.

 Found this idea on Pinterest of course.  Do you go to Pinterest?  I sure do an find all kinds of ideas.  My problem, actually making up the ideas I have pinned.  This week's theme is helping me make up my Paper Pumpkin pins.  I used the Gold Wink of Stella pen to highlight the leaves and flower.  The center of the flower is punched out of some of the extra gold paper.

This card was made by punching out some of the flowers on the circle that was included in the kit.  I love the font of the words in this set.  Hope to remember to use them more often.

I used one of the envelopes for the Coral background and the Hello Honey backing of the flowers.  The flowers were stamped on one of the background sheets included in the kit.

The square accent piece was punched out with a circle for a different look.

The stamp from the Blissful Bouquet set was stamped in black Memento ink and then colored in with Mossy Meadow ink using an Aqua Painter.  I will be very sad to see Mossy Meadow go as it was a favorite of mine.

I think I could have gone on and on with more samples and I may later on tonight.  Paper Pumpkin can be  used for more than what the directions tell you.  I will show you on Friday how I have stored my stamps so they are more easily accessible.

Come back tomorrow to see the cards that I have made using the February set called Hello Sunshine.

Tuesday, May 17, 2016

March Paper Pumpkin-Pocketful of Cheer

  March Paper Pumpkin kit was really cute, featuring 4 cards each with a place for a gift card and 4 gift card holders.  But, I need just a few gift card holders each year, so I decided to try and use the supplies I was given to make some cards.


 I thought this card was really cute. I found it on Pinterest and it was connected to a blog called creativejuice created by Loni Spendlove. It used a couple of the stamps included in the kit, and the balloon punch to make matching balloons.  The banner on the side of the word box  is actually two small banners made to look like a long one.


 I love the simplicity of this card that Liz Baily at myelegantcards made. The adorable background paper is actually cut from one of the envelopes. I would love to see some designer paper like this pattern.


For this card I used several different parts of the leftovers and some of my favorite punches. And this is a Sushi Original! 


 Last but not least I used several left over parts from the envelopes and belly band to make graduated banners.  I stamped the saying and then cut it apart for a different look.

  This is really a lot of fun and help me use up lots of old supplies.  Nothing to throw away.  That appeals to the part of me that recycles and tries to avoid waste.

  My new paper pumpkin came in the mail today and I hope to have some projects made with the leftovers on Friday.

   Come back tomorrow to see what I have done with the October 2015 kit called Blissful Bouquet.

Monday, May 16, 2016

April Paper Pumpkin-Lovely Little Wreath

Welcome to Paper Pumpkin Week.  I will be featuring a Paper Pumpkin kit each day and showing you alternative ways to use the set.


    Love this wreath, and the best part of making it was how easy it was.
This was the April Paper Pumpkin project.  When I was finished I was so surprised at how many leftovers I had.  So, I went to Pinterest and then tried my hand at being creative.  See what you think....


  I was inspired by a similar card I found on Pinterest with a blog address called www.barbstamps.com.  You can see that Barb used leftover wreath wrap to make the trees at the bottom.  I changed Barb's card by using a different saying in the set and adding some color to the saying.

 I loved the way  Stacy McCain at craftasticdayswithstacy used the negative image leftover from punching out the stem as a stencil.  All I changed from her sample was the flower and adding some candy spots.


 Now I was ready to do some of my own creating.  I used the leftover piece from punching out the leaves on the wreath as my background, stamped the flower that is a part of the stamp set and used the words Happy and Day from two of the stamp sets.


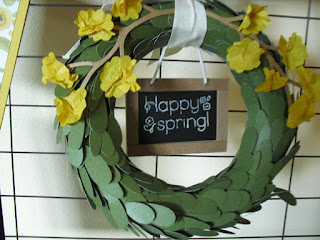
 I wondered if I could make a wreath out of the left over leaves and this is what I came up with.  The row of leaves has its own adhesive along the bottom which helped me create a circular effect.  

  I have lots more leftovers and could keep going.  I would love to see some of your ideas. If you liked this post and enjoy checking out my blog, please consider liking it and even sharing it with your friends.

If you like what you see with this Paper Pumpkin kit, then click on the link above to receive your own Paper Pumpkin kit each month. Contact me if you have any questions.

  Come back tomorrow to see some alternate ways to use Pocketful of Cheer, the March Paper Pumpkin kit.

Friday, May 13, 2016

In the Meadow-Fix It Friday


   I love this card for the coloring effect.  This was done using blender pens.  They are great to use, but when I am coloring in a larger area like the grass I find it hard to blend the colors the way I like them.  They are absorbed into the cardstock too fast.  So I decided this would be the card I would fix.


See if you can see what I kept the same and what I changed.

1. The ink and cardstock colors are the same

2. The background paper has been changed to water color paper and therefore was easier to get a blended look.

3. The shape of the card has been changed (I hope you noticed this on your own)

4.  There is ribbon on both cards, but it has been changed to lace trim around the oval.

5. The same saying is used on both cards just placed in different spots.

6. The design is the same on both cards but looks very different due to the colors around it.

   Is it Friday already, WOW another fast paced week.  I hope you have had as much fun looking as I have had creating the In the Meadow cards for this week.


 Come back Monday for Paper Pumpkin Week.  I will be creating extra cards from some of the latest Paper Pumpkin kits.  Have a great weekend, and if you are interested in the In the Meadow stamp set or any of the supplies I have used you can shop in my store by clicking on the link above.

Thursday, May 12, 2016

In the Meadow-Template Thursday


  I really liked the simplicity of this card so this is my template for today.

1. Stamped image-the mountain and lake

2. Sponging to add color-Sahara Sand and Pool Party

3. A saying


1. The trees and grass

2. Fall colors on the trees and grass to resemble fallen leaves-Tangelo Twist, Delightful Dijon, Cajun Craze


1. The flowers and butterflies

2. Spring colors-Pool Party, Night of Navy, Island Indigo and Old Olive


1. The deer and grass

2. Sunset colors-Pink Pirouette, Blushing Bride, Watermelon Wonder, and Rose Red

    That was a lot of fun.  Maybe you can try this template with any stamp set you have around.  I would love to see your sample.

   Come back tomorrow to see how I fix the final card of the week featuring In the Meadow.

Wednesday, May 11, 2016

In the Meadow-Wednesday Wow


  Don't you love this card!  I made this at a class that Robin Armbrecht held last month.  Here are the steps that I think make it a WOW card.

1. Place a precut frame over the white cardstock and start to sponge ink inside the frame.  

2. Sponge the lightest color over the entire frame, the darker color over 2/3 of the frame and the darkest color over the top 1/3.

3. Remove the frame and then stamp your accent image over the sponged area.  

  I can't wait to try this technque using different colors and stamps.

  Come back tomorrow for a template using the different parts of In the Meadow stamp set.

Tuesday, May 10, 2016

In the Meadow-Technique Tuesday-Masking


    Do you know how to mask?  If so this card will be easy for you to make.  If not, here is how you mask in 3 easy steps.

1. Stamp the deer on a post it note making sure the head of the tallest deer is at the top of the sticky note on the sticky part.  Then cut this out. This is your mask.

2. Stamp the background of the card, stamp the deer on top of the background, then place the post it note mask on top of the deer.

3. Stamp the trees so that part of each tree is on top of the post it note.  Take off the mask and Voila the trees are now behind the deer.

   Such a simple but impressive technique.

   Come back tomorrow to see a Wednesday Wow card using this wonderful stamp set In the Meadow.