Showing posts with label cut it out Tuesday. Show all posts

Tuesday, July 6, 2021

Cut it out Tuesday-3 Tiered Arrow Card

Directions to cut out supplies to make this Triple Arrow card.

1. Card base 5.5 x 8.5 scored at 2 1/8 and 4.25
2. Alternate card stock color. 
    a. Cut a triangle 3.5 inches square. Cut on the diagonal and emboss one of the 2 halves.
    b. Cut a piece for the front of the card 2 x 5.25 and emboss it also.
    c. Cut 2 1.5 inch squares.
3. Designer paper
    a. Cut for the side 2 x 5.25.
    b. Cut 4 x 5.25 for the inside.
4. Added accent pieces and a saying.


Come back on Friday at 10:30 on Facebook Live or 6:30 on Zoom to see how to assemble this card.

Tomorrow I will be sharing cards you can make using the designer papers that are on sale.  Be sure and come back and be ready to choose your favorites.

Till then,
Happy Stamping,
Sushi

Tuesday, June 8, 2021

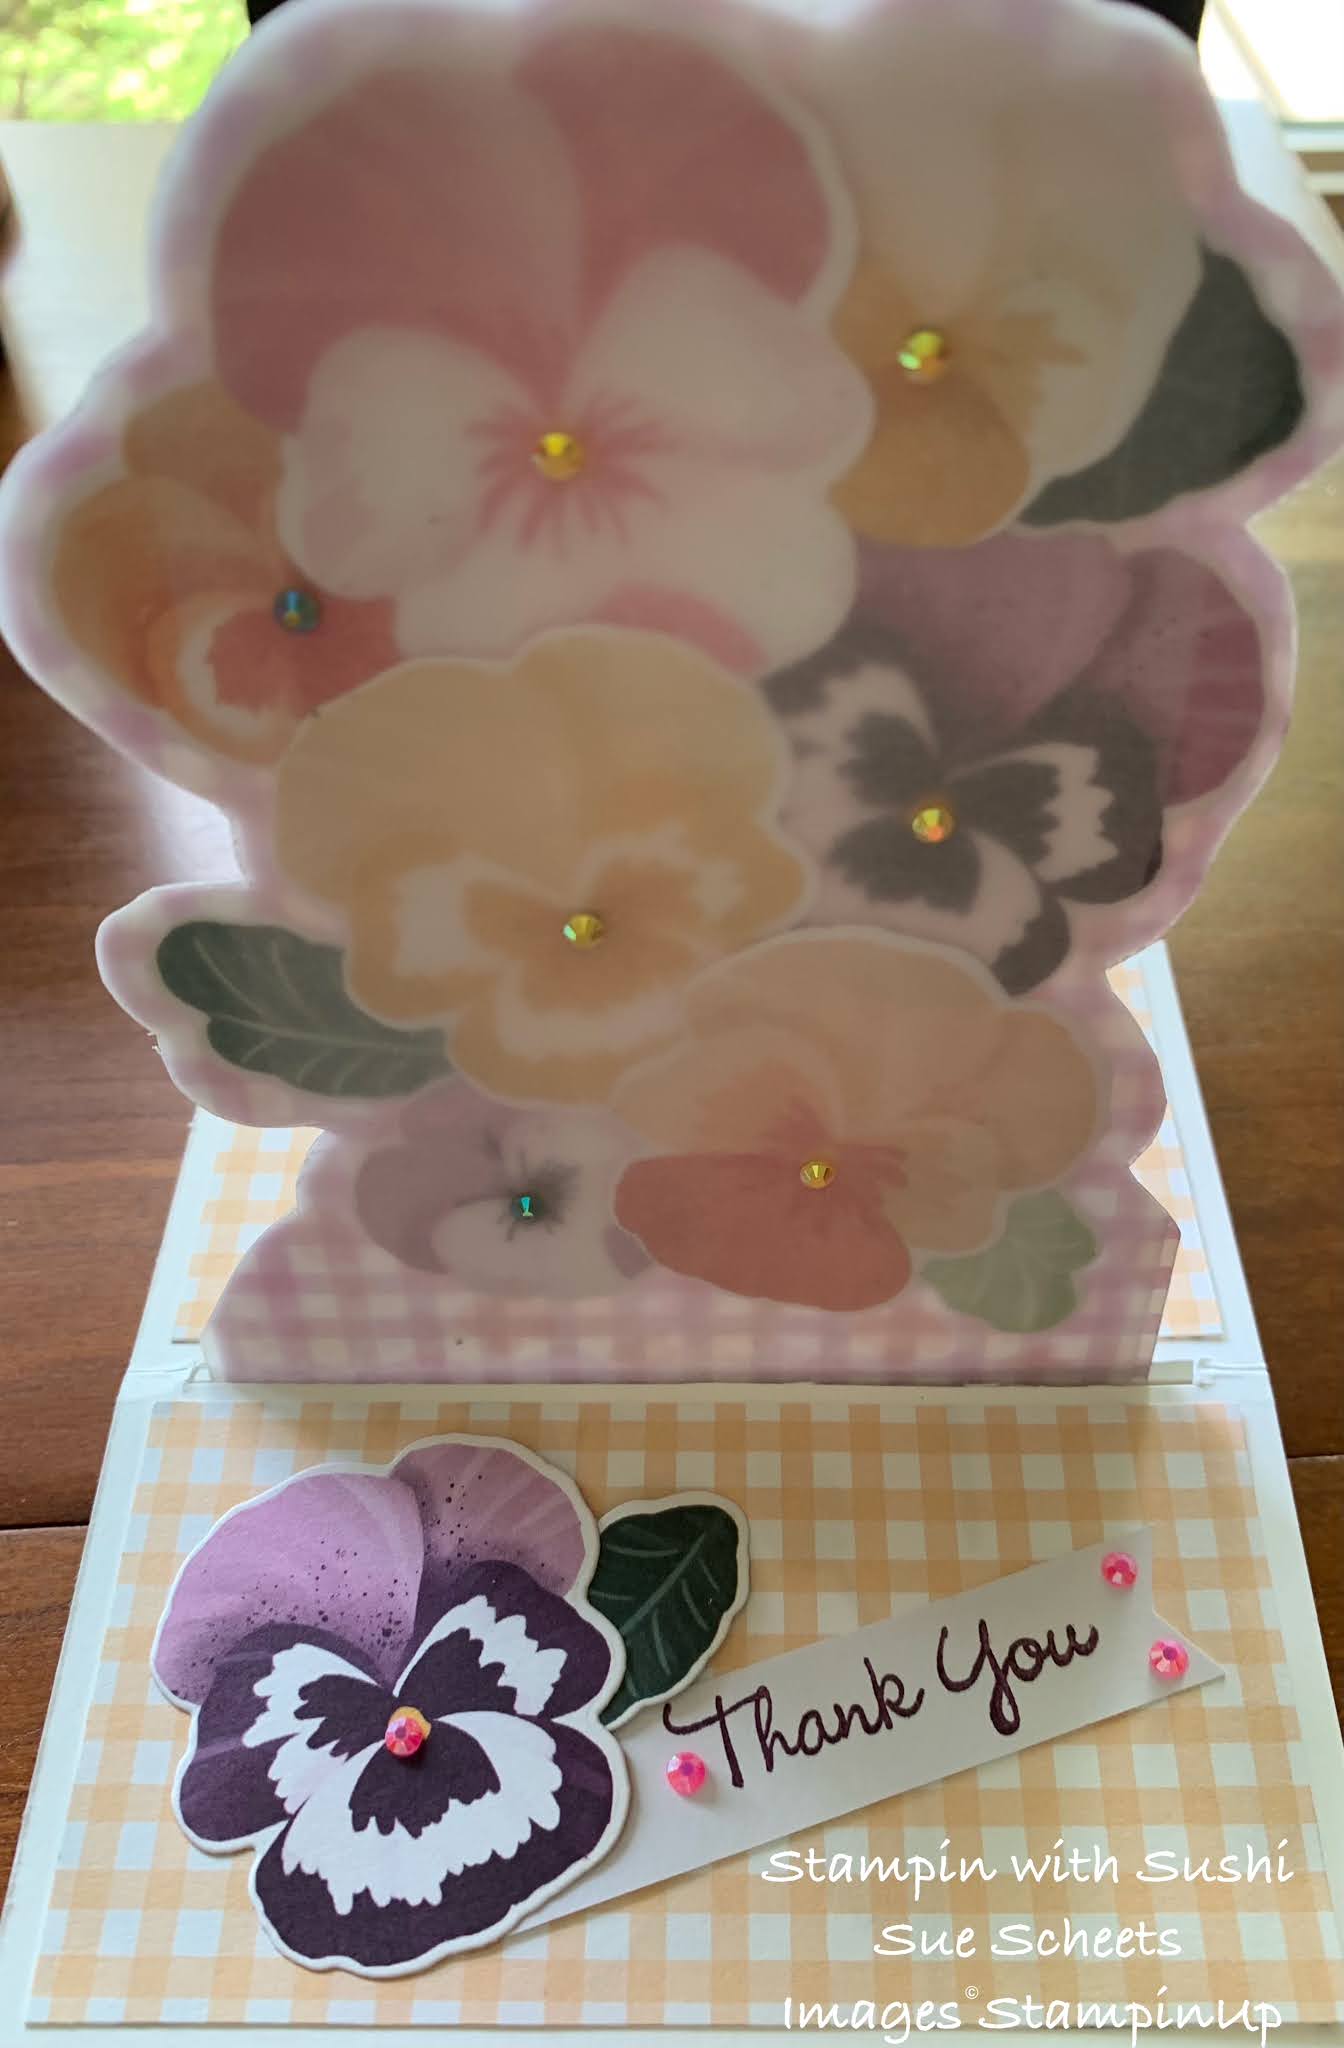
Cut it out Tuesday-Standing Pop-Up card

This week's card is called Standing Pop-Up card. I got my inspiration from 2 sources.  The first was my sister Barb who showed me her sample and how cool it was the way the card popped up.  She then told me where she learned how to make the card from a video from Vy Tran. Vy's videos are well done and easy to follow. Check them out.


This is how the card would come out of your envelope.


 When you press down on each side of the fold on top, the inside pops up to show a great surprise.
Looks hard, but quite easy.

Here's what you need to have ready for putting your card together.

1. Card base cut 4.25 x 11 out of heavy white card stock.
2. Score this piece at .5, 2.75, 3.25,5.5,7.75,8.25, 10.5.
3. Cut one piece of window sheet, or card stock at 3.5 x 5.5.
4. Cut designer paper at 2 x 4 ( 4 pieces)
5. Focal point and accessories
6. Saying
7. Paper Cutter for the very beginning

Product List
Pansy Dies
[155680]
$32.00

Does this make you want to figure out how to put this card together?  Well, come back on Friday at 10:30 for my Facebook Live and either watch or put your card together with me.

I will be taking the day off tomorrow to spend some time with family.  So, come back on Thursday to see how I step up the Monday card using this week's template.

Till Then
Happy Stampin
Sushi

Tuesday, June 1, 2021

Cut it out Tuesday-Opposite card

Today is cut it out Tuesday.  This week I am calling the card the Opposite card and here are the cutting instructions.

1. Base card 5.5 x 8.5
2. 2 contrasting colors of card stock, or designer paper cut 2 1/8 x 5.5
3. Using the same or similar designer paper or card stock cut 2 1 inch squares of each color.
4. Cut one of each of the squares on the diagonal to make 2 pieces of each color.
4. Find a saying and embelishements.


 This is one of the cards I chose to make as an Opposite card.  On Friday at 10:30 I will put together the parts I showed in this morning's video, and at 6:30 I will be putting together a black and white card.


Tomorrow, I will show you all the pieces of the Pansy Patch stamps and dies and how they go together as well as the cards that are going to be a part of my June online class.

Till then,
Happy Stamping,
Sushi

Tuesday, May 25, 2021

Cut it out Tuesday-Interlocking card

Recently at a Butterfly Friends upline meeting Cheryl showed us how to make an interlocking card like this.  It was fun to make (have you noticed I think just about everything is fun) and easy.  The best kind of card.

Here are the supplies you will need to have ready to make this card on Friday.

1.A card base of 5.5 x 8.5.  Score at one end at 2 1/8.  Don't try to score both ends I will teach you an easy way to make sure the two fronts meet.

2. A contrast card stock that measures 1.5 x 4.25. You will need two of these.

3.Designer paper #1 cut 2 x 5 3/8. You will need two of these. This will coordinate with your card base color.

4. Designer paper #2 cut 1 3/8 x 4 1/8.  You will need two of these and they should coordinate with your contrast card stock.

5. Sayings and accent pieces.

6. Inside neutral unless your card is already a neutral.

Now you are set to learn how to put this card together on Friday.


Here are the supplies I used on my sample of the card of the week.


Product List

Come back Friday with your supplies and make your card at 10:30 when I have a Facebook Live or at 6:30 for a Zoom.  My card I will be making at 10:30 will be using supplies from the Batter Up paper pumpkin kit.

Tomorrow I will be sharing the May paper pumpkin kit and show you some of the changes that have been made.  Good ones I think.

Till then,
Happy Stamping,
Sushi

Tuesday, May 18, 2021

Cut it out Tuesday-Lattice card #60

Rain Rain go away! Little Susie wants to play! We have had and will have almost a week of rain.  Some of it is needed but it really interferes with my desire to take a walk or bike ride every day. At least I can stay inside and do some stamping.

This is the card of the week.  It uses strips of designer paper and is called the Lattice card.

Here is what you need to have cut out and ready to go on Friday when I share how to put the card together.

1. Card Base cut 5.5 x 8.5 and scored at 4.25
2. Cut 1.75 off the front flap of the card after it is folded.
3. Cut white strip 5.25 x 1.5.  Then mark every .75 inches on the long side top and bottom.
4. Cut 2 coordinating colors of designer paper in 12 inch long strips at .75 each. If using 6 x 6 paper then cut a total of 12 inch for each color.
5. Cut designer paper for the front 2.25 x 5.25
6. Coordinating card stock cut one piece 2 3/8 x 5 3/8 for front  and a second at 4 1/8 x 5 3/8 for the inside.
7. Cut a neutral piece that is 5.25 x 2.5 for inside
8. Cut a shape that a saying can fit inside and accent pieces.

Lots of pieces but they fit together quite easily.


 Here is my sample.  I used the So Cool paper pumpkin kit for my card.  Can you see how cute the lattice looks on the back layer of the card.


Get your supplies ready and join me on Friday when I will show you how to put this card together.  Facebook Live at 10:30 or Zoom at 6:30  Contact me if you will need the Zoom links.

Tomorrow I will share what it means to be a Super Snail. Check my video at 10:30.

Till then,
Happy Stamping,
Sushi

Tuesday, May 11, 2021

Cut it out Tuesday-Pull Tab Flip

The card of the week is called the Pull Tab Flip card, and this is card design # 59.

Here are the cutting instructions.  Get these ready and come back on Friday to make the card with me.

Card Base
Card stock 8.5 x 5.5 score at 4.25

Card front 
Card stock color #2 cut 5.25 x 4 
Card stock, color #3 cut 5 x 3 .75
Designer paper cut 4 .75 x 3.5

Inside card 
Card stock #2 cut 5 x 3.75
Basic White cut 4.75 x 3.5

Pull Tab
Card stock 2 or 3 cut 6 x 2 scored at 2, 2.5 inches
Card stock same as pull tab 2 .75 square and 2.25 square
Basic White 2.5 square and  2 square

Ribbon of your choice


This is the front.  Pull the ribbon and ......
                                                                  The top flips and opens


Product List

I hope this has teased you enough that you want to come back on Friday with your supplies ready and make your card.  Lots of pieces but not too hard to assemble.

Tomorrow I will share several techniques I have used with the largest die from the Simply Succulent bundle 
Till then,
Happy Stamping,
Sushi

Tuesday, May 4, 2021

Cut it out Tuesday-Flowering Cactus Faux Quilted card #59


YES!  it's true, the new catalog is live!!!!

If you place an order today and don't work with another demonstrator, please use this Hostess Code FSRUYYPT before checking out..


I have used some items from the new catalog and the current mini catalog for my card of the week.  It is called a Faux Quited Card because you use an embossing folder after putting your designer paper strips on the card.

Follow these cutting instructions to get ready to put your card together with me on Friday May 7th.

1. Card base 5.5 x 8.5
2. Second layer 5.25 x 4
3. Designer paper strips 10-12 cut 1 x 6 inches
4. Embossing folder that looks like quilting
5. Saying and embellishments


This card is made with retired items and embossed with the following retired embossing folder.


Product List

Make sure you let me know if you need a new catalog and I will get it into the mail ASAP.

Tomorrow I will share the parts of the Flowering Cactus Medley and make a card with you many of the parts of this medley.

Till then,
Happy Stamping,
Sushi

Tuesday, April 27, 2021

Cut it out Tuesday-Pop Up Swing card


Are you ready to collect your ingredients to make the card of the week.
The card is called the Pop Up Swing card and is inspired by my upline Robin.  Her blog is called 
Really Robin stamps. Check it out.


Here are the cutting instructions.

1. Base 5.5 x 8.5 scored at 4.25

2. Neutral layer 5 x 8 scored at 2,4,6, inches

3. Designer paper cut at 5.25 x 4

4. 2 strips of Designer paper cut at 1 .75 x 4.75

5. 2 shape dies that are close together in size.

6. Using the smaller of the two dies, cut a shape from coordinating card stock.

7. Sayings and Embellishments


 For my first card I used parts from the April paper pumpkin kit called So Cool.

I will share my other cards on Friday when I share how to put this fun card together.


Get your supplies ready and make your card with me on Friday at 10:30 for a Facebook Live or at 6:30 for a Zoom meeting.

Now, tomorrow for What is it Wednesday I will be showing you all the April Paper Pumpkin kit and talking about the May kit and the special offer.

Till Then,
Happy Stamping,
Sushi

Tuesday, April 20, 2021

Cut it out Tuesday-Zig Zag quilt card card 56

My daughter Debbie came for a visit in March during her spring break as a 4th grade teacher.  We put together this quilt top for her daughter's bed.  I love the colors that Gracie picked out for her quilt don't you.  It was a simple design that was easy to put together. After it was finished I thought to myself that I could put together a card like this.  So........

I used some of the pieces I had from the March paper pumpkin kit and looked at the photo of the quilt and came up with this design.  What do you think?

Here are the supplies you need to gather and then you can make your own zig zag quilt card with me on Friday.

1. Card base 5.5 x 8.5

2. Coordinating card stock cut 4 x 4

3. Neutral card stock which will not show 3.75 x 3.75

4.3 different designer paper colors each one cut into 12 pieces that measure 1/2 x 1 inch.

5. Ribbon

6. Saying and embellishments

Get your supplies ready


Tuesday, April 13, 2021

Cut it out Tuesday-Easy Swing Fold Card card#56

My friend Robin Armbrecht whose site is called ReallyRobinStamps.com recently showed how to make the card I am featuring this week.

Here are the cutting directions.

1. Card base 5.5 x8.5 scored at 4.25 and 2 1/8
2. 6 by 6 designer paper
3. nesting dies, any shape
4. White card stock to cut out 3 of the smaller shape
5. A device to cut the designer paper
6. A die cutting machine


This is what the card looks like card looks like before it is opened.


And this is what is on the other side of the swing fold. Lots of fun to open and lots of fun to make.


Product List

Have fun getting your supplies ready for Friday, the put it together day.

Tomorrow I will share a fast and easy way to make 27 cards with 1/2 a stack of 12 x 12 paper and the Forever Gold Laser-Cut specialty paper.

Till then,
Happy Stamping,
Sushi

Tuesday, April 6, 2021

Cut it out Tuesday-One inch strip #4 card 55

Here are the cutting instructions for the card of the week.
1. Card base 5.5 x 8.5 scored at 4.25
2. Next layer 5.25 x 4 (optional)
3. Contrasting card stock cut 2.25 x 2.25
4. Four 1-inch squares of designer paper any combination
5. Ribbon
6. Saying and accesories


For my first example, I embossed the second layer with the New World embossing folder.
I used all other elements from the December paper pumpkin kit.


My next sample was created using the Butterfly Bijou designer paper.  The cute butterflies were cut out with the dies from the Butterfly Brilliance bundle. I left the saying for later when I have a special occasion that needs this card.


Product List

Be sure and come back tomorrow to learn several techniques that can be used with vellum card stock.

Till Then,
Happy Stamping,
Sushi

Tuesday, March 30, 2021

Cut it out Tuesday-Pop-Up card in a box

Are you ready for cutting instructions for a Pop-Up box card?

1. Cut card base 7.5 x 9.25
2.Cut 1 piece of designer paper and 1 neutral at 5.25 x 2
3. cut 6 pieces of designer paper at 2.25 x 1 7/8
4. Cut 3 pieces of designer paper at 2.75 x 1 7/8
Plan some accessories and a saying

Here is my first example of the card.  It will fold and fit into a standard envelope.
On Friday I will post more examples and make the card with you.  So come back for directions.


Product List

Get your supplies ready for Friday at 10:30 on Facebook Live, or 6:30 on Zoom or anytime here on my blog.

Tomorrow I plan to share my cards I have made using the March Here's to you paper pumpkin kit.
Till Then,
Happy Stamping, 
Sushi

Tuesday, March 23, 2021

Cut it up Tuesday Here’s to you kit

Today is Cut it Up Tuesday with directions for getting your supplies together for the card of the week.

1. Card Base 5.5 x 8.5 scored at 4.25
2. Layer 1 5.25 x 4
3. 10 pieces designer paper cut into 1 x 1 inch squares.
-all the same
-3 colors cut 3,4,3
-10 individual pieces of different designer paper
4. Saying and accent piece


My first card I used pieces from the December Paper Pumpkin kit.


The second card used pieces from the Butterfly Brilliance designer paper.


Product List

Tomorrow I will be sharing ways that I have found to use the stencils in the March paper pumpkin kit which is called Here's to You.

Till then,
Happy Stamping,
Sushi

Tuesday, March 9, 2021

Cut it up Tuesday for 1 inch card #4 (51)

This is week 51 that I have been doing these Tuesday and Friday videos.  I have had so much fun making the videos and sharing my love of stamping with others.

This week the card is another card made with 1 inch strips.
Supplies needed
1. Card Base 5.5 x 8.5 scored at 4 .25
2. next layer 5.25 x 4
3. 4 1 inch strips of designer paper 
4. Saying and accessories

This card was made with the December paper pumpkin kit. Don't you just love that cute koala.


 This card used the designer paper from the Butterfly Bijou pack.

Friday I will be putting this card together on my Facebook Live at 10:30.


Product List

Come back tomorrow to learn the differences in the variety of papers that SU offers.
Till then,
Happy Stamping,
Sushi

Tuesday, March 2, 2021

Cut it Up Tuesday using Ice Cream Corner designer paper

So what does card #50 look like?  I am calling it Four Flip fun card.  Robin Armbrecht my upline inspired me with this design.  It is a great way to make use of your extra pieces of 12 x 12 designer paper.

These are the supplies you will need to have ready on Friday for Put it Together Friday.

1. one sheet of double sided paper where both sides look great together.
2. One sheet of Basic White card stock.
I will help you cut and score each sheet on Friday.

Other tools you will need.
scissors
 ruler
 pencil
glue
scoring device
paper cutter
circle punch


  After you open 4 flaps this is what you will see.
Believe it or not it folds up and will fit inside a standard envelope.


Product List

Come back tomorrow and learn about the new offer.  Butterfly Brilliance Collection.
Till then,
Stay healthy, try some stamping, and make some contact.
Sushi

SPECIAL OFFER

My sister Barb Ward has created a file for cards 1-45 and is willing to share her files with you.  Each card design is created to fit on a index card.  She will  mail a set of cards 1-45  to you for $5 to help with printing and mailing costs.  If you are interested, then contact her at 
Barb Ward
btcward@gmail.com


This shows you a sample of one of the cards and Barb's email address. I know I love them and have gone back to card samples we have already done this past year to refresh my memory.