Thursday, December 5, 2013

Thankful Thursday- Birthday cards

Dina, my Leadership friend sent me this card.  I love the sponged background colors.
     One of the great things about being a stamper and teaching stamping to others is the wonderful birthday cards you receive in the mail.  Yes, the 26th of November was my birthday . I celebrated with my daughter Jen and her family, but I was not home to receive any mail.  But when I arrived back at my house this is what I found.
Amanda sent me a card with a great use of Designer paper.
Nan's card is so sparkly.  I love the color combination and the shimmer paper.
Judy, a customer, who had never stamped before sent me a card using my favorite designer paper.

Cindy sent me one of her challenge cards from our Super Snails meeting.  Love the colors on the flowers.

 
   These cards are all the more special because I know how much went into the making of them.  Thanks every one for thinking of me.

Wednesday, December 4, 2013

Wednesday Wow- Cards for others


     The last Jubilant Butterflies meeting I went to we were issued a challenge.  Hold an event to make cards to send to Veterans who would not be home for Christmas and to the Ronald McDonald house for families staying there to send to loved ones.  I held my event on Monday.  5 people came and made 82 cards.  I used leftover card supplies from Christmas cards I had accumulated over the years.  We had a great time and performed a wonderful service for others.  That is what this season is all about for me.

Tuesday, December 3, 2013

Thankful Tuesday-Thanksgiving card


     It is hard for me to believe that a week has passed since I have sat down to the computer.  Family crisis and 15 people in my house are the reasons.  But, it feels good to be back to stamping and sharing.  This card is from my sister Nan who is also my downline.  I love the look of the card.  The interesting thing she told me about the card is that the challenges I give my downline have stretched her as a stamper.  Last year she would have been content with sending out this card with just the saying on it.  But this year it did not look complete.  So after several attempts she added the leaves.  I love that about working with the craft.  You learn new ways to create your projects that step them up a bit.  So, thanks Nan for a great card that I enjoyed.

Wednesday, November 27, 2013

Wednesday Wow-Oval Punch bow


     Want the look of a bow, but don't have any ribbon?  Well, all you need is an oval punch and some cute designer paper.

1.  Punch out 4 ovals of the same paper.

2. Using a glue dot fold two ovals in half and secure at the pointed end with the glue dot.

3. Layer the remaining two ovals together and cut a notch at one end.

4. Create your bow and put a button in the middle to cover the glue dots. 

How simple and cute is that!!!!

Sunday, November 24, 2013

Simple Sunday-Use an old Christmas card


     Have you ever wondered what you could do with old Christmas cards?  Well, one of my stampers, Judy, figured out a great way to use them.  Create a new Christmas card.

 1. Cut a frame of your choice.  Judy used the Apothocery Accents framelit for her card.

2. Embossed the frame, she embossed using the polka dots embossing folder.

3. Attach the card under the frame and layer the card base to your liking.

Super simple!  Now, to find all those old cards I knew I needed to save for some reason.  Thanks Judy for a great idea.

Saturday, November 23, 2013

Scrappin Saturday-Using up your DSP


     I swapped a card with Gracelyn at the Jubilant Butterflies meeting and decided I wanted to use it for a Thank You card.  What appealed to me most was the tiny strip of designer paper that was at the bottom of the card.  Now who does not have leftover pieces of designer paper that are 1/4 in thick.  I love when I can make use of all the parts of my paper, don't you?

Friday, November 22, 2013

Fix it Friday-Hybrid MDS card

 
     I love making cards with MDS, and have tried my hand at making hybrid cards.  This time I took a card that SU had created and just changed up some of the elements of the card.  I changed the background color, the embellishment, and trims.  Once I had the cards back from the SU printer, I trimmed them to 5 1/4 by 4 so they could be the front layer of the card.  Now, what to have my stampers put on the card front.

1. The items needed to be small and easy to produce, so I chose the stamp set A round array.

2. I chose punches that could be used to punch out the stamped items.

3. Finally, I finished off the designs, by adding a tiny pearl to the smallest scalloped piece.

    The inside of the card needed something in order to be able to write a message.  I used a second sheet of my MDS design on the inside to complete the project.

Thursday, November 21, 2013

3-D Thursday-Triple File folder card


     If you look carefully you should see 3 tabs on this file folder card.  A green tab with polka dotted paper on the front, a white tab in the middle and a green tab in the back.  This card can be made using the same idea as the basic card, just change the measurement.  But the great thing about having a middle tab is that you can include a treat layer.


     When you pull up the Ho Ho layer there is a surprise attached.  Check out this link for how to make this card. I loved how Debbie included photos for several different versions of the very trendy File Folder card.  What would you  include inside your card?

Wednesday, November 20, 2013

Wednesday Wow-File Folder cards


     Don't you love finding more than one use for a tool you have on hand?  Well, I love my envelope punch board, and use it a lot for making envelopes. but heard that you could make cards with the same tool. Here is a link with a great tutorial on making a card similar to this one.

1. I used Pool Party card stock to make the file folder card base.

2. I embossed the front using the Northern Flurry embossing folder.

3. I created the snowman using Snow Day stamp from My Digital studio and printed it on my home printer on Whisper White card stock.

4. Last step was to use the Festive Flurry framelits, the largest snowflake to make the accent piece.  The card is held together with Pool Party ribbon.

Come back tomorrow to see another version of the file folder card that is perfect for an insert.

Tuesday, November 19, 2013

Technique Tuesday-Embedded Embossing


     Don't you think this little monster is so cute?  I think this is one of my favorite sets right now.  Monstermaniacs is the second set that StampinUp is offering made by someone other than a company designer.  I just smile whenever I look at them.  What is the background paper you might wonder, well, it was made using the embedded embossing technique.

1. Choose a punch of some sort that you want to be a part of the background of your card.  Punch out the pieces in several colors.

2. Glue the punched out pieces onto a background color.  The technique works best when the pieces are glued on using glue stick.  The adhesive needs to cover the entire shape.

3. Take the piece of background paper with the shapes glued onto it, choose a small design that is pretty solid, like the square lattice embossing folder and emboss.

When the paper comes out of the embossing folder it looks like your punched out shapes are actually a part of the paper.
Have fun creating your own embedded embossing designs.

Monday, November 18, 2013

Miscellaneous Monday-Freshly Made Sketch


     No matter how hard I tried this morning, I could not get to the part of my blog that allows me to make entries.  GRRR!!! computers can be so wonderful and such a headache.  Anyhow this is the card I made for this week's sketch.

  I tried to think out of the box using this plain sketch.  Can you see the changes I made?

1. I switched the direction of the sketch.

2. Instead of using a rectangular piece of card stock, I used the chevron punch pieces for the outside pieces.

3. For the center piece I used my leaf cluster.

What do you think of my ideas?  I just know this would have been one of the chosen cards, but my computer problem kept me from submitting it on time.  There is always next week, Right?

Sunday, November 17, 2013

Simple Sunday- Christmas card


     I got the idea for this card from Connie Babbert.  Her ,Inkspired Creations, has so many inspirational ideas that I like.  I like this card for its simplicity and elegance. You can duplicate this card in 4 easy steps.

1. Emboss the card front using the Fancy Fan embossing folder.

2. Stamp the snowflake from the Festive Flurries stamp set using Cherry Cobbler ink.

3. Cut out the two snowflakes using the Festive Flurries framelits.  Both snowflakes can be cut out at the same time, especially if you have the Magnetic Platform.

4. Stamp the saying of your choice onto the top layer of white card stock.  I used one of the sayings from the More Merry Messages (126402).  This stamp set is not in the current catalog but still available to order.

5. Add your finishing touches by layering the pieces together and you have a great card made in under a half an hour.

Saturday, November 16, 2013

Saturday Sharing-Super Snail Dana

Dana said she got this idea from a stamping event.  I think pictures would look great in the blocks without letters.


   One of the things we do at the Super Snails downline meeting is show and tell.  You can never get too old for show and tell right!  Well, Dana had quite a few awesome items to share with us.  She made several for a craft fair.  Can't say which one I like the best.

I wonder how many butterflies there are on this picture.

   As soon as Dana pulled this one out it got Oohs and Aahs from all of us.

Just designer paper folded in half.

  I couldn't believe how simple it sounded to make this outstanding wreath.  I can see a new seasonal wreath with this same design. 

   I hope you will be inspired by Dana as much as I was.

Friday, November 15, 2013

Fix it Friday-A card that looks like a present


     I found a card similar to this on the internet somewhere.  It was a square card, so I fixed it up to be a regular sized card. 
 
1. I changed the size of the squares to rectangles.

2. Instead of Season of Style designer paper that was on the sample I looked at, I used the polka dot paper from the Brights designer paper stack.

3. I wanted a saying on the card so I used the Thinlits Expressions merry. It is so easy to make minor changes to a card you like to accommodate you needs and likes.

This is a simple card that will be featured in my All About Christmas cards class today and tomorrow. 

 If you love the Gift Bow die I used on this card, it is on sale this week until the end of the day Monday.  I would be glad to order it for you.

How would you change my design to make it your own?


Thursday, November 14, 2013

Downline challenge part 2


     This is the picture that Tanya found as her inspiration.  She had it on her phone and emailed it to me.  Looks Yummy!


   Notice how clever she was to include the same colors from the picture, and even the Sesame seeds are reflected in the splatter across the page.  This definitely was a fun challenge. You should try one of your own, and send it to me.


Wednesday, November 13, 2013

Wednesday Wow- Downline Magazine challenge


     Last night was the November meeting of the Super Snails, my downline group.  A couple of us presented the results of last months challenge.  Each person was supposed to find magazine picture they liked and use it as inspiration for a card.  Dana chose this picture of a Martha Stewart pumpkin and created this card from the picture.


     I love how she captured the delicate design of the pumpkin into her card using the Delicate Doilies stamp set.  She also told us how to make card stock strips look like ribbon.

   Tanya, who is new to our group, had a wonderful picture photo on her phone and a great representation of that picture in person, but my photos did not turn out for either one.  So, look for her pictures in a later blog posting.


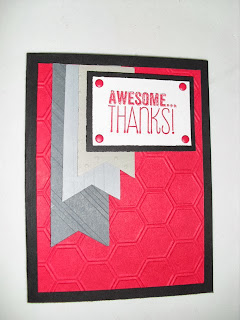
     I chose this picture for the colors, and the lines and circles.  Not sure I am happy with my results.  The card may end up on my Fix it Friday post.


     I got the effect I wanted with the colors.  I tried to show the lines with the banners, and the texture I put on each banner, and the honeycomb design on the background.  I placed candy dots on the edges of the saying to show the circles in the picture.  I think this needs something else.  Any ideas out there?


Monday, November 11, 2013

Miscellaneous Monday-Swapping


  Whenever I go to a Stamping Event I try to participate in the swaps that are offered.  What is a swap you might wonder?

1. You make as many card fronts as you wish of a design.  I usually make no more than 20 of one design because I get bored doing the same thing over and over. 

2. You find someone who is also swapping and trade one of yours for one of theirs.

3. You come home with lots of new ideas. This card is based on a swap I got at the Convention this past summer.

Sunday, November 10, 2013

Simple Sunday-Freshly Made sketch Doily


     I thought the sketch this week was kind of strange.  The piece that goes from one side to the other had a break in it.  Me, I like things completed so it looks a little odd.  But, to stretch myself I went with the look anyway.

1. I knew I wanted to use the doily for the focal point. 

2. I decided a bit of Coastal Cabana underneath would look good as would the In-Color Boutique Details.

3. For the strip I decided on Winter Frost designer paper but to give it a more frilly look, I placed the Ruffle stretch trim on either side of the paper. 

4. Something seemed to be missing so I added some of the tiny pearls in the center area of the design. 

 I am happy with my card even though I keep wanting to add a bit more paper to the strip.

  What would your card look like using this sketch?

Saturday, November 9, 2013

Scrappin Saturday-Fall Layout


  It seems I can not get enough of the Sweater Weather designer paper.  I decided to use it for the second layout we did in October in Scrapbook Your Life class.  The strips and squares were a great way to use some of the smaller pieces I had.  The leaves were cut out using the Autumn Accents big shot die.


  Once everyone sorted the leaves out by color they used the Grateful Grunge stamp set to add some depth to the leaves and background paper.


  I found some great pictures of a camping trip Sam and I took to the Red River Gorge for these pages.  I am proud of myself that I am keeping up with my scrapbookers and completing each page as I make it.

The view after a half hour hike.
 
 
We were surrounded by beautiful trees just starting to turn color.


Friday, November 8, 2013

Fix it Friday-Thankful frame art


     Do you love putting seasonal decorations up as much as I do?  In fact, I love to put up monthly decorations.  Last month in my Hurray for Halloween class we made a great frame art picture. The picture was created so that it could be taken out of the frame and stored till next year.  Here is the frame art for November.  I used a design from Create with Connie and Mary as my inspiration.  Here are the changes I made.
 
1. I changed the picture from a square frame to a rectangular frame.  No square frames in my town.
 
2. I used a different color scheme for the background papers.
 
3. I had loaned out my leaf die cut so I used some already cut out ones that were not the right color.  Instead of panicking, I decided to use heat and stick powder and our wonderful gold glitter.
 
 
Thanks Mary Brown for such wonderful inspiration.


Thursday, November 7, 2013

3-D Thursday More Reindeer treat holders


    Have you ever had so much fun with something it is hard to stop?  Well, Linda and I have had so much fun creating little treat holders it seems we don't want to stop.  This is one of the latest creations.

1. Cut brown card stock to measure 7 1/2 by 1 3/4 inches.  Score it at 1/2. 3 1/4,4 1/4, 7 inches.

2. Fold on score lines.  The top and bottom folds will be at the top of the treat holder.

3. Use the following punches to make the reindeer
   Owl punch
   Leaf from bird punch for the antlers
   1/2 punch for nose and white of the eye
   Small punch ( I call mine the school punch because I used it a lot when I was teaching.

3. Place the dum dum on the inside with some glue dots on the bottom.  Attach sticky strip to each of the 1/2 inch folds to hold the top together.

4. Final touch, tie a red ribbon around the top of the dum dum stick and your treat is finished.

Wonder what we will come up with next/

Wednesday, November 6, 2013

Wednesday Wow- Stenciling on a card


     Tonight was another Jubilant Butterflies meeting.  We often share technique ideas with each other and I shared different ways I used stenciling on cards.  For this card I used the leaf from the Secret Garden framelits to make a background for my card.  Don't have a background paper you like....then make your own.


     I tried to think of other ways to use a stencil and came up with the idea of using it as a shadow to a punched out image.  On this card I even cut around one of the stenciled images and used it as my flower.  It gives it a softer look than an ink pad.


     I got a little crazy on this last card and did reverse stenciling.  I used the cut out flower and brushed around the edges of the flower with a sponge. Next, I found another flower shape in the framelit set and with a different color on my sponge did some more sponging not caring if they overlapped at all.  Finally, I chose a 3rd color using the same process.  To finish I even used the flower pieces I had sponged around as part of the card.  A little funky, but hey I have to get out of my comfort zone now and then.


   This is the card that started off all my thinking about stenciling in the first place.  Which card is your favorite and why?  If you think you would like to try some stenciling with me, let me know and we can get a party set up soon.


Monday, November 4, 2013

Miscellaneous Monday-My Digital Studio birthday card

The first page of the card.  I thought the spatter made it look like fall.

    Who do you send cards to?  I send them to my customers, family members, and quilt guild members.  That is a lot of cards each month.  I have a perpetual calendar that I refer to that helps me make sure I get cards out on time.  Some of the cards I send out I make in My Digital Studio.  They are quick, fun and I still have a chance to be creative. This is the card I am sending out this month.  Here is why I like to use MDS

1. I make the 1st and 3rd page of the card the same, likewise the 2nd and 4th page.

This is the second page and has a place where I can write a message.
2. I have SU print off the cards, saves me ink and especially now when there is a sale on printing services.

3. I cut the cards in half when I get the cards back from the printing service, and then have double cards for the original price.

  There are all kinds of tutorials at  www.mydigitalstudio.com that help you figure out what to do with some of the tools.  And MDS is only $19.95 instead of the $79.95 it was when I purchased it.  You can even try it out one month for free.  Can't get a better offer than that.

Sunday, November 3, 2013

Simple Sunday-Gently Falling, Freshly Made Sketch


     I am in love with all the fall colors I see whenever I get in my car to go somewhere.  So, I decided to use the stamp set, Gently Falling, for my sketch challenge this week. Here's what I love about this stamp......

1. Two step stamping and how it gives the image a dimensional look.

2. The rough look of the images.

3. How easy it is to use just one of the images and make a great looking card, either just the outline, or just the solid.

   I had a great time thinking up what I wanted to do with this card.  Isn't it amazing that just a simple sketch can help jump start my creativity.  What kind of card would you make with this sketch?


Saturday, November 2, 2013

Scrappin Saturday-Halloween Layout

I love how one sheet already had Halloween words on it.

     One of the layouts we made in Scrapbook Your Life had to be a Halloween layout since it was October, right.  I wanted to use some of the Witches Brew designer paper, and the Witches Brew washi tape.  Here is the layout I came up with.

It was so easy to add accent pieces with the Witches Brew washi tape.


I had to use the spider web from the Bite Me stamp set.


Now that my pictures are mostly organized I was able to quickly look through them and find pictures of me in costume over the years.  I think they fit into the layout just fine.

Ima Ugly, Scarecrow, and half man half woman for a start.


Bag Lady and Tight rope walker for a Mystery Dinner.
    I guess I do like to get a little crazy now and then.